Posted 27 March 2023,
While waiting for my new VL53L1X time-of-flight distance sensors to arrive, I’m in a bit of a lull. So, I decided to make a run at using the ‘Processing’ language & IDE to try out some ideas on displaying the telemetry from recent autonomous wall following trials.
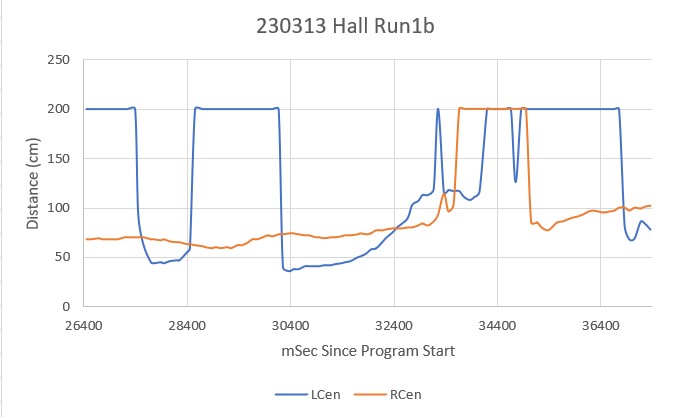
I currently use Excel to produce 2D plots of various telemetry parameters, and this does a pretty good job of giving me good insight into the behavior of WallE3, my autonomous wall-following robot. However in this last batch of trials after giving WallE3 the ability to ignore open doorways if another wall is available for tracking, it became more difficult to tell what was going on using just the 2D plots. I also video the runs, but I have discovered it is very difficult to synchronize the video with the 2D Excel plots; when I look at the video I can see specific events, but I have real trouble seeing those same events in the 2D plot, and vice versa. In one of my going-to-sleep brainstorming sessions I recalled some web research I had done regarding the ‘Processing’ language & IDE – and thought this might be an opportunity to try using Processing to display robot telemetry visually. Maybe ‘Processing’ would allow me to create the equivalent of a video directly from the telemetry, which hopefully would give me greater insight into the details of robot behavior, especially when dealing with ‘open doorway’ and ‘wrong wall’ events.
So, I downloaded and installed Processing. I really hate the name; it’s too vague and doesn’t work very well in the English language; it always sounds like the sentence is missing a noun or a verb. You wind up with sentences like “using Processing, I processed robot telemetry to create a visual representation of a wall-following run.” Oh, well – maybe all the other names were taken?
In any case, after fumbling around with some tutorials and trying (with mixed success) to get my head around Processing’s architecture, I was able to make a crude representation of some recent wall-following telemetry.
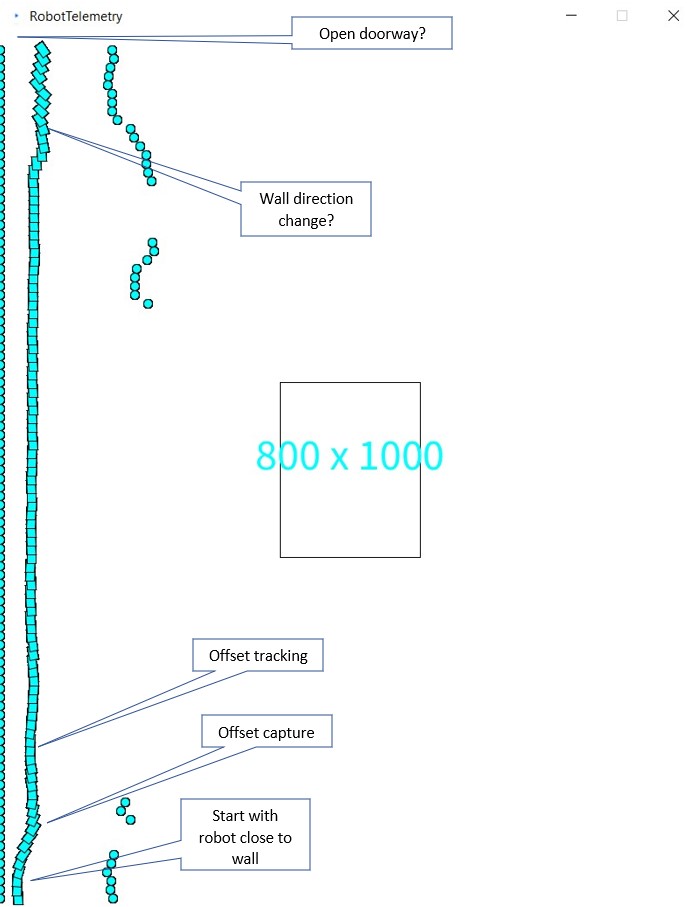
For such a crude result, the above plot is actually pretty informative. I could easily see where the robot started off by capturing the desired offset, and then tracked the offset very accurately up to the point where the wall changed direction. The robot did OK, but the above display doesn’t accurately display the wall direction change.
Here’s the entire Processing ‘RobotTelemetry.pde’ sketch:
|
1 2 3 4 5 6 7 8 9 10 11 12 13 14 15 16 17 18 19 20 21 22 23 24 25 26 27 28 29 30 31 32 33 34 35 36 37 38 39 40 41 42 43 44 45 46 47 48 49 50 51 52 53 54 55 56 57 58 59 60 61 62 63 64 65 66 67 68 69 70 71 72 73 74 75 76 77 78 79 80 81 82 83 84 85 86 87 88 89 90 91 92 93 94 95 96 97 98 99 100 101 102 103 104 105 106 107 108 109 110 111 112 113 114 115 116 117 118 119 120 121 122 123 124 125 126 127 128 129 130 131 132 133 134 135 136 137 138 139 140 141 142 143 144 145 146 147 148 149 150 151 152 153 154 155 156 157 158 159 160 161 162 163 164 165 166 167 168 169 170 171 172 173 |
BufferedReader reader; String line; ArrayList<Frame> frameArray = new ArrayList<Frame>(); float fwdspd = 20; //robot forward speed in cm/sec float ydist = 10; //static final boolean DEBUG = true; static final boolean DEBUG = false; //geometry in cm static final int MAX_LR_DIST = 200; static final int ROBOT_WIDTH = 20; static final int ROBOT_HEIGHT = 15; float last_good_ldist = 0; float last_good_rdist = 0; void setup() { size(800, 1000); background(255,255,255); // Open the file from the createWriter() example reader = createReader("C:/Users/Frank/Documents/Processing/positions.txt"); readData(reader); System.out.printf("loaded %d Frame objects\n", frameArray.size()); ydist = height/frameArray.size(); System.out.printf("window height %d with %d Frame objects, so ydist = height/numobjects = %2.2f pixels\n", height, frameArray.size(), ydist); rectMode(CENTER); rect(width/2, height/2, width/5, height/5); String h = nf(height); String w = nf(width); String txt = w + " x " + h; fill(0, 408, 612); textSize(50); textAlign(CENTER); text(txt, width/2, height/2); // if(DEBUG) // { // for(int i = 0; i <frameArray.size(); i++) // { // Frame f = frameArray.get(i); //// f.print(); // f.draw(); // } // } } void draw() { float ystart = height; float yloc = ystart - ydist; for(Frame element: frameArray) { element.draw(yloc); yloc -= ydist; } } void readData(BufferedReader reader) { line = "";//non-null contents while(line != null) //'noloop()' function breaks loop at EOF { //Read in telemetry frame data from robot, and store in an ArrayList of Frame objects try { line = reader.readLine(); if(line != null) { println(line); } } catch (IOException e) { e.printStackTrace(); line = null; } if (line == null) { // Stop reading because of an error or file is empty // noLoop(); } else { Frame frame = new Frame(line); if(frame.ldist < MAX_LR_DIST) last_good_ldist = frame.ldist; if(frame.rdist < MAX_LR_DIST) last_good_rdist = frame.rdist; if(!Float.isNaN(frame.sec)) { frameArray.add(frame); } } } } ///////////////////////////////////////////////////////////////////////////////////////////// ////////////////////////////// Frame Class //////////////////////////////////////////////// ///////////////////////////////////////////////////////////////////////////////////////////// public class Frame { Float sec, ldist, rdist, fwdpos, rearpos, hdgdeg; Frame (float s, float l, float r, float f, float rear, float h) { sec = s; ldist = l; rdist = r; fwdpos = f; rearpos = rear; hdgdeg = h; } Frame (String line) { String[] pieces = split(line, TAB); sec = float(pieces[0]); ldist = float(pieces[1]); rdist = float(pieces[2]); fwdpos = float(pieces[3]); rearpos = float(pieces[4]); hdgdeg = float(pieces[7]); } void print() { System.out.printf("%2.2f\t%2.2f\t%2.2f\t%2.2f\t%2.2f\t\n", sec, ldist, rdist, fwdpos, rearpos, hdgdeg); } void draw(float yloc) { //float ydist = 10*fwdspd * sec; //(cm/sec) * sec = cm if(ldist < MAX_LR_DIST) { circle(0,yloc,10); //left wall //right-hand border takes more work if(rdist < MAX_LR_DIST) { circle(ldist + ROBOT_WIDTH + rdist,yloc,10); } } else if (ldist > MAX_LR_DIST && rdist < MAX_LR_DIST) { circle(last_good_ldist + ROBOT_WIDTH + rdist ,yloc,10); } rectMode(CENTER); //draw rectangle rotated by hdgdeg deg pushMatrix(); float rad = radians(hdgdeg); translate(ldist,(int)yloc); rotate(rad); //drawArrow(0,0,15,0); rect(0,0,10,15); popMatrix(); } } |
First impressions of using ‘Processing’:
Pros:
- Easy to get started – fast download, quick install, lots of tutorials
- Java programming syntax close enough to C++ to be usable
- Very easy to get a working program to display in viewing window
- Lots of examples
- Lots of extensions
Cons:
- Not easy to expand beyond simple fixed-window-size displays
- Not obvious how to handle user interactions with screens
- Not obvious how to handle non-fixed window sizes, viewports with different size than display window, scrollbars, or other user controls
- Can’t change default IDE window size – very frustrating.
- Programming IDE kind of clunky; no ‘Intellisense’ capability, have to keep jumping to Processing ‘Reference’ website for function syntax, etc.
After going through the ‘process’ of using ‘Processing’ (I hate that name!) to ‘process’ robot telemetry to produce a graphical view of the robot’s behavior, I realized that although it was relatively easy to get to ‘first display’, In my particular case I would probably have been better off building this in C#/Visual Studio due to the wealth of support for GUI systems.
09 April 2023 Update:
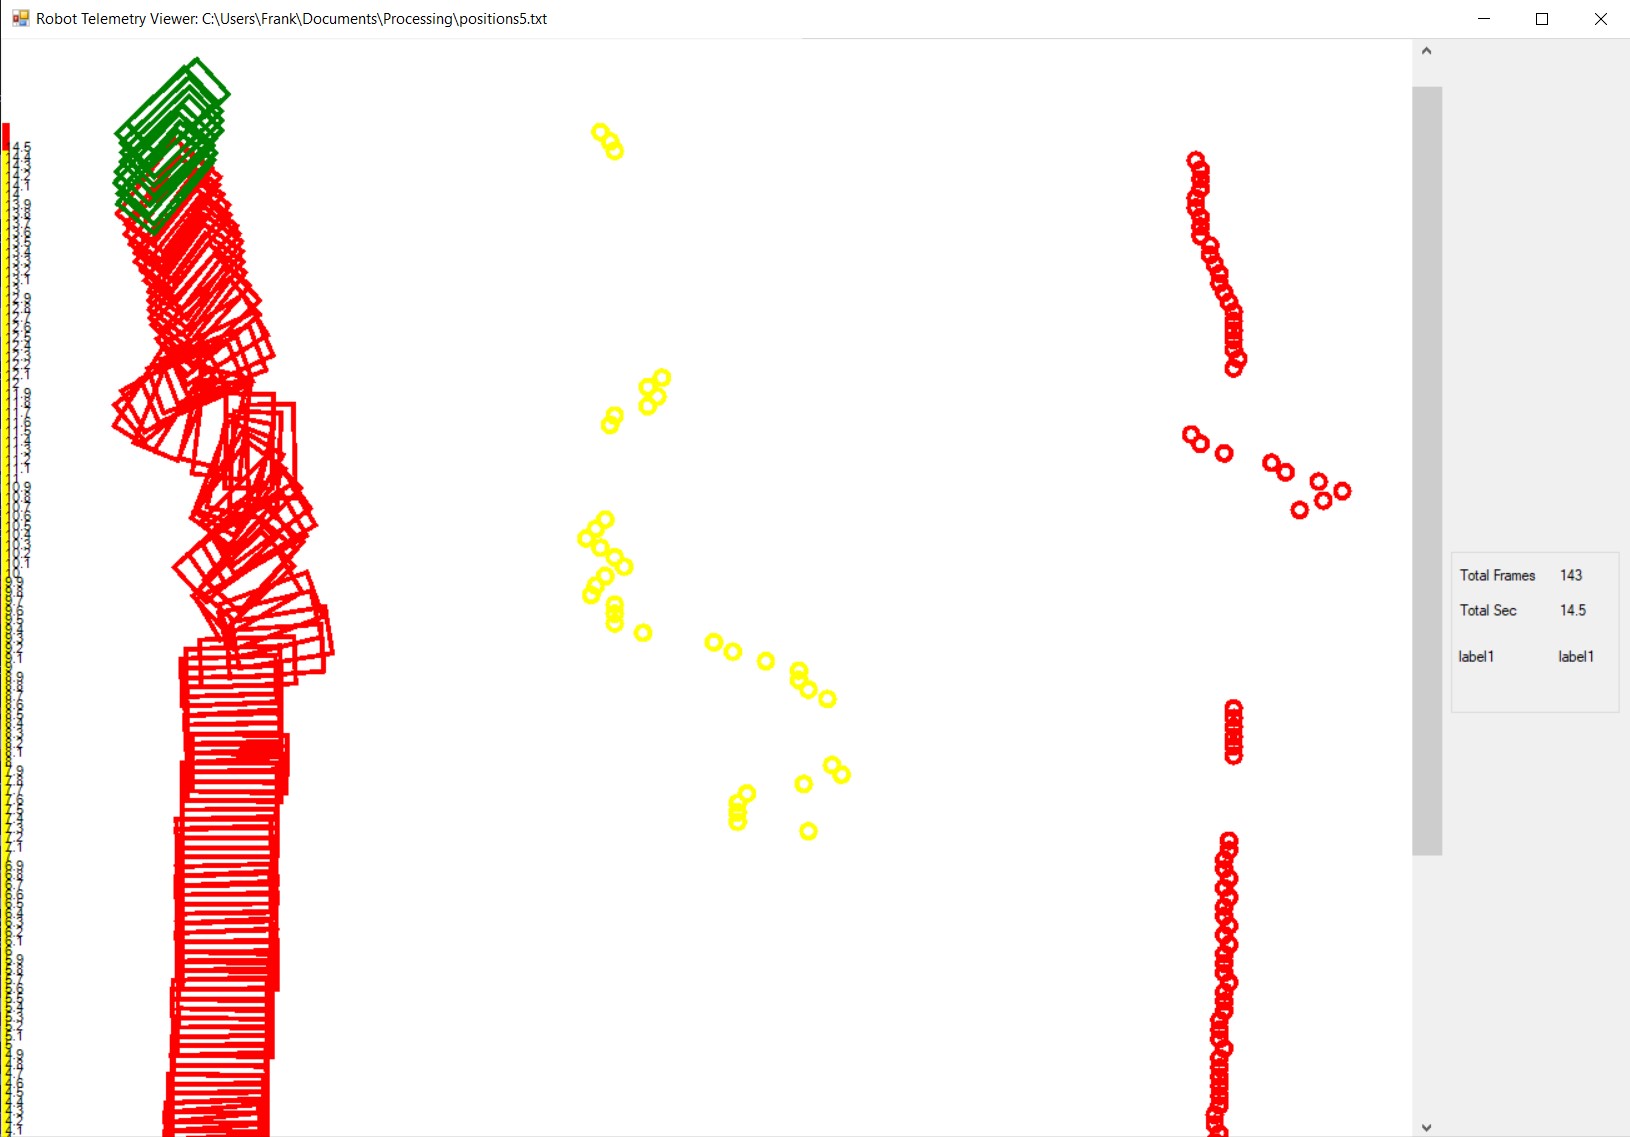
In a little more than a week I was able to put together a pretty decent Windows Forms App using my normal 2022 Visual Studio Community Edition IDE and C#/.Net. Here’s a screenshot displaying approximately the same section of wall as is displayed above using ‘Processing’ (I still hate that title!): For convenience, I also copied the image from above:
The C#/.Net environment was so much easier to use – there is almost no comparison (although I may be a bit biased by the fact that I have been programming Windows graphical user interfaces for over 30 years).
Pros:
- It is actually very easy to get started in the modern Windows Forms App genre. The Visual Studio Community Edition is free, and there are more tutorials than you can shake a stick at
- Great community support. If you have a problem, the probability that someone else has already experienced the same problem and solved it! is essentially 1. For instance, on this project I wanted to use CTRL-SCROLLWHEEL input to zoom in or out of the view, but the ‘pictureBox’ control I was using as a drawing surface didn’t support this feature ‘out of the box’. After a few Google searches I easily found multiple posts about the issues, and several different solutions, and now I have the feature enabled in my app – neat!
- Great language support from Microsoft. The Visual Studio IDE allows the programmer to press F1 on any language element, and this links to the relevant reference page – also neat.
- You get the benefit of a huge number of graphical entities and a very successful IDE. Even a novice can generate a complete, working Windows app in just a few minutes. The app won’t do much, but it will have a visible window that can be resized, moved around, minimized, maximized, and everything else you would expect all Windows apps to do. From there that same novice can easily add graphical elements like scrollbars, labels, data entry boxes and more.
Cons:
- The Visual Studio IDE can be a bit daunting at first, as it is meant to be everything to everyone. However, an installation with a basic set of features for Windows Forms apps can be easily downloaded and installed for free from Microsoft, and the installation process is straightforward
- If you haven’t done any graphical programming at all, then there will be a learning curve to get used to concepts like the drawing surface and drawing operations (but this would be true of ‘Processing’ as well).
- In order to share a Windows Forms app, either the recipient has to have the same programming environment so the app can be run in DEBUG mode, or the app must be compiled into an executable that can then be run on the recipient’s machine in a stand-alone fashion. With a ‘Processing’ sketch, it is a bit easier (I think) to send someone a Processing ‘sketch’ which they can then run in their ‘Processing’ environment (there may also be a way to compile a ‘Processing’ sketch into an executable, but I didn’t investigate that).
In any case, as the man says, “Your mileage may vary”
Stay Tuned,
Frank