Posted 20 February 2024,
I recently got re-interesting in soaring (glider racing) after a number of years away. As part of this new journey, I became interested in contributing to the development of the XCSoar glider racing navigation software. I had contributed to this program some years ago in a very minor way, and thought maybe now that I’m retired and have plenty of time to waste (NOT!!), I could maybe contribute in a more meaningful way.
In any case, XCSoar development is done in Linux (Specifically in Debian Linux, but that’s another story), so I started thinking about creating a development environment on a Debian Linux box. I had an old Dell Precision M6700 ‘desktop replacement’ laptop that I hadn’t turned on for years, so I dug it out, installed Linux (Ubuntu first, then Debian), and with the help of Ronald Niederhagen (see this post), I was able to clone the XCSoar repo from Github and built both the Linux and Android versions.
However, I still needed to find a way to ‘break into’ the code, and to do that I was going to need a way of running the program under debug control. I have done this sort of thing for decades on the Windows world, but not so much in Linux, so I was sort of starting from scratch. After a LOT of research, I found that Microsoft had a free Linux IDE called VS Code – sort of a lightweight version of Visual Studio aimed at the Linux and IOS world.
So, I installed VS Code on my Linux box and started the ‘lets learn yet another coding IDE’ dance, again starting with a lot of Google searches, running tutorials, etc etc. After creating some basic ‘hello world’ programs using VS code, I started thinking about how to use VS Code on the XCSoar project, comprised of thousands of source files and a Makefile almost three hundred lines long. I knew just enough about Makefiles to type ‘make’ or ‘make all’, so there was a steep learning curve ahead to use VSCode for debugging.
After yet another round of Google searches and forum posts, I found a relevant tutorial on the ‘HackerNoon’ website. the HackerNoon tutorial seems to be aimed at Windows users (Linux doesn’t use extensions to denote executable files), but I was able to work my way through and translate as appropriate. I suggest you open the HackerNoon tutorial in one window, and this ‘translation’ in another.
Original:
|
1 2 3 4 5 6 7 8 9 |
I will be using the following tools: VSCode Git Bash (using MinGW-w64) g++ (part of the GNU Compiler Collection (GCC)) GNU Make |
Translation for Linux:
|
1 2 3 4 5 6 7 8 9 |
I will be using the following tools: VSCode Bash g++ (part of the GNU Compiler Collection (GCC)) Make |
Download & Install VS Code: See this link. Everything else should already be available as part of any modern Linux distro (I’m using Debian 12 – ‘bookworm’).
main.cpp: (same as original – no translation required)
|
1 2 3 4 5 6 7 8 9 10 11 |
#include <iostream> #include <vector> #include <string> int main() { std::vector<std::string> testStrings {"this", "is", "just", "a", "test"}; for(auto testString : testStrings) { std::cout << testString << std::endl; } } |
Makefile (Original):
|
1 2 3 4 |
CC="/c/MinGW/bin/g++.exe" main.exe: main.cpp ${CC} -g main.cpp |
Makefile (Translation for Linux):
|
1 2 3 4 |
OUT_FILE = "mymain" main: mymain.cpp g++ -g -o $(OUT_FILE) mymain.cpp |
Run the ‘main.exe’ make target, then run the executable to make sure everything works (Original):
|
1 2 |
$ /c/MinGW/bin/mingw32-make.exe main.exe $ ./main.exe |
Translation for Linux:
I placed ‘mymain.cpp’ and ‘Makefile’ in my home directory tree as shown below:
|
1 2 3 |
frank@M6700:~/projects$ ls /home/frank/projects/Hacknoon/ Makefile mymain.cpp frank@M6700:~/projects$ |
so to test the Makefile and the executable, I did the following:
|
1 2 3 4 5 6 7 8 9 10 |
frank@M6700:~/projects$ cd /home/frank/projects/Hacknoon/ frank@M6700:~/projects/Hacknoon$ make g++ -g -o "mymain" mymain.cpp frank@M6700:~/projects/Hacknoon$ ./mymain this is just a test frank@M6700:~/projects/Hacknoon$ |
This test confirms that the source code compiles correctly, that the Makefile is correct, and the output from the compiled program is as expected – yay!
Setting up VSCode debugger:
At this point the HackerNoon tutorial and my experience parted ways. I could get the ‘Run and Debug’ side panel open, and I could open ‘mymain.cpp’ in the VSCode editor window, but I couldn’t find anything that suggested it could “create a launch.json file”. I tried to send a comment to the author, but comments weren’t enabled for some reason (and yes, I did register and log in). I suspect that the disparity between the HackerNoon example and my VSCode reality is due to changes in VSCode after the HackerNoon tutorial was created. Which is why I absolutely hate posts like this that aren’t dated in any way shape or form. Because of this, it is impossible to determine if changes like I encountered are due to mistakes on the part of the author, or just changes in the underlying software being demonstrated.
So, I was left to randomly click on things until, by some miracle, the ‘launch.json’ file was created and appeared in the VSCode edit window. Later I went back and tried to re-create the miracle and I sort of figured it out; with the ‘mymain.cpp’ file open in the editor, click on the ‘gear’ icon (upper right as shown in the screenshot below):
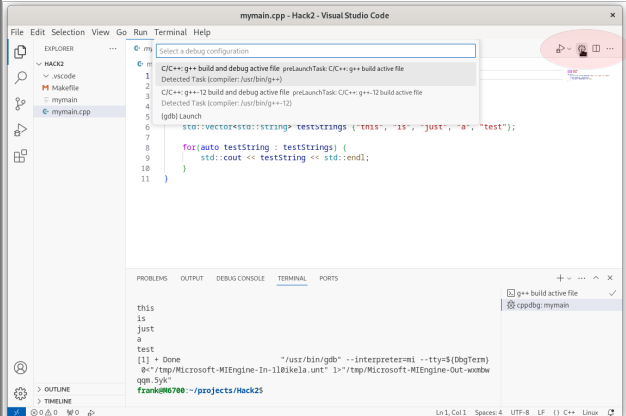
And select ‘(gdb) Launch’ from the menu items presented. This will create a ‘launch.json’ file and open it in the editor, as shown below:
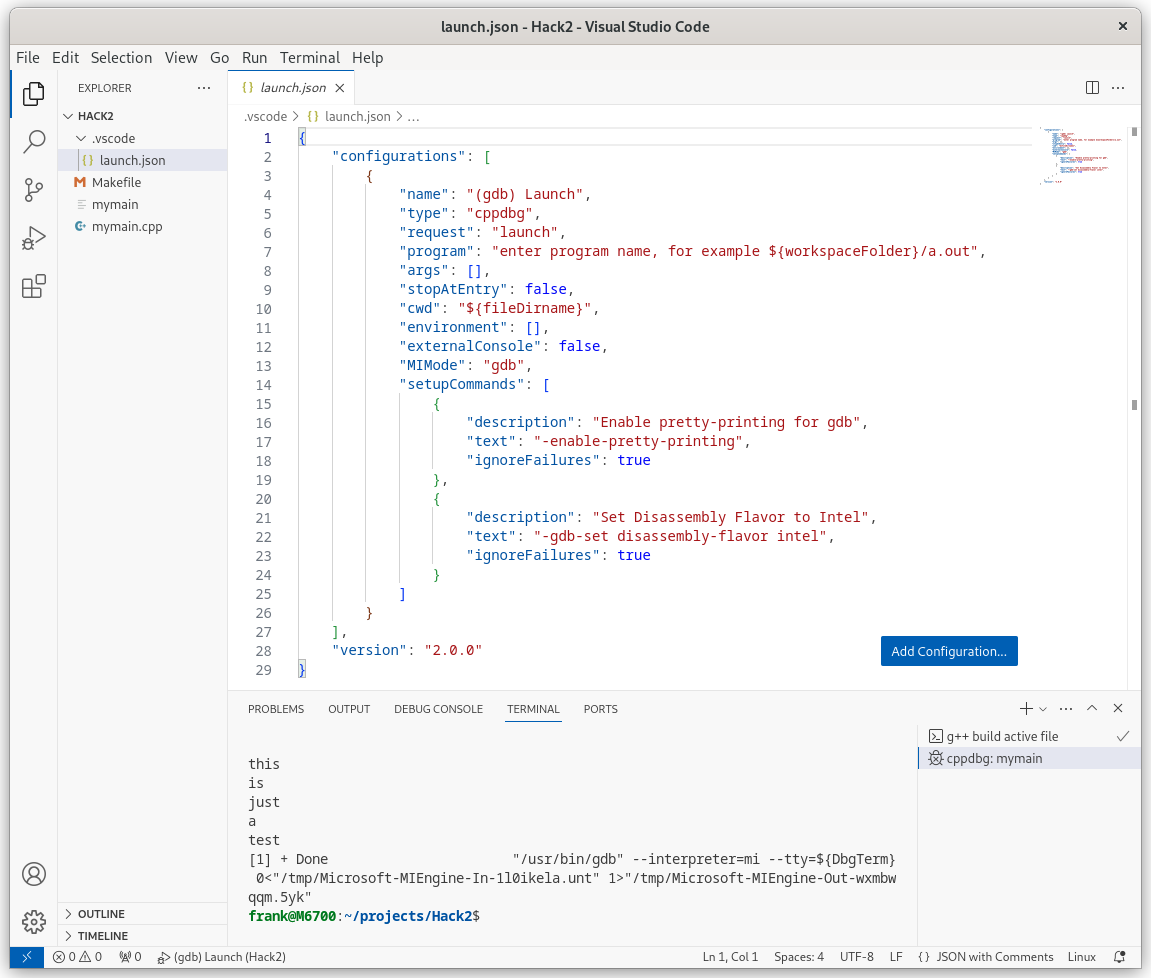
At this point we can reconnect to the ‘HackerNoon’ tutorial and copy/paste the launch.json contents from the tutorial to the newly-created launch.json file in VSCode, as shown below
Here’s the ‘launch.json’ file from HackerNoon:
|
1 2 3 4 5 6 7 8 9 10 11 12 13 14 15 16 17 18 19 20 21 22 23 24 25 26 27 28 29 30 31 |
{ "version": "0.2.0", "configurations": [ { "name": "(gdb) Launch", "type": "cppdbg", "request": "launch", "program": "${workspaceFolder}/main.exe", "args": [], "stopAtEntry": false, "cwd": "${fileDirname}", "environment": [], "externalConsole": false, "MIMode": "gdb", "miDebuggerPath": "C:\\MinGW\\bin\\gdb.exe", "setupCommands": [ { "description": "Enable pretty-printing for gdb", "text": "-enable-pretty-printing", "ignoreFailures": true }, { "description": "Set Disassembly Flavor to Intel", "text": "-gdb-set disassembly-flavor intel", "ignoreFailures": true } ], "preLaunchTask": "run the makefile" } ] } |
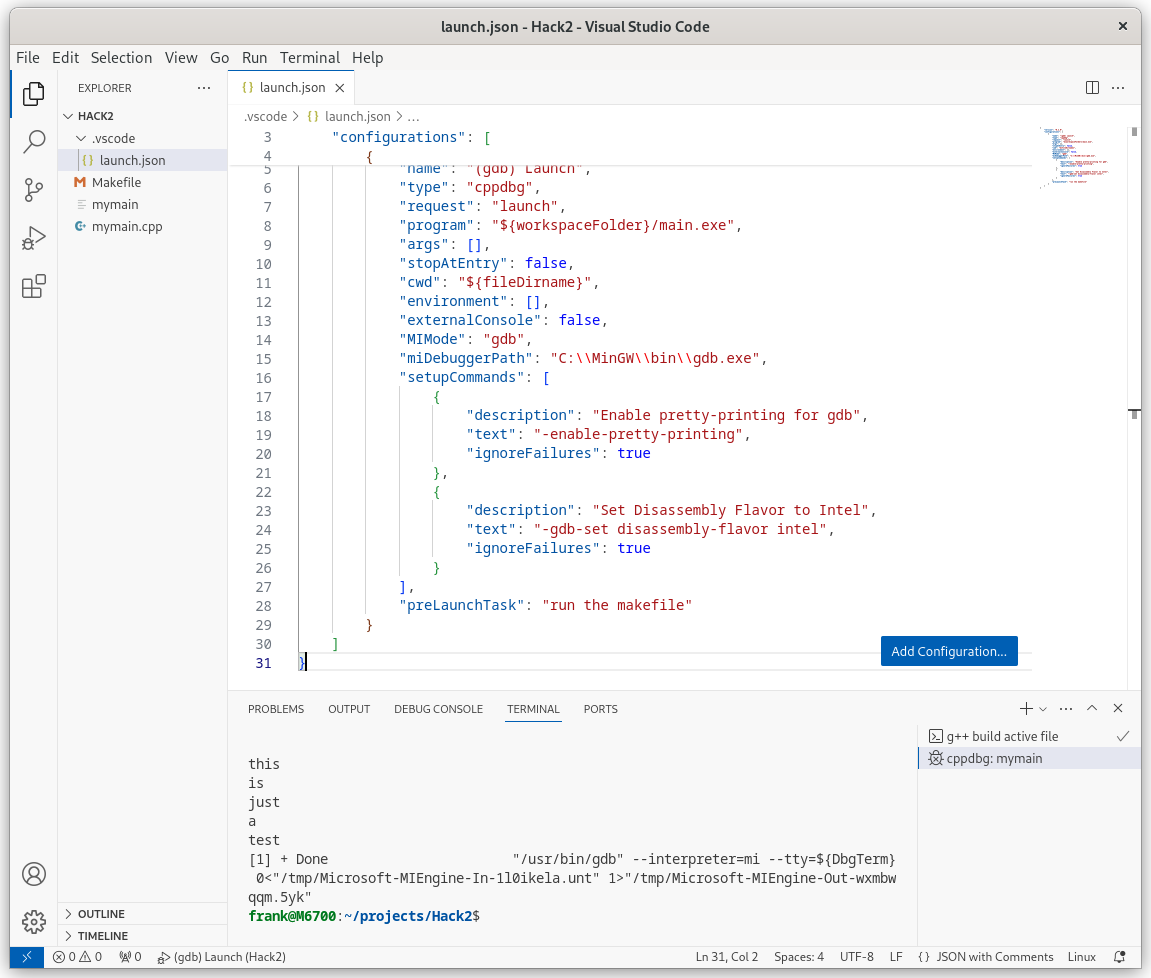
And here’s the same file, after translating it for Linux instead of Windows:
|
1 2 3 4 5 6 7 8 9 10 11 12 13 14 15 16 17 18 19 20 21 22 23 24 25 26 27 28 29 30 31 |
{ "version": "0.2.0", "configurations": [ { "name": "(gdb) Launch", "type": "cppdbg", "request": "launch", "program": "${workspaceFolder}/mymain", "args": [], "stopAtEntry": false, "cwd": "${fileDirname}", "environment": [], "externalConsole": false, "MIMode": "gdb", "miDebuggerPath": "./gdb", "setupCommands": [ { "description": "Enable pretty-printing for gdb", "text": "-enable-pretty-printing", "ignoreFailures": true }, { "description": "Set Disassembly Flavor to Intel", "text": "-gdb-set disassembly-flavor intel", "ignoreFailures": true } ], "preLaunchTask": "run the makefile" } ] } |
The next step is to create a ‘tasks.json’ file using the ‘New File’ (ALT-Ctrl-N) in VSCode. This brings up a dialog forcing the user to specify the folder into which the new file will be placed, which seemed a bit strange for me, but what do I know. Put the new file in the same (hidden) .vscode folder as the companion ‘launch.json’. In my setup this was layed out as shown below:
|
1 2 3 4 5 6 7 8 9 10 11 12 13 14 15 16 |
frank@M6700:~/projects/Hacknoon$ ls -alFR .: total 152 drwxr-xr-x 3 frank frank 4096 Feb 21 11:33 ./ drwxr-xr-x 7 frank frank 4096 Feb 21 12:19 ../ -rw-r--r-- 1 frank frank 116 Feb 20 18:44 Makefile -rwxr-xr-x 1 frank frank 134680 Feb 21 11:33 mymain* -rw-r--r-- 1 frank frank 243 Feb 19 11:19 mymain.cpp drwxr-xr-x 2 frank frank 4096 Feb 19 19:43 .vscode/ ./.vscode: total 16 drwxr-xr-x 2 frank frank 4096 Feb 19 19:43 ./ drwxr-xr-x 3 frank frank 4096 Feb 21 11:33 ../ -rw-r--r-- 1 frank frank 970 Feb 21 16:37 launch.json -rw-r--r-- 1 frank frank 383 Feb 20 19:16 tasks.json |
Here’s the original ‘tasks.json’:
|
1 2 3 4 5 6 7 8 9 10 11 12 |
{ "tasks": [ { "type": "shell", "label": "run the makefile", "command": "/c/MinGW/bin/mingw32-make.exe", "args": ["main.exe"], "problemMatcher": [], } ], "version": "2.0.0" } |
And here’s the same file after translation for Linux:
|
1 2 3 4 5 6 7 8 9 10 11 12 |
{ "tasks": [ { "type": "shell", "label": "run the makefile", "command": "make", "args": ["mymain"], "problemMatcher": [], } ], "version": "2.0.0" } |
The above three files (mymain.cpp, launch.json and tasks.json) form a complete set (a ‘configuration?) that enables VSCode to compile and then run – under debug control – a .cpp file. Here’s a short video showing two complete compile/run cycles:
At this point is is clear that the combination of VSCode, in conjunction with appropriately constructed ‘Makefile’, ‘launch.json’ and ‘tasks.json’ files is capable of debugging a Linux-base C++ program. This means that – at least in theory – I should be able to aim VSCode at the humungous Makefile associated with the equally humungous XCSoar program and step through the source code under debug control – yeeehah!
23 February 2024 Update:
Well, the theory (about being able to run XCSoar under debug control) has now been validated. I was able to run XCSoar using the following launch & tasks.json file contents
Launch.json:
|
1 2 3 4 5 6 7 8 9 10 11 12 13 14 15 16 17 18 19 20 21 22 23 24 25 26 27 28 29 30 31 |
{ "version": "0.2.0", "configurations": [ { "name": "(gdb) Launch", "type": "cppdbg", "request": "launch", "program": "${workspaceFolder}/output/UNIX/bin/xcsoar", "args": [], "stopAtEntry": false, "cwd": "${fileDirname}", "environment": [], "externalConsole": false, "MIMode": "gdb", "miDebuggerPath": "gdb", "setupCommands": [ { "description": "Enable pretty-printing for gdb", "text": "-enable-pretty-printing", "ignoreFailures": true }, { "description": "Set Disassembly Flavor to Intel", "text": "-gdb-set disassembly-flavor intel", "ignoreFailures": true } ], "preLaunchTask": "run the makefile" } ] } |
Tasks.json:
|
1 2 3 4 5 6 7 8 9 10 11 12 |
{ "tasks": [ { "type": "shell", "label": "run the makefile", "command": "make", "args": [], "problemMatcher": [], }, ], "version": "2.0.0" } |
And here is a short video showing the action:
So now I’m set; I can run XCSoar under debug control, and I should be able to poke around and hopefully make some changes (or at least understand some of the magic tricks). On thing I’ve already found is that (depending on where the breakpoints are) XCSoar can grab the mouse focus (not the keyboad, thankfully), so even though the mouse cursor can move around the screen outside the XCSoar window, all mouse clicks go to XCSoar. Fortunately I found that keyboard inputs still go to VSCode, so I can still (with some difficulty) get around OK.