Posted 06 July 2026
After wrapping up the Wifi_OTA project described in this post, Grok Code and I moved on to the next big step – integrating the Luxonis OAKD-Lite camera integrated into ROS (Robot Operating System) so the robot could take advantage of the ROS ‘topic/subscriber’ strategy where a sensor like the OAKD-Lite camera can ‘publish’ formatted sensor data to a ‘topic’ that programs can ‘subscribe’ to, thereby making sensor data available to inform robot navigation. Amazingly, this trick actually worked, and now the robot can ‘see’ the best direction to move. Below is a summary of the work involved getting to this point, produced by Grok Code at my request. (note: When Grok uses ‘I’ below, he really means ‘we’, as I was very much the junior partner in this adventure. Think of me more as somewhat intelligent clerk,just barely smart enough to follow direction and report results ;).
From Grok Code: Summary for “2 Wheel Robot with Vision Processing, Part IV”
After struggling for a while with custom ROS 2 package structures and running into repeated setup.py issues, I decided to take a step back and follow a known working example as closely as possible. I came across Jesse Stevens’ blog post about setting up the OAK-D Lite with ROS 2 Jazzy on a Raspberry Pi 5, and it looked very close to what I was trying to achieve. Rather than continuing to fight with my own over-engineered layout, I made the deliberate choice to start fresh using his structure and naming.
We began by backing up my existing src/ folder and creating a clean myrobot package exactly as described in the blog. This meant using the standard ros2 pkg create command, adding a config/ directory, and modifying setup.py to properly install YAML files using data_files and glob. Following the blog’s oak_run.yaml example, I configured the camera for a Depth-only pipeline with conservative settings (no subpixel, RGB disabled, HIGH_ACCURACY preset initially).
Getting the camera running wasn’t entirely smooth — we hit the familiar X_LINK_DEVICE_ALREADY_IN_USE error a few times — but once we established a reliable restart process, the camera would come up and begin publishing depth data. However, early captures showed suspicious results: the minimum and maximum depth values were often stuck at the same numbers across different scenes. This told us the depth data wasn’t yet reliable enough for motion planning.
To make progress visible and testable, we built a capture utility (save_depth_frame.py) that could save both raw depth values as CSV and, later, visual PNG heatmaps. Being able to generate side-by-side comparisons between the depth map and the actual scene was incredibly helpful. Over time, with adjustments to the YAML (switching to the DEFAULT preset, enabling subpixel, and using only the bottom half of the image for processing), the depth maps started to look structurally meaningful. Features in the real world began appearing clearly in the heatmaps.
With usable depth data in hand, we shifted focus toward the higher-level goal: using vision to help the robot decide where to go. We created a new node called clearest_direction_node.py that divides the lower half of the depth image into seven sectors, labeled intuitively as clock positions from 9:00 to 3:00. The node calculates the average valid depth in each sector and identifies the “clearest” direction — the one with the highest average depth. It then suggests a turn angle toward that direction.
This node proved to be surprisingly effective right from the start. When I moved objects into different parts of the camera’s view, the recommended direction updated immediately and logically. Seeing the output change in real time gave me confidence that the depth data was now good enough to build motion logic on top of.
Throughout this process, we also invested time in workflow improvements. I created several small shell scripts (restart_camera.sh, capture_depth.sh, start_viewer.sh) to reduce friction when restarting the camera or capturing data. These scripts, along with the analysis node, were eventually moved into my my_vision_robot GitHub repository under a clean structure (software/ros2/ for the ROS package and software/scripts/ for the utilities). We also updated the project .gitignore to properly exclude ROS 2 build artifacts and temporary test data.
By the end of this phase, I had moved well beyond simply getting the camera to publish data. I now had a working system that could look at a depth image and suggest a sensible direction for the robot to face — all running on the Pi 5 and reacting to real changes in the environment. While there’s still work ahead to turn these direction suggestions into actual motor commands on the Teensy, this felt like a genuine milestone: the vision processing side had gone from “not yet reliable” to “usable for basic navigation decisions.”
Because I know I won’t remember the details of how we got from the start to a functioning “Turn this way” demo, I asked Grok for a short description of the relevant files, based on the latest GitHub file structure for the ‘vision-to-motion-demo’ branch, as shown in the following screenshot:
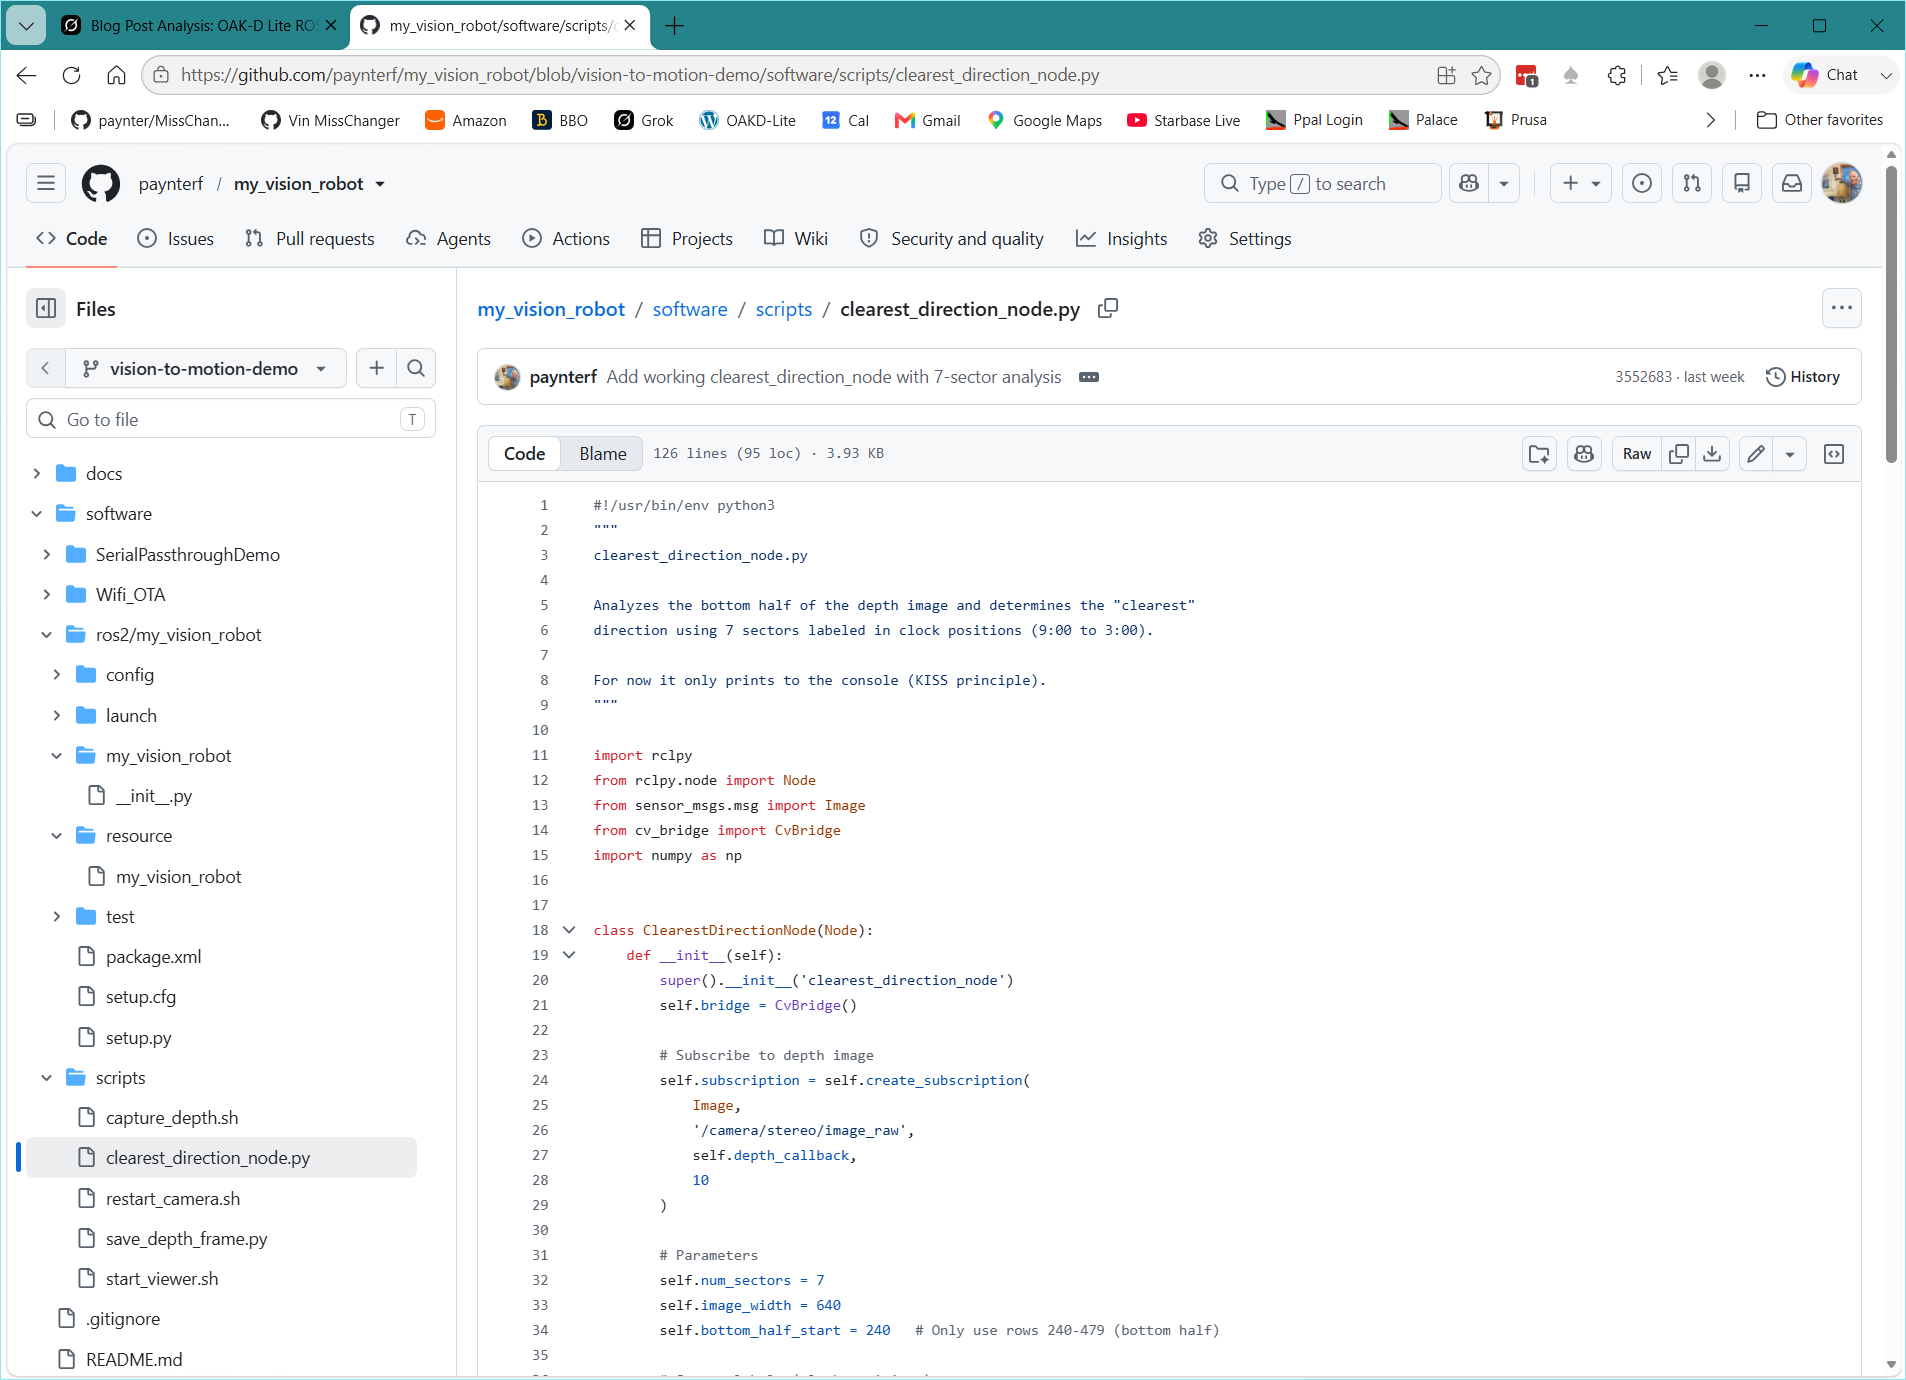
1. Camera Launch & Configuration (the foundation)
- software/ros2/my_vision_robot/config/oak_run.yaml The main parameter file passed to depthai_ros_driver. Defines the Depth pipeline, 480P stereo resolution, HIGH_ACCURACY (or DEFAULT) preset, bottom-half-friendly settings, RGB disabled, and all the i_* parameters that make depth actually usable.
- software/ros2/my_vision_robot/launch/oak_camera.launch.py Simple launch file that starts depthai_ros_driver’s camera_node and loads oak_run.yaml via –params-file. This is what restart_camera.sh calls.
2. Core Depth Capture Script
- software/scripts/save_depth_frame.py The workhorse script. Subscribes to /camera/stereo/image_raw, converts the 16UC1 depth image with CvBridge, saves the raw depth values as a timestamped CSV, and generates a matplotlib heatmap PNG (with stats in the title). This is what produces the nice side-by-side depth maps you’ve been using for validation.
3. Convenience / Workflow Scripts
- software/scripts/capture_depth.sh Tiny wrapper that sources both ROS 2 environments (/opt/ros/jazzy + your workspace) and then runs save_depth_frame.py. Prevents the classic “No module named ‘rclpy’” error.
- software/scripts/restart_camera.sh One-command way to kill any old camera processes, source the environments, and relaunch the camera via the launch file above. You use this every time you reboot the robot.
- software/scripts/start_viewer.sh Sources the environments and launches rqt_image_view pointed at the depth topic so you can visually confirm the camera is streaming.
4. Depth Analysis / “Clearest Direction” Node
- software/scripts/clearest_direction_node.py The first real vision-to-motion node. Subscribes to the depth image, looks only at the bottom half (rows 240–479), divides it into 7 clock-position sectors (9:00–3:00), computes average valid depth per sector, identifies the “clearest” direction, and prints a live table + recommended turn angle. This is the node that actually reacts when you move obstacles in front of the camera.
5. Supporting Package Files (mostly standard but customized)
- software/ros2/my_vision_robot/package.xml & setup.py Standard ament_python package files. We updated the package name from myrobot → my_vision_robot and made sure config/ and launch/ get installed correctly.
- software/ros2/my_vision_robot/my_vision_robot/__init__.py & resource/my_vision_robot Required empty marker files so the package is recognized by ROS 2.
- software/ros2/my_vision_robot/setup.cfg & test/ files Boilerplate that came with ros2 pkg create; left mostly untouched.
Summary of the “depth measurement stack”
- restart_camera.sh → starts the camera with the tuned oak_run.yaml
- capture_depth.sh (or save_depth_frame.py directly) → grabs a frame and saves CSV + pretty PNG
- start_viewer.sh → lets you watch the live depth image
- clearest_direction_node.py → turns the raw depth into actionable “which way is clearest?” information
All of these now live under version control in the repo, so “future Frank” (or anyone else) can clone the branch and have a working depth pipeline in a few minutes.
Additions by the not-so-smart human:
This was the part of the project that transformed my somewhat unrealistic idea of enhancing my robot’s navigation capabilities with vision processing into a real, concrete capability even in its current nascent state. The Raspberry Pi5 combined with the OAKD-Lite camera easily processed 30 frames/sec of depth information to generate ‘turn this much in this direction’ outputs for the robot. This part of the overall project didn’t actually send commands to the Teensy for movement, but the ability to do so was demonstrated with an earlier ‘end-to-end-serial’ project and the earlier Wifi_OTA project. There is still A LOT more to do to get to the point where I can set the robot loose on the world (or at least the house), but getting even the most basic vision processing going was a HUGE milestone.
In addition to the above progress, I have been learning a huge amount about the OAKD-Lite camera, the ROS (Robot Operating System) environment, Visual Studio Code, and Git repository creation & maintenance. Early on in this phase of the project, Grok Code recommended VS Code for working with the Raspberry Pi in general, and for Python programming in general. I have always used Visual Studio on my PC, and by adding the Python extension I could easily generate Python code on my PC. However, this project required that the actual code has to run on the Raspberry Pi5 on the robot. In addition, there is a lot that has to be done at the Linux (bash) command line on the Pi5. What I needed was a way of doing all the work on my dual-screen PC setup without having to keep transferring files and programs back and forth between the PC and the Pi5. It turns out that ‘that something’ is VS Code, and now that I have had some time to work my way up the learning curve, it is WONDERFUL!
Once VS Code is setup properly to connect via SSH over Wifi to my Pi5, it does so every time it is launched, and from then on, the environment is very much like using Visual Studio. Files can be created, edited, moved etc using a File Explorer and editor window very similar to VS and it is easy to lose track of the fact that all the action is actually taking place on that small Pi5 board over there on my robot.
Another milestone of sorts that was achieved with this project was making a Git repository a central part of the overall project. Although I have Tortoise Git on my PC and have used it on and off for years, this is the first time I decided to set up a logical repo layout and keep it up-to-date as the project moved along. The Git repo has three different pieces – a local repo on the Pi5 for all the shell scripts, Python scripts and ROS-specific configuration files, a local repo on the PC for the teensy stuff, and a GitHub remote repo that ties the two together. Here’s a sketch of the repo layout (produced in about 3 seconds by Grok Code):
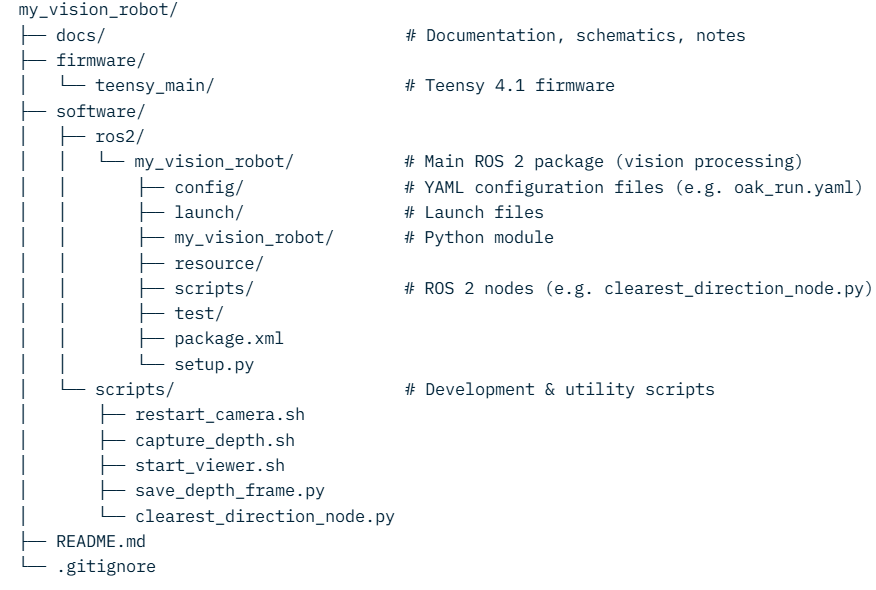
This same layout exists in all three places (Pi5, PC, Github), but obviously the pi5 repo deals with the ‘Software’ side and the PC deals with the ‘Firmware side. Both ‘local’ repos are clones of the same repo on Github, so both local repos also contain all the material produced by the other one. So a typical work flow on either the PC or the Pi5 would be:
- Git status – to see if anything unusual is happening
- Git pull origin [branch] <– started out on ‘main’, now working on ‘vision-to-motion-demo’. This synchs the local repo with the GitHub repo, and any commits from the ‘other local’ repo
- Git status – again to see what changed during this session
- Git commit -m “[Message]”
- Git status – again to catch any problems
- Git push origin [branch] <- synchs the GitHub repo with the local repo
06 August 2026 Update:
Here is a ‘structured index of the Grok chat that produced most of the progress shown above:
Structured Index – OAK-D Lite + ROS 2 Jazzy on Pi 5
Chat focus: Getting reliable depth data and a “clearest direction” node working, then organizing everything into a proper Git repo.
1. Project Context & Philosophy
- Goal: Vision-enhanced 2-wheel (later 4-wheel) robot using OAK-D Lite + Raspberry Pi 5 + Teensy 4.1
- Key decision: Stop fighting custom structures and follow Jesse Stevens’ blog post exactly as a known-working template
- Philosophy: “BIG RED BUTTON” approach — get something known to work first, then adapt
2. Initial Clean Setup (July 5–6)
- Backed up and cleared ~/ros2_ws/src
- Created package: ros2 pkg create –build-type ament_python myrobot –dependencies launch_ros rclpy
- Added config/ folder and oak_run.yaml
- Modified setup.py to install launch files and YAML configs
- Successfully launched camera with: ros2 run depthai_ros_driver camera_node –ros-args –params-file …
- Confirmed depth topic /camera/stereo/image_raw was publishing at ~30 Hz (16UC1 encoding)
3. Key Files Created
| File | Purpose | Final Location |
|---|---|---|
| oak_run.yaml | Camera configuration (Depth pipeline, resolution, stereo settings) | software/ros2/my_vision_robot/config/ |
| oak_camera.launch.py | Launch file for the camera node | software/ros2/my_vision_robot/launch/ |
| restart_camera.sh | Kill old processes + source environments + launch camera | software/scripts/ |
| start_viewer.sh | Launch rqt_image_view (requires monitor) | software/scripts/ |
| capture_depth.sh | Wrapper that sources ROS and runs the capture script | software/scripts/ |
| save_depth_frame.py | Captures one depth frame → CSV + PNG heatmap | software/scripts/ |
| clearest_direction_node.py | Analyzes bottom half of depth image into 7 clock sectors and recommends turn direction | software/scripts/ |
4. Depth Data Validation
- Early problem: Fixed min/max values (358 mm / ~34 m) that didn’t change with scene
- Solution path:
- Enabled subpixel, changed depth preset to DEFAULT
- Restricted analysis to bottom half of the image (camera is highest point on robot)
- Confirmed with side-by-side photo + heatmap that real structure was visible (cup handle, toolbox edge, doorframe, etc.)
- Capture method: Press Enter in save_depth_frame.py to grab one frame on demand
5. Clearest Direction Node Design Decisions
- 7 sectors labeled as clock positions: 9:00 → 3:00
- Only processes the bottom half of the depth image (rows 240–479)
- Scoring: Average valid depth per sector
- Output: Live table showing valid pixel count, average depth, best sector, and recommended turn angle
- First successful test: Correctly switched from 3:00 to 1:00 when a cardboard box was moved into the view
6. Git Repository Organization
- Repo: paynterf/my_vision_robot
- Branch used: vision-to-motion-demo
- Final structure:text
my_vision_robot/ ├── software/ │ ├── ros2/ │ │ └── my_vision_robot/ ← ROS 2 package │ └── scripts/ ← All utility scripts ├── docs/ ├── firmware/ └── .gitignore - Important: Scripts now live inside the repo. Old copies in ~/ were cleaned up.
- .gitignore updated to exclude ROS 2 build artifacts, CSVs, PNGs, and backup folders
7. Verification After Moving to 4-Wheel Robot
- Switched from ~18″ USB cable to a short 6″ high-speed cable
- Camera still launched cleanly and produced usable depth heatmaps
- Confirmed the entire stack still works on the new platform
8. Current Recommended Workflow
Bash
# Start camera
cd ~/my_vision_robot/software/scripts
./restart_camera.sh

# Capture depth frames (in another terminal)
./capture_depth.sh

# Run direction analysis
python3 clearest_direction_node.py
9. Open Items / Next Logical Steps
Clean residual old myrobot package from ~/ros2_ws/src/ once fully confident
Send recommended turn commands to the Teensy
Add hysteresis / minimum valid-pixel thresholds
Possibly improve sector scoring