Posted 04 February 2023,
The ‘WallE3_Complete’ program was intended to incorporate all the improvements to my WallE3 autonomous wall tracking robot, as described in this post. At the end of this effort I showed that the ‘Complete_V1’ program did compile, and made a successful run on my ‘two-break’ test wall configuration. Here’s the video that was posted at the end of that previous post:
This test is just the beginning of the effort to determine how well the ‘WallE3_Complete_V1’ program will perform. There’s lots more testing to come.
The next step is to port the above successful left-side algorithm to the right-side case. After the usual number of mistakes, I got the right-side tracking algorithm going as well, as shown in the following short video.
05 February 2023 Update:
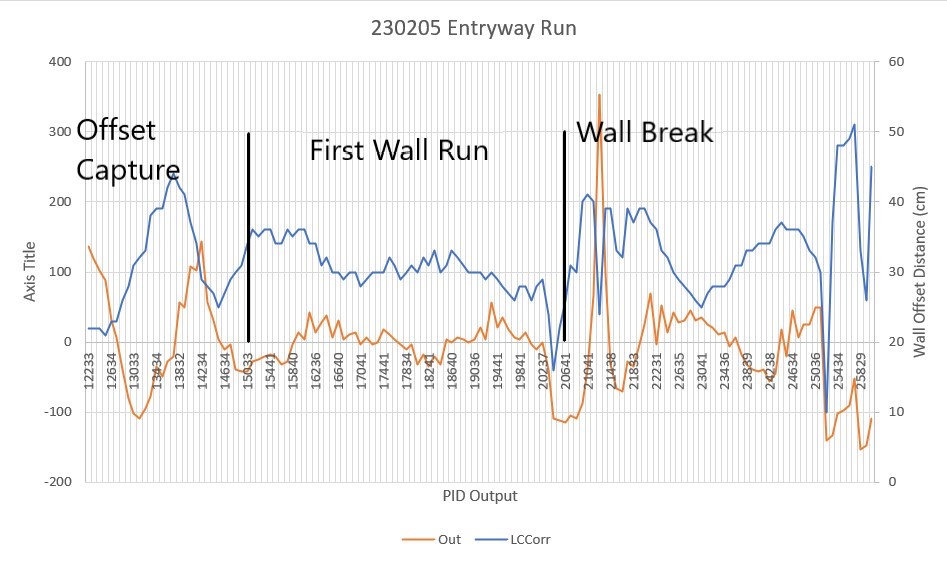
Did my first ‘live’ test with WallE3 this evening, and now I’m wading through the telemetry. Here’s the video of the run:
An Excel plot of the run:
And here is the raw telemetry:
|
1 2 3 4 5 6 7 8 9 10 11 12 13 14 15 16 17 18 19 20 21 22 23 24 25 26 27 28 29 30 31 32 33 34 35 36 37 38 39 40 41 42 43 44 45 46 47 48 49 50 51 52 53 54 55 56 57 58 59 60 61 62 63 64 65 66 67 68 69 70 71 72 73 74 75 76 77 78 79 80 81 82 83 84 85 86 87 88 89 90 91 92 93 94 95 96 97 98 99 100 101 102 103 104 105 106 107 108 109 110 111 112 113 114 115 116 117 118 119 120 121 122 123 124 125 126 127 128 129 130 131 132 133 134 135 136 137 138 139 140 141 142 143 144 145 146 147 148 149 150 151 152 153 154 155 156 157 158 159 160 161 162 163 164 165 166 167 168 169 170 171 172 173 174 175 176 177 178 179 180 181 182 183 184 185 186 187 188 189 190 191 192 193 194 195 196 197 198 199 200 201 202 203 204 205 206 207 208 209 210 211 212 213 214 215 216 217 218 219 220 221 222 223 224 225 226 227 228 229 230 231 232 233 234 235 236 237 238 239 240 241 242 243 244 245 246 247 248 249 250 251 252 253 254 255 256 257 258 259 260 261 262 263 264 265 266 267 268 269 270 271 272 273 274 275 276 277 278 279 280 281 282 283 284 285 286 287 288 289 290 291 292 293 294 295 296 297 298 299 300 301 302 303 304 305 306 307 308 309 310 311 312 313 314 315 316 317 318 319 320 321 322 323 324 325 326 327 328 329 330 331 332 333 334 335 336 337 338 339 340 341 342 343 344 345 346 347 348 349 350 351 352 353 354 355 356 357 358 359 360 361 362 363 364 365 366 367 368 369 370 371 372 373 374 375 376 377 378 379 380 381 382 383 384 385 386 387 388 389 390 391 392 393 394 395 396 397 398 399 400 401 402 403 404 405 406 407 408 409 410 411 412 413 414 415 416 417 418 419 420 421 422 423 424 425 426 427 428 429 430 431 432 433 434 435 436 437 438 439 440 441 442 443 444 445 446 447 448 449 450 451 452 453 454 455 456 |
12087: Top of loop() - calling UpdateAllEnvironmentParameters() Battery Voltage = 8.26 IRHomingValTotalAvg = 62 12105: glLeftCenterCm = -2097152000 glRightCenterCm = 0 glLeftCenterCm <= glRightCenterCm --> Calling TrackLeftWallOffset() TrackLeftWallOffset: Start tracking offset of 40cm with Kp/Ki/Kd = 350.00 0.00 0.00 Msec LF LC LR RF RC RR F Fvar R Rvar Steer Set Output LSpd RSpd IRAvg WallE3_Complete_V1.ino: In TrackLeftWallOffset: before while with errcode = NO_ANOMALIES Msec LF LC LR LCCorr Steer Tweak OffCm Err LastI LastD Out Lspd Rspd 12233 24.00 22.00 24.00 22.00 -0.03 -0.36 0.00 0.39 0.00 0.39 136.50 127 0 12333 24.00 22.00 24.00 22.00 0.02 -0.36 0.00 0.34 0.00 -0.05 119.00 127 0 12440 24.00 22.00 23.00 22.00 0.07 -0.36 0.00 0.29 0.00 -0.05 101.50 127 0 12533 24.00 22.00 23.00 21.00 0.13 -0.38 0.00 0.25 0.00 -0.04 87.50 127 0 12634 26.00 25.00 24.00 23.00 0.25 -0.34 0.00 0.09 0.00 -0.16 31.50 106 43 12732 28.00 27.00 25.00 23.00 0.32 -0.34 0.00 0.02 0.00 -0.07 7.00 82 68 12835 34.00 33.00 30.00 26.00 0.39 -0.28 0.00 -0.11 0.00 -0.13 -38.50 36 113 12932 39.00 39.00 35.00 28.00 0.47 -0.24 0.00 -0.23 0.00 -0.12 -80.50 0 127 13033 42.00 43.00 37.00 31.00 0.47 -0.18 0.00 -0.29 0.00 -0.06 -101.50 0 127 13136 43.00 44.00 38.00 32.00 0.47 -0.16 0.00 -0.31 0.00 -0.02 -108.50 0 127 13237 43.00 43.00 38.00 33.00 0.41 -0.14 0.00 -0.27 0.00 0.04 -94.50 0 127 13336 41.00 42.00 38.00 38.00 0.26 -0.04 0.00 -0.22 0.00 0.05 -77.00 0 127 13434 40.00 40.00 39.00 39.00 0.12 -0.02 0.00 -0.10 0.00 0.12 -35.00 40 110 13534 39.00 41.00 38.00 39.00 0.16 -0.02 0.00 -0.14 0.00 -0.04 -49.00 26 124 13633 41.00 42.00 41.00 42.00 0.04 0.04 0.00 -0.08 0.00 0.06 -28.00 47 103 13730 42.00 44.00 43.00 44.00 -0.02 0.08 0.00 -0.06 0.00 0.02 -21.00 54 96 13832 42.00 45.00 44.00 42.00 -0.20 0.04 0.00 0.16 0.00 0.22 56.00 127 19 13934 41.00 43.00 42.00 41.00 -0.16 0.02 0.00 0.14 0.00 -0.02 49.00 124 26 14029 38.00 41.00 41.00 37.00 -0.25 -0.06 0.00 0.31 0.00 0.17 108.50 127 0 14134 34.00 36.00 36.00 34.00 -0.17 -0.12 0.00 0.29 0.00 -0.02 101.50 127 0 14234 31.00 31.00 33.00 29.00 -0.19 -0.22 0.00 0.41 0.00 0.12 143.50 127 0 14341 30.00 28.00 29.00 28.00 0.08 -0.24 0.00 0.16 0.00 -0.25 56.00 127 19 14438 30.00 28.00 28.00 27.00 0.17 -0.26 0.00 0.09 0.00 -0.07 31.50 106 43 14533 30.00 29.00 27.00 25.00 0.29 -0.30 0.00 0.01 0.00 -0.08 3.50 78 71 14634 32.00 31.00 29.00 27.00 0.29 -0.26 0.00 -0.03 0.00 -0.04 -10.50 64 85 14733 33.00 32.00 30.00 29.00 0.23 -0.22 0.00 -0.01 0.00 0.02 -3.50 71 78 14837 34.00 35.00 32.00 30.00 0.31 -0.20 0.00 -0.11 0.00 -0.10 -38.50 36 113 14934 35.00 36.00 32.00 31.00 0.30 -0.18 0.00 -0.12 0.00 -0.01 -42.00 33 117 15033 36.00 37.00 34.00 34.00 0.24 -0.12 0.00 -0.12 0.00 0.00 -42.00 33 117 15134 36.00 37.00 35.00 36.00 0.16 -0.08 0.00 -0.08 0.00 0.04 -28.00 47 103 15236 37.00 37.00 35.00 35.00 0.17 -0.10 0.00 -0.07 0.00 0.01 -24.50 50 99 15335 36.00 37.00 35.00 36.00 0.14 -0.08 0.00 -0.06 0.00 0.01 -21.00 54 96 15441 37.00 37.00 35.00 36.00 0.13 -0.08 0.00 -0.05 0.00 0.01 -17.50 57 92 15541 37.00 36.00 35.00 34.00 0.18 -0.12 0.00 -0.06 0.00 -0.01 -21.00 53 96 15641 37.00 37.00 35.00 34.00 0.21 -0.12 0.00 -0.09 0.00 -0.03 -31.50 43 106 15738 37.00 37.00 35.00 36.00 0.16 -0.08 0.00 -0.08 0.00 0.01 -28.00 47 103 15840 36.00 36.00 35.00 35.00 0.11 -0.10 0.00 -0.01 0.00 0.07 -3.50 71 78 15934 36.00 36.00 36.00 36.00 0.04 -0.08 0.00 0.04 0.00 0.05 14.00 89 61 16041 35.00 36.00 34.00 36.00 0.07 -0.08 0.00 0.01 0.00 -0.03 3.50 78 71 16137 34.00 34.00 34.00 34.00 0.00 -0.12 0.00 0.12 0.00 0.11 42.00 117 33 16236 34.00 34.00 33.00 34.00 0.08 -0.12 0.00 0.04 0.00 -0.08 14.00 89 61 16338 33.00 32.00 32.00 31.00 0.10 -0.18 0.00 0.08 0.00 0.04 28.00 103 47 16441 32.00 32.00 32.00 32.00 0.05 -0.16 0.00 0.11 0.00 0.03 38.50 113 36 16538 32.00 32.00 30.00 30.00 0.18 -0.20 0.00 0.02 0.00 -0.09 7.00 82 68 16640 31.00 31.00 30.00 30.00 0.11 -0.20 0.00 0.09 0.00 0.07 31.50 106 43 16741 32.00 31.00 29.00 29.00 0.21 -0.22 0.00 0.01 0.00 -0.08 3.50 78 71 16841 31.00 31.00 30.00 30.00 0.17 -0.20 0.00 0.03 0.00 0.02 10.50 85 64 16941 31.00 31.00 30.00 30.00 0.16 -0.20 0.00 0.04 0.00 0.01 14.00 89 61 17041 32.00 31.00 29.00 28.00 0.25 -0.24 0.00 -0.01 0.00 -0.05 -3.50 71 78 17140 31.00 31.00 29.00 29.00 0.20 -0.22 0.00 0.02 0.00 0.03 7.00 82 68 17241 32.00 32.00 30.00 30.00 0.21 -0.20 0.00 -0.01 0.00 -0.03 -3.50 71 78 17340 32.00 32.00 30.00 30.00 0.20 -0.20 0.00 0.00 0.00 0.01 0.00 75 75 17441 31.00 31.00 30.00 30.00 0.15 -0.20 0.00 0.05 0.00 0.05 17.50 92 57 17541 32.00 33.00 30.00 32.00 0.13 -0.16 0.00 0.03 0.00 -0.02 10.50 85 64 17631 32.00 32.00 31.00 31.00 0.17 -0.18 0.00 0.01 0.00 -0.02 3.50 78 71 17736 33.00 32.00 30.00 29.00 0.23 -0.22 0.00 -0.01 0.00 -0.02 -3.50 71 78 17834 33.00 33.00 31.00 30.00 0.23 -0.20 0.00 -0.03 0.00 -0.02 -10.50 64 85 17932 33.00 33.00 31.00 31.00 0.19 -0.18 0.00 -0.01 0.00 0.02 -3.50 71 78 18034 34.00 34.00 31.00 30.00 0.29 -0.20 0.00 -0.09 0.00 -0.08 -31.50 43 106 18132 33.00 34.00 31.00 32.00 0.21 -0.16 0.00 -0.05 0.00 0.04 -17.50 57 92 18241 34.00 35.00 31.00 31.00 0.28 -0.18 0.00 -0.10 0.00 -0.05 -35.00 40 110 18341 34.00 35.00 32.00 33.00 0.20 -0.14 0.00 -0.06 0.00 0.04 -21.00 54 96 18441 34.00 34.00 31.00 30.00 0.29 -0.20 0.00 -0.09 0.00 -0.03 -31.50 43 106 18541 33.00 33.00 32.00 31.00 0.17 -0.18 0.00 0.01 0.00 0.10 3.50 78 71 18640 33.00 34.00 32.00 33.00 0.14 -0.14 0.00 0.00 0.00 -0.01 0.00 75 75 18734 33.00 33.00 32.00 32.00 0.14 -0.16 0.00 0.02 0.00 0.02 7.00 82 68 18840 32.00 33.00 30.00 31.00 0.17 -0.18 0.00 0.01 0.00 -0.01 3.50 78 71 18938 32.00 32.00 30.00 30.00 0.20 -0.20 0.00 0.00 0.00 -0.01 0.00 75 75 19036 31.00 32.00 29.00 30.00 0.19 -0.20 0.00 0.01 0.00 0.01 3.50 78 71 19138 31.00 31.00 29.00 30.00 0.14 -0.20 0.00 0.06 0.00 0.05 21.00 96 54 19240 31.00 31.00 28.00 29.00 0.21 -0.22 0.00 0.01 0.00 -0.05 3.50 78 71 19341 30.00 30.00 29.00 30.00 0.04 -0.20 0.00 0.16 0.00 0.15 56.00 127 19 19441 29.00 30.00 28.00 29.00 0.16 -0.22 0.00 0.06 0.00 -0.10 21.00 96 54 19541 28.00 29.00 27.00 28.00 0.14 -0.24 0.00 0.10 0.00 0.04 35.00 110 40 19641 29.00 29.00 27.00 27.00 0.21 -0.26 0.00 0.05 0.00 -0.05 17.50 92 57 19741 29.00 29.00 26.00 26.00 0.26 -0.28 0.00 0.02 0.00 -0.03 7.00 82 68 19841 29.00 30.00 27.00 28.00 0.23 -0.24 0.00 0.01 0.00 -0.01 3.50 78 71 19941 29.00 30.00 27.00 28.00 0.20 -0.24 0.00 0.04 0.00 0.03 14.00 89 61 20041 30.00 30.00 27.00 26.00 0.29 -0.28 0.00 -0.01 0.00 -0.05 -3.50 71 78 20141 30.00 31.00 27.00 28.00 0.27 -0.24 0.00 -0.03 0.00 -0.02 -10.50 64 85 20237 30.00 31.00 28.00 29.00 0.22 -0.22 0.00 0.00 0.00 0.03 0.00 75 75 20337 33.00 32.00 29.00 24.00 0.43 -0.32 0.00 -0.11 0.00 -0.11 -38.50 36 113 20441 38.00 39.00 30.00 16.00 0.79 -0.48 0.00 -0.31 0.00 -0.20 -108.50 0 127 20541 40.00 42.00 33.00 22.00 0.68 -0.36 0.00 -0.32 0.00 -0.01 -112.00 0 127 20641 43.00 45.00 37.00 26.00 0.61 -0.28 0.00 -0.33 0.00 -0.01 -115.50 0 127 20734 43.00 44.00 38.00 31.00 0.48 -0.18 0.00 -0.30 0.00 0.03 -105.00 0 127 20832 42.00 44.00 37.00 30.00 0.51 -0.20 0.00 -0.31 0.00 -0.01 -108.50 0 127 20933 40.00 44.00 37.00 40.00 0.25 0.00 0.00 -0.25 0.00 0.06 -87.50 0 127 21041 39.00 42.00 38.00 41.00 0.09 0.02 0.00 -0.11 0.00 0.14 -38.50 36 113 21140 40.00 42.00 41.00 40.00 -0.19 0.00 0.00 0.19 0.00 0.30 66.50 127 8 21233 43.00 48.00 50.00 24.00 -0.69 -0.32 0.00 1.01 0.00 0.82 353.50 127 0 21336 40.00 43.00 42.00 39.00 -0.26 -0.02 0.00 0.28 0.00 -0.73 98.00 127 0 21438 38.00 40.00 36.00 39.00 0.11 -0.02 0.00 -0.09 0.00 -0.37 -31.50 43 106 21538 38.00 39.00 35.00 33.00 0.33 -0.14 0.00 -0.19 0.00 -0.10 -66.50 8 127 21639 38.00 39.00 35.00 32.00 0.36 -0.16 0.00 -0.20 0.00 -0.01 -70.00 4 127 21740 37.00 40.00 36.00 39.00 0.10 -0.02 0.00 -0.08 0.00 0.12 -28.00 47 103 21833 38.00 39.00 36.00 37.00 0.16 -0.06 0.00 -0.10 0.00 -0.02 -35.00 40 110 21931 37.00 39.00 37.00 39.00 0.03 -0.02 0.00 -0.01 0.00 0.09 -3.50 71 78 22031 36.00 39.00 37.00 39.00 -0.05 -0.02 0.00 0.07 0.00 0.08 24.50 99 50 22133 34.00 38.00 35.00 37.00 -0.14 -0.06 0.00 0.20 0.00 0.13 70.00 127 5 22231 34.00 36.00 33.00 36.00 0.09 -0.08 0.00 -0.01 0.00 -0.21 -3.50 71 78 22335 32.00 33.00 32.00 33.00 -0.01 -0.14 0.00 0.15 0.00 0.16 52.50 127 22 22432 31.00 33.00 30.00 32.00 0.12 -0.16 0.00 0.04 0.00 -0.11 14.00 89 61 22532 29.00 30.00 28.00 30.00 0.08 -0.20 0.00 0.12 0.00 0.08 42.00 117 33 22635 29.00 30.00 28.00 29.00 0.14 -0.22 0.00 0.08 0.00 -0.04 28.00 103 47 22734 28.00 29.00 26.00 28.00 0.15 -0.24 0.00 0.09 0.00 0.01 31.50 106 43 22841 27.00 28.00 25.00 27.00 0.13 -0.26 0.00 0.13 0.00 0.04 45.50 120 29 22940 26.00 28.00 25.00 26.00 0.19 -0.28 0.00 0.09 0.00 -0.04 31.50 106 43 23041 27.00 27.00 25.00 25.00 0.20 -0.30 0.00 0.10 0.00 0.01 35.00 110 39 23141 26.00 29.00 24.00 27.00 0.19 -0.26 0.00 0.07 0.00 -0.03 24.50 99 50 23241 27.00 29.00 25.00 28.00 0.18 -0.24 0.00 0.06 0.00 -0.01 21.00 96 54 23341 28.00 30.00 26.00 28.00 0.21 -0.24 0.00 0.03 0.00 -0.03 10.50 85 64 23436 28.00 30.00 26.00 28.00 0.20 -0.24 0.00 0.04 0.00 0.01 14.00 89 61 23541 30.00 32.00 27.00 29.00 0.24 -0.22 0.00 -0.02 0.00 -0.06 -7.00 68 82 23641 31.00 32.00 29.00 31.00 0.16 -0.18 0.00 0.02 0.00 0.04 7.00 82 68 23737 32.00 34.00 30.00 31.00 0.23 -0.18 0.00 -0.05 0.00 -0.07 -17.50 57 92 23839 32.00 36.00 30.00 33.00 0.23 -0.14 0.00 -0.09 0.00 -0.04 -31.50 43 106 23935 33.00 36.00 31.00 33.00 0.25 -0.14 0.00 -0.11 0.00 -0.02 -38.50 36 113 24041 34.00 37.00 32.00 34.00 0.24 -0.12 0.00 -0.12 0.00 -0.01 -42.00 33 117 24141 34.00 37.00 32.00 34.00 0.23 -0.12 0.00 -0.11 0.00 0.01 -38.50 36 113 24238 35.00 38.00 32.00 34.00 0.28 -0.12 0.00 -0.16 0.00 -0.05 -56.00 19 127 24337 34.00 39.00 32.00 36.00 0.21 -0.08 0.00 -0.13 0.00 0.03 -45.50 29 120 24432 35.00 37.00 35.00 37.00 0.01 -0.06 0.00 0.05 0.00 0.18 17.50 92 57 24531 35.00 37.00 34.00 36.00 0.14 -0.08 0.00 -0.06 0.00 -0.11 -21.00 54 96 24634 34.00 36.00 34.00 36.00 -0.05 -0.08 0.00 0.13 0.00 0.19 45.50 120 29 24736 33.00 36.00 32.00 36.00 0.06 -0.08 0.00 0.02 0.00 -0.11 7.00 82 68 24834 31.00 35.00 31.00 35.00 0.03 -0.10 0.00 0.07 0.00 0.05 24.50 99 50 24934 31.00 33.00 30.00 33.00 0.07 -0.14 0.00 0.07 0.00 0.00 24.50 99 50 25036 29.00 32.00 28.00 32.00 0.02 -0.16 0.00 0.14 0.00 0.07 49.00 124 26 25136 28.00 30.00 27.00 30.00 0.06 -0.20 0.00 0.14 0.00 0.00 49.00 124 26 25234 41.00 41.00 29.00 10.00 1.00 -0.60 0.00 -0.40 0.00 -0.54 -140.00 0 127 25338 45.00 50.00 41.00 37.00 0.44 -0.06 0.00 -0.38 0.00 0.02 -133.00 0 127 25434 45.00 49.00 43.00 48.00 0.13 0.16 0.00 -0.29 0.00 0.09 -101.50 0 127 25535 44.00 49.00 43.00 48.00 0.12 0.16 0.00 -0.28 0.00 0.01 -98.00 0 127 25635 45.00 50.00 44.00 49.00 0.08 0.18 0.00 -0.26 0.00 0.02 -91.00 0 127 25731 48.00 51.00 49.00 51.00 -0.07 0.22 0.00 -0.15 0.00 0.11 -52.50 22 127 25829 51.00 54.00 45.00 33.00 0.58 -0.14 0.00 -0.44 0.00 -0.29 -154.00 0 127 25931 50.00 52.00 43.00 26.00 0.70 -0.28 0.00 -0.42 0.00 0.02 -147.00 0 127 26029 44.00 48.00 42.00 45.00 0.21 0.10 0.00 -0.31 0.00 0.11 -108.50 0 127 In HandleAnomalousConditions with WALL_OFFSET_DIST_AHEAD error code detected WALL_OFFSET_DIST_AHEAD case detected with tracking case Left In SpinTurn(CW, 90.00, 45.00) with PID = (0.7,0.3,0.0) Init hdg = -95.99 deg, Turn = 90.00 deg, tgt = -5.99 deg, timeout = 4.00 sec Msec Hdg PrvHdg dHdg Rate tgtDPS err Kp*err Ival Kd*Derr speed Match Slope 26094 -100.46 -95.99 -4.47 149.05 45.00 -104.05 -72.84 -31.22 -0.00 0 0.48 0.48 26124 -103.58 -100.46 -3.11 103.73 45.00 -58.73 -41.11 -48.83 0.00 0 0.46 -0.02 26154 -106.23 -103.58 -2.66 88.63 45.00 -43.63 -30.54 -61.92 0.00 0 0.44 -0.01 26184 -107.97 -106.23 -1.74 57.89 45.00 -12.89 -9.02 -65.79 0.00 0 0.43 -0.01 26214 -108.71 -107.97 -0.74 24.58 45.00 20.42 14.30 -59.66 0.00 0 0.43 -0.00 26244 -108.85 -108.71 -0.15 4.85 45.00 40.15 28.10 -47.62 0.00 0 0.43 -0.00 26274 -109.03 -108.85 -0.18 5.90 45.00 39.10 27.37 -35.89 -0.00 0 0.43 -0.00 26304 -109.03 -109.03 0.00 0.02 45.00 44.98 31.48 -22.39 0.00 9 0.43 0.00 26334 -108.99 -109.03 0.04 1.36 45.00 43.64 30.55 -9.30 -0.00 21 0.43 0.00 26364 -108.99 -108.99 0.00 0.08 45.00 44.92 31.45 4.18 0.00 35 0.43 0.00 26394 -108.84 -108.99 0.15 4.90 45.00 40.10 28.07 16.21 -0.00 44 0.43 0.00 26424 -108.54 -108.84 0.30 9.91 45.00 35.09 24.56 26.73 -0.00 51 0.43 0.00 26454 -107.46 -108.54 1.08 36.00 45.00 9.00 6.30 29.43 -0.00 35 0.44 0.01 26484 -105.94 -107.46 1.52 50.79 45.00 -5.79 -4.05 27.70 -0.00 23 0.44 0.01 26517 -104.37 -105.94 1.57 52.18 45.00 -7.18 -5.02 25.54 -0.00 20 0.45 0.01 26547 -102.98 -104.37 1.39 46.34 45.00 -1.34 -0.94 25.14 0.00 24 0.46 0.01 26577 -101.85 -102.98 1.14 37.90 45.00 7.10 4.97 27.27 0.00 32 0.47 0.01 26607 -100.90 -101.85 0.95 31.70 45.00 13.30 9.31 31.26 0.00 40 0.47 0.01 26637 -99.91 -100.90 0.98 32.72 45.00 12.28 8.59 34.94 -0.00 43 0.48 0.01 26667 -98.77 -99.91 1.14 38.01 45.00 6.99 4.90 37.04 -0.00 41 0.48 0.01 26697 -97.38 -98.77 1.39 46.40 45.00 -1.40 -0.98 36.62 -0.00 35 0.49 0.01 26727 -95.87 -97.38 1.51 50.46 45.00 -5.46 -3.82 34.98 -0.00 31 0.50 0.01 26757 -94.36 -95.87 1.51 50.41 45.00 -5.41 -3.79 33.36 0.00 29 0.51 0.01 26787 -92.85 -94.36 1.50 50.06 45.00 -5.06 -3.54 31.84 0.00 28 0.52 0.01 26817 -91.48 -92.85 1.37 45.78 45.00 -0.78 -0.55 31.61 0.00 31 0.53 0.01 26847 -90.20 -91.48 1.28 42.66 45.00 2.34 1.64 32.31 0.00 33 0.53 0.01 26877 -88.96 -90.20 1.24 41.21 45.00 3.79 2.66 33.45 0.00 36 0.54 0.01 26907 -87.73 -88.96 1.23 41.12 45.00 3.88 2.72 34.61 0.00 37 0.55 0.01 26937 -86.44 -87.73 1.29 43.13 45.00 1.87 1.31 35.17 -0.00 36 0.55 0.01 26967 -85.06 -86.44 1.38 45.97 45.00 -0.97 -0.68 34.88 -0.00 34 0.56 0.01 26997 -83.65 -85.06 1.40 46.83 45.00 -1.83 -1.28 34.33 -0.00 33 0.57 0.01 27027 -82.24 -83.65 1.41 47.14 45.00 -2.14 -1.50 33.69 -0.00 32 0.58 0.01 27057 -80.82 -82.24 1.42 47.24 45.00 -2.24 -1.57 33.02 -0.00 31 0.58 0.01 27087 -79.34 -80.82 1.48 49.31 45.00 -4.31 -3.02 31.73 -0.00 28 0.59 0.01 27117 -77.89 -79.34 1.45 48.35 45.00 -3.35 -2.35 30.73 0.00 28 0.60 0.01 27147 -76.50 -77.89 1.40 46.53 45.00 -1.53 -1.07 30.27 0.00 29 0.61 0.01 27177 -75.24 -76.50 1.25 41.74 45.00 3.26 2.28 31.24 0.00 33 0.62 0.01 27207 -74.06 -75.24 1.18 39.37 45.00 5.63 3.94 32.93 0.00 36 0.62 0.01 27237 -72.89 -74.06 1.17 38.97 45.00 6.03 4.22 34.74 0.00 38 0.63 0.01 27267 -71.64 -72.89 1.26 41.91 45.00 3.09 2.16 35.67 -0.00 37 0.64 0.01 27297 -70.21 -71.64 1.43 47.56 45.00 -2.56 -1.79 34.90 -0.00 33 0.64 0.01 27327 -68.60 -70.21 1.61 53.74 45.00 -8.74 -6.12 32.28 -0.00 26 0.65 0.01 27357 -66.99 -68.60 1.60 53.45 45.00 -8.45 -5.92 29.74 0.00 23 0.66 0.01 27387 -65.66 -66.99 1.33 44.39 45.00 0.61 0.42 29.92 0.00 30 0.67 0.01 27417 -64.52 -65.66 1.15 38.21 45.00 6.79 4.75 31.96 0.00 36 0.67 0.01 27447 -63.41 -64.52 1.11 36.90 45.00 8.10 5.67 34.39 0.00 40 0.68 0.01 27477 -62.24 -63.41 1.17 39.09 45.00 5.91 4.14 36.16 -0.00 40 0.69 0.01 27507 -60.97 -62.24 1.26 42.15 45.00 2.85 1.99 37.02 -0.00 39 0.69 0.01 27537 -59.56 -60.97 1.41 47.01 45.00 -2.01 -1.41 36.41 -0.00 35 0.70 0.01 27567 -58.01 -59.56 1.55 51.59 45.00 -6.59 -4.62 34.43 -0.00 29 0.71 0.01 27597 -56.47 -58.01 1.54 51.45 45.00 -6.45 -4.52 32.50 0.00 27 0.72 0.01 27627 -55.06 -56.47 1.41 46.98 45.00 -1.98 -1.39 31.90 0.00 30 0.73 0.01 27657 -53.70 -55.06 1.36 45.28 45.00 -0.28 -0.20 31.82 0.00 31 0.73 0.01 27687 -52.42 -53.70 1.29 42.85 45.00 2.15 1.50 32.46 0.00 33 0.74 0.01 27717 -51.17 -52.42 1.25 41.62 45.00 3.38 2.37 33.48 0.00 35 0.75 0.01 27747 -49.87 -51.17 1.30 43.25 45.00 1.75 1.23 34.00 -0.00 35 0.76 0.01 27777 -48.55 -49.87 1.32 43.91 45.00 1.09 0.76 34.33 -0.00 35 0.76 0.01 27807 -47.18 -48.55 1.37 45.83 45.00 -0.83 -0.58 34.08 -0.00 33 0.77 0.01 27837 -45.75 -47.18 1.43 47.56 45.00 -2.56 -1.79 33.31 -0.00 31 0.78 0.01 27867 -44.35 -45.75 1.40 46.76 45.00 -1.76 -1.23 32.79 0.00 31 0.79 0.01 27897 -42.98 -44.35 1.37 45.67 45.00 -0.67 -0.47 32.59 0.00 32 0.79 0.01 27927 -41.64 -42.98 1.34 44.66 45.00 0.34 0.24 32.69 0.00 32 0.80 0.01 27957 -40.38 -41.64 1.26 42.00 45.00 3.00 2.10 33.59 0.00 35 0.81 0.01 27987 -39.09 -40.38 1.29 43.00 45.00 2.00 1.40 34.19 -0.00 35 0.82 0.01 28017 -37.77 -39.09 1.32 43.87 45.00 1.13 0.79 34.52 -0.00 35 0.82 0.01 28047 -36.43 -37.77 1.34 44.76 45.00 0.24 0.17 34.60 -0.00 34 0.83 0.01 28077 -35.04 -36.43 1.38 46.14 45.00 -1.14 -0.80 34.25 -0.00 33 0.84 0.01 28107 -33.68 -35.04 1.37 45.66 45.00 -0.66 -0.46 34.05 0.00 33 0.85 0.01 28137 -32.40 -33.68 1.27 42.36 45.00 2.64 1.85 34.85 0.00 36 0.85 0.01 28167 -31.14 -32.40 1.27 42.27 45.00 2.73 1.91 35.67 0.00 37 0.86 0.01 28197 -29.83 -31.14 1.30 43.40 45.00 1.60 1.12 36.15 -0.00 37 0.87 0.01 28227 -28.38 -29.83 1.45 48.40 45.00 -3.40 -2.38 35.13 -0.00 32 0.88 0.01 28257 -26.85 -28.38 1.53 51.08 45.00 -6.08 -4.26 33.30 -0.00 29 0.88 0.01 28287 -25.38 -26.85 1.47 48.84 45.00 -3.84 -2.69 32.15 0.00 29 0.89 0.01 28317 -24.01 -25.38 1.37 45.74 45.00 -0.74 -0.52 31.93 0.00 31 0.90 0.01 28347 -22.68 -24.01 1.33 44.28 45.00 0.72 0.50 32.15 0.00 32 0.91 0.01 28377 -21.40 -22.68 1.28 42.68 45.00 2.32 1.62 32.84 0.00 34 0.91 0.01 28407 -20.12 -21.40 1.28 42.62 45.00 2.38 1.66 33.55 0.00 35 0.92 0.01 28437 -18.80 -20.12 1.32 44.10 45.00 0.90 0.63 33.82 -0.00 34 0.93 0.01 28467 -17.43 -18.80 1.37 45.64 45.00 -0.64 -0.45 33.63 -0.00 33 0.94 0.01 28497 -16.02 -17.43 1.42 47.22 45.00 -2.22 -1.55 32.96 -0.00 31 0.94 0.01 28527 -14.61 -16.02 1.40 46.83 45.00 -1.83 -1.28 32.41 0.00 31 0.95 0.01 28557 -13.23 -14.61 1.38 46.07 45.00 -1.07 -0.75 32.09 0.00 31 0.96 0.01 28587 -11.94 -13.23 1.29 42.89 45.00 2.11 1.48 32.73 0.00 34 0.97 0.01 28617 -10.72 -11.94 1.22 40.83 45.00 4.17 2.92 33.98 0.00 36 0.97 0.01 28647 -9.42 -10.72 1.29 43.09 45.00 1.91 1.34 34.55 -0.00 35 0.98 0.01 28677 -8.01 -9.42 1.41 47.03 45.00 -2.03 -1.42 33.94 -0.00 32 0.99 0.01 28707 -6.65 -8.01 1.37 45.62 45.00 -0.62 -0.43 33.76 0.00 33 1.00 0.01 average turn rate = 43.7 28710: Top of loop() - calling UpdateAllEnvironmentParameters() Battery Voltage = 8.06 IRHomingValTotalAvg = 98 28732: glLeftCenterCm = -2080374784 glRightCenterCm = 0 glLeftCenterCm <= glRightCenterCm --> Calling TrackLeftWallOffset() TrackLeftWallOffset: Start tracking offset of 40cm with Kp/Ki/Kd = 350.00 0.00 0.00 Msec LF LC LR RF RC RR F Fvar R Rvar Steer Set Output LSpd RSpd IRAvg WallE3_Complete_V1.ino: In TrackLeftWallOffset: before while with errcode = NO_ANOMALIES Msec LF LC LR LCCorr Steer Tweak OffCm Err LastI LastD Out Lspd Rspd 28859 35.00 38.00 32.00 31.00 0.36 -0.18 0.00 -0.18 0.00 -0.18 -63.00 11 127 28959 35.00 38.00 32.00 34.00 0.27 -0.12 0.00 -0.15 0.00 0.03 -52.50 22 127 29059 34.00 38.00 31.00 33.00 0.31 -0.14 0.00 -0.17 0.00 -0.02 -59.50 15 127 29159 34.00 37.00 32.00 35.00 0.19 -0.10 0.00 -0.09 0.00 0.08 -31.50 43 106 29264 33.00 36.00 32.00 35.00 0.13 -0.10 0.00 -0.03 0.00 0.06 -10.50 64 85 29367 33.00 36.00 33.00 36.00 0.06 -0.08 0.00 0.02 0.00 0.05 7.00 82 68 29467 34.00 36.00 33.00 35.00 0.13 -0.10 0.00 -0.03 0.00 -0.05 -10.50 64 85 29567 33.00 36.00 32.00 35.00 0.10 -0.10 0.00 0.00 0.00 0.03 0.00 75 75 29666 33.00 35.00 32.00 35.00 0.07 -0.10 0.00 0.03 0.00 0.03 10.50 85 64 29767 32.00 35.00 32.00 35.00 0.05 -0.10 0.00 0.05 0.00 0.02 17.50 92 57 29862 32.00 35.00 30.00 33.00 0.17 -0.14 0.00 -0.03 0.00 -0.08 -10.50 64 85 29962 31.00 34.00 30.00 34.00 0.08 -0.12 0.00 0.04 0.00 0.07 14.00 89 61 30065 25.00 29.00 29.00 21.00 -0.47 -0.38 0.00 0.85 0.00 0.81 297.50 127 0 30164 22.00 23.00 25.00 21.00 -0.26 -0.38 0.00 0.64 0.00 -0.21 224.00 127 0 30267 24.00 26.00 22.00 24.00 0.20 -0.32 0.00 0.12 0.00 -0.52 42.00 117 33 30366 26.00 27.00 24.00 26.00 0.18 -0.28 0.00 0.10 0.00 -0.02 35.00 110 40 30462 25.00 28.00 24.00 28.00 0.09 -0.24 0.00 0.15 0.00 0.05 52.50 127 22 30564 29.00 35.00 25.00 28.00 0.38 -0.24 0.00 -0.14 0.00 -0.29 -49.00 26 124 30661 749.00 824.00 705.00 207.00 1.00 3.34 0.00 -4.34 0.00 -4.20 -1519.00 0 127 30762 749.00 824.00 705.00 207.00 1.00 3.34 0.00 -4.34 0.00 0.00 -1519.00 0 127 30866 749.00 824.00 705.00 207.00 1.00 3.34 0.00 -4.34 0.00 0.00 -1519.00 0 127 30965 749.00 824.00 705.00 207.00 1.00 3.34 0.00 -4.34 0.00 0.00 -1519.00 0 127 31067 749.00 824.00 705.00 207.00 1.00 3.34 0.00 -4.34 0.00 0.00 -1519.00 0 127 31161 749.00 824.00 47.00 207.00 1.00 3.34 0.00 -4.34 0.00 0.00 -1519.00 0 127 31258 55.00 58.00 48.00 32.00 0.65 -0.16 0.00 -0.49 0.00 3.85 -171.50 0 127 31359 49.00 49.00 43.00 33.00 0.52 -0.14 0.00 -0.38 0.00 0.11 -133.00 0 127 31460 46.00 50.00 48.00 45.00 -0.26 0.10 0.00 0.16 0.00 0.54 56.00 127 19 31556 52.00 58.00 56.00 44.00 -0.43 0.08 0.00 0.35 0.00 0.19 122.50 127 0 31660 53.00 57.00 55.00 54.00 -0.19 0.28 0.00 -0.09 0.00 -0.44 -31.50 43 106 31757 46.00 50.00 48.00 46.00 -0.23 0.12 0.00 0.11 0.00 0.20 38.50 113 36 31861 43.00 47.00 44.00 46.00 -0.11 0.12 0.00 -0.01 0.00 -0.12 -3.50 71 78 31959 48.00 50.00 43.00 34.00 0.50 -0.12 0.00 -0.38 0.00 -0.37 -133.00 0 127 32056 49.00 53.00 44.00 36.00 0.50 -0.08 0.00 -0.42 0.00 -0.04 -147.00 0 127 32160 50.00 53.00 47.00 46.00 0.30 0.12 0.00 -0.42 0.00 0.00 -147.00 0 127 32259 50.00 53.00 48.00 48.00 0.25 0.16 0.00 -0.41 0.00 0.01 -143.50 0 127 32357 50.00 54.00 47.00 48.00 0.26 0.16 0.00 -0.42 0.00 -0.01 -147.00 0 127 32458 49.00 53.00 48.00 52.00 0.11 0.24 0.00 -0.35 0.00 0.07 -122.50 0 127 32558 49.00 53.00 49.00 53.00 0.02 0.26 0.00 -0.28 0.00 0.07 -98.00 0 127 32658 50.00 56.00 705.00 14.00 -1.00 -0.52 0.00 1.52 0.00 1.80 532.00 127 0 32762 749.00 824.00 705.00 207.00 1.00 3.34 0.00 -4.34 0.00 -5.86 -1519.00 0 127 32858 45.00 824.00 705.00 207.00 -1.00 3.34 0.00 -2.34 0.00 2.00 -819.00 0 127 32956 50.00 56.00 705.00 14.00 -1.00 -0.52 0.00 1.52 0.00 3.86 532.00 127 0 33061 50.00 49.00 705.00 12.00 -1.00 -0.56 0.00 1.56 0.00 0.04 546.00 127 0 33161 47.00 51.00 51.00 36.00 -0.49 -0.08 0.00 0.57 0.00 -0.99 199.50 127 0 33256 43.00 47.00 43.00 47.00 0.05 0.14 0.00 -0.19 0.00 -0.76 -66.50 8 127 33360 40.00 42.00 41.00 40.00 -0.15 0.00 0.00 0.15 0.00 0.34 52.50 127 22 33460 37.00 39.00 37.00 39.00 -0.05 -0.02 0.00 0.07 0.00 -0.08 24.50 99 50 33560 36.00 39.00 34.00 38.00 0.14 -0.04 0.00 -0.10 0.00 -0.17 -35.00 40 110 33661 35.00 38.00 32.00 34.00 0.27 -0.12 0.00 -0.15 0.00 -0.05 -52.50 22 127 33758 34.00 38.00 33.00 36.00 0.17 -0.08 0.00 -0.09 0.00 0.06 -31.50 43 106 33858 34.00 37.00 32.00 35.00 0.20 -0.10 0.00 -0.10 0.00 -0.01 -35.00 40 110 33957 33.00 36.00 33.00 36.00 0.03 -0.08 0.00 0.05 0.00 0.15 17.50 92 57 34061 32.00 35.00 32.00 35.00 0.00 -0.10 0.00 0.10 0.00 0.05 35.00 110 40 34160 31.00 34.00 30.00 34.00 0.07 -0.12 0.00 0.05 0.00 -0.05 17.50 92 57 34257 29.00 32.00 28.00 32.00 0.06 -0.16 0.00 0.10 0.00 0.05 35.00 110 40 34358 27.00 30.00 26.00 30.00 0.05 -0.20 0.00 0.15 0.00 0.05 52.50 127 22 34457 25.00 28.00 25.00 28.00 0.04 -0.24 0.00 0.20 0.00 0.05 70.00 127 5 34559 24.00 27.00 22.00 26.00 0.14 -0.28 0.00 0.14 0.00 -0.06 49.00 124 26 34661 22.00 25.00 21.00 25.00 0.11 -0.30 0.00 0.19 0.00 0.05 66.50 127 8 34760 21.00 24.00 20.00 23.00 0.16 -0.34 0.00 0.18 0.00 -0.01 63.00 127 11 34858 22.00 23.00 20.00 21.00 0.22 -0.38 0.00 0.16 0.00 -0.02 56.00 127 19 34960 38.00 41.00 26.00 10.00 1.00 -0.60 0.00 -0.40 0.00 -0.56 -140.00 0 127 35058 40.00 43.00 37.00 37.00 0.31 -0.06 0.00 -0.25 0.00 0.15 -87.50 0 127 35156 41.00 44.00 37.00 34.00 0.41 -0.12 0.00 -0.29 0.00 -0.04 -101.50 0 127 35259 42.00 44.00 39.00 40.00 0.26 0.00 0.00 -0.26 0.00 0.03 -91.00 0 127 35357 42.00 45.00 39.00 40.00 0.27 0.00 0.00 -0.27 0.00 -0.01 -94.50 0 127 35456 41.00 45.00 40.00 44.00 0.11 0.08 0.00 -0.19 0.00 0.08 -66.50 8 127 35561 42.00 46.00 42.00 46.00 -0.01 0.12 0.00 -0.11 0.00 0.08 -38.50 36 113 35660 44.00 48.00 44.00 48.00 0.01 0.16 0.00 -0.17 0.00 -0.06 -59.50 15 127 35758 48.00 51.00 44.00 42.00 0.35 0.04 0.00 -0.39 0.00 -0.22 -136.50 0 127 35857 48.00 51.00 43.00 34.00 0.52 -0.12 0.00 -0.40 0.00 -0.01 -140.00 0 127 35956 45.00 49.00 43.00 45.00 0.22 0.10 0.00 -0.32 0.00 0.08 -112.00 0 127 In HandleAnomalousConditions with OBSTACLE_AHEAD error code detected OBSTACLE_AHEAD case detected with tracking case Left In BackupAndTurn90Deg(0, 1, 200)with front distance = 32 MoveToDesiredFrontDistCm(40): Kp/Ki/Kd= 1.5/0.1/0.2 MTFD: at start, tgt = 40cm, curr_dist = 32, front/rear var = 13328.0/833.0 Msec Fdist TgtD err Ival Out Speed FVar RVar 37101 31 40 9.0 0.9 12.6 12 12802.2 762.9 37201 32 40 8.0 1.7 13.9 13 13107.7 734.6 37303 33 40 7.0 2.4 13.1 13 13773.5 707.6 37402 32 40 8.0 3.2 15.0 15 14762.2 678.3 37502 31 40 9.0 4.1 17.4 17 15945.0 640.9 37602 31 40 9.0 5.0 18.5 18 17218.5 603.2 37701 32 40 8.0 5.8 18.0 18 18431.5 571.2 37802 32 40 8.0 6.6 18.6 18 19446.0 540.0 37902 31 40 9.0 7.5 20.8 20 20131.4 503.0 37999 33 40 7.0 8.2 19.1 19 20295.0 466.7 38097 31 40 9.0 9.1 22.2 22 19799.2 436.3 38201 28 40 12.0 10.3 27.7 27 18452.5 405.8 38302 31 40 9.0 11.2 25.3 25 16007.0 372.5 38398 32 40 8.0 12.0 24.2 24 12270.2 340.6 38501 33 40 7.0 12.7 23.4 23 7011.5 312.0 38602 35 40 5.0 13.2 21.1 21 1.9 284.2 38699 39 40 1.0 13.3 15.6 15 4.2 257.3 MTFD: Stopped with front dist = 39 and errcode = WALL_OFFSET_DIST_AHEAD In SpinTurn(CW, 90.00, 45.00) with PID = (0.7,0.3,0.0) Init hdg = 148.51 deg, Turn = 90.00 deg, tgt = -121.49 deg, timeout = 4.00 sec Msec Hdg PrvHdg dHdg Rate tgtDPS err Kp*err Ival Kd*Derr speed Match Slope 38758 148.50 148.51 -0.00 0.05 45.00 44.95 31.46 13.48 0.00 44 0.50 0.50 38788 148.47 148.50 -0.03 1.01 45.00 43.99 30.79 26.68 -0.00 57 0.50 -0.00 38818 148.93 148.47 0.45 15.13 45.00 29.87 20.91 35.64 -0.00 56 0.50 0.00 38848 149.93 148.93 1.00 33.37 45.00 11.63 8.14 39.13 -0.00 47 0.51 0.01 38878 151.80 149.93 1.87 62.36 45.00 -17.36 -12.15 33.92 -0.00 21 0.52 0.01 38908 153.93 151.80 2.13 71.04 45.00 -26.04 -18.23 26.11 -0.00 7 0.53 0.01 38938 155.81 153.93 1.88 62.64 45.00 -17.64 -12.35 20.82 0.00 8 0.54 0.01 38968 157.28 155.81 1.47 48.98 45.00 -3.98 -2.79 19.62 0.00 16 0.55 0.01 38998 158.27 157.28 0.99 32.85 45.00 12.15 8.50 23.27 0.00 31 0.55 0.01 39028 159.01 158.27 0.74 24.74 45.00 20.26 14.19 29.35 0.00 43 0.56 0.00 39058 159.81 159.01 0.81 26.85 45.00 18.15 12.70 34.79 -0.00 47 0.56 0.00 39088 160.92 159.81 1.11 36.94 45.00 8.06 5.64 37.21 -0.00 42 0.57 0.01 39118 162.34 160.92 1.42 47.45 45.00 -2.45 -1.72 36.47 -0.00 34 0.58 0.01 39148 163.92 162.34 1.57 52.34 45.00 -7.34 -5.14 34.27 -0.00 29 0.59 0.01 39178 165.53 163.92 1.62 53.96 45.00 -8.96 -6.27 31.58 -0.00 25 0.59 0.01 39208 167.02 165.53 1.49 49.71 45.00 -4.71 -3.29 30.17 0.00 26 0.60 0.01 39238 168.33 167.02 1.30 43.40 45.00 1.60 1.12 30.65 0.00 31 0.61 0.01 39268 169.54 168.33 1.22 40.50 45.00 4.50 3.15 32.00 0.00 35 0.62 0.01 39298 170.75 169.54 1.21 40.37 45.00 4.63 3.24 33.39 0.00 36 0.62 0.01 39328 171.95 170.75 1.20 39.97 45.00 5.03 3.52 34.90 0.00 38 0.63 0.01 39358 173.25 171.95 1.30 43.34 45.00 1.66 1.16 35.40 -0.00 36 0.64 0.01 39388 174.78 173.25 1.53 50.96 45.00 -5.96 -4.17 33.61 -0.00 29 0.65 0.01 39418 176.31 174.78 1.53 51.11 45.00 -6.11 -4.28 31.78 -0.00 27 0.65 0.01 39448 177.86 176.31 1.55 51.69 45.00 -6.69 -4.69 29.77 -0.00 25 0.66 0.01 39478 179.33 177.86 1.46 48.74 45.00 -3.74 -2.62 28.65 0.00 26 0.67 0.01 39508 -179.48 179.33 1.19 39.81 45.00 5.19 3.64 30.21 0.00 33 0.68 0.01 39538 -178.42 -179.48 1.06 35.32 45.00 9.68 6.78 33.11 0.00 39 0.68 0.01 39568 -177.27 -178.42 1.15 38.26 45.00 6.74 4.72 35.14 -0.00 39 0.69 0.01 39598 -175.90 -177.27 1.37 45.81 45.00 -0.81 -0.57 34.89 -0.00 34 0.70 0.01 39628 -174.40 -175.90 1.50 50.03 45.00 -5.03 -3.52 33.38 -0.00 29 0.71 0.01 39658 -172.88 -174.40 1.51 50.42 45.00 -5.42 -3.80 31.76 -0.00 27 0.71 0.01 39688 -171.45 -172.88 1.43 47.82 45.00 -2.82 -1.97 30.91 0.00 28 0.72 0.01 39718 -170.21 -171.45 1.24 41.42 45.00 3.58 2.51 31.98 0.00 34 0.73 0.01 39748 -169.01 -170.21 1.19 39.78 45.00 5.22 3.66 33.55 0.00 37 0.74 0.01 39778 -167.66 -169.01 1.35 44.97 45.00 0.03 0.02 33.56 -0.00 33 0.74 0.01 39808 -166.16 -167.66 1.51 50.25 45.00 -5.25 -3.68 31.98 -0.00 28 0.75 0.01 39838 -164.72 -166.16 1.44 47.87 45.00 -2.87 -2.01 31.12 0.00 29 0.76 0.01 39868 -163.15 -164.72 1.57 52.41 45.00 -7.41 -5.19 28.90 -0.00 23 0.77 0.01 39898 -161.37 -163.15 1.78 59.37 45.00 -14.37 -10.06 24.59 -0.00 14 0.78 0.01 39928 -159.85 -161.37 1.51 50.40 45.00 -5.40 -3.78 22.97 0.00 19 0.79 0.01 39958 -159.05 -159.85 0.81 26.86 45.00 18.14 12.70 28.41 0.00 41 0.79 0.00 39988 -158.52 -159.05 0.53 17.77 45.00 27.23 19.06 36.58 0.00 55 0.79 0.00 40018 -157.22 -158.52 1.29 43.09 45.00 1.91 1.34 37.15 -0.00 38 0.80 0.01 40051 -155.56 -157.22 1.66 55.34 45.00 -10.34 -7.24 34.05 -0.00 26 0.81 0.01 40081 -153.97 -155.56 1.60 53.19 45.00 -8.19 -5.73 31.59 0.00 25 0.82 0.01 40111 -152.50 -153.97 1.47 49.00 45.00 -4.00 -2.80 30.39 0.00 27 0.83 0.01 40141 -151.30 -152.50 1.20 39.86 45.00 5.14 3.60 31.94 0.00 35 0.83 0.01 40171 -150.27 -151.30 1.03 34.50 45.00 10.50 7.35 35.09 0.00 42 0.84 0.01 40201 -149.28 -150.27 0.99 32.94 45.00 12.06 8.44 38.70 0.00 47 0.85 0.01 40231 -147.96 -149.28 1.32 43.98 45.00 1.02 0.72 39.01 -0.00 39 0.85 0.01 40261 -146.50 -147.96 1.46 48.71 45.00 -3.71 -2.59 37.90 -0.00 35 0.86 0.01 40291 -145.13 -146.50 1.37 45.61 45.00 -0.61 -0.43 37.72 0.00 37 0.87 0.01 40321 -143.85 -145.13 1.28 42.65 45.00 2.35 1.64 38.42 0.00 40 0.88 0.01 40351 -142.45 -143.85 1.40 46.52 45.00 -1.52 -1.06 37.97 -0.00 36 0.88 0.01 40381 -141.00 -142.45 1.45 48.45 45.00 -3.45 -2.41 36.93 -0.00 34 0.89 0.01 40411 -139.62 -141.00 1.38 45.99 45.00 -0.99 -0.69 36.64 0.00 35 0.90 0.01 40441 -138.23 -139.62 1.39 46.38 45.00 -1.38 -0.96 36.22 -0.00 35 0.91 0.01 40471 -136.79 -138.23 1.44 47.88 45.00 -2.88 -2.02 35.36 -0.00 33 0.92 0.01 40501 -135.39 -136.79 1.40 46.74 45.00 -1.74 -1.22 34.84 0.00 33 0.92 0.01 40531 -134.24 -135.39 1.15 38.30 45.00 6.70 4.69 36.85 0.00 41 0.93 0.01 40561 -132.98 -134.24 1.26 42.06 45.00 2.94 2.06 37.73 -0.00 39 0.94 0.01 40591 -131.67 -132.98 1.31 43.69 45.00 1.31 0.91 38.12 -0.00 39 0.94 0.01 40621 -130.14 -131.67 1.53 51.09 45.00 -6.09 -4.27 36.29 -0.00 32 0.95 0.01 40651 -128.64 -130.14 1.50 49.91 45.00 -4.91 -3.44 34.82 0.00 31 0.96 0.01 40681 -127.20 -128.64 1.44 47.92 45.00 -2.92 -2.04 33.94 0.00 31 0.97 0.01 40711 -125.79 -127.20 1.41 47.09 45.00 -2.09 -1.46 33.32 0.00 31 0.98 0.01 40741 -124.45 -125.79 1.34 44.72 45.00 0.28 0.19 33.40 0.00 33 0.98 0.01 40771 -123.15 -124.45 1.29 43.15 45.00 1.85 1.29 33.96 0.00 35 0.99 0.01 average turn rate = 43.3 BackupAndTurn90Deg finished 40776: Top of loop() - calling UpdateAllEnvironmentParameters() Battery Voltage = 8.04 IRHomingValTotalAvg = 109 40802: glLeftCenterCm = -2080374784 glRightCenterCm = 0 glLeftCenterCm <= glRightCenterCm --> Calling TrackLeftWallOffset() TrackLeftWallOffset: Start tracking offset of 40cm with Kp/Ki/Kd = 350.00 0.00 0.00 Msec LF LC LR RF RC RR F Fvar R Rvar Steer Set Output LSpd RSpd IRAvg WallE3_Complete_V1.ino: In TrackLeftWallOffset: before while with errcode = NO_ANOMALIES Msec LF LC LR LCCorr Steer Tweak OffCm Err LastI LastD Out Lspd Rspd 40928 38.00 41.00 40.00 40.00 -0.13 0.00 0.00 0.13 0.00 0.13 45.50 120 29 41028 35.00 40.00 40.00 26.00 -0.54 -0.28 0.00 0.82 0.00 0.69 287.00 127 0 41128 33.00 31.00 37.00 24.00 -0.41 -0.32 0.00 0.73 0.00 -0.09 255.50 127 0 41227 38.00 37.00 29.00 15.00 0.81 -0.50 0.00 -0.31 0.00 -1.04 -108.50 0 127 41328 47.00 50.00 35.00 13.00 1.00 -0.54 0.00 -0.46 0.00 -0.15 -161.00 0 127 41428 54.00 55.00 48.00 33.00 0.59 -0.14 0.00 -0.45 0.00 0.01 -157.50 0 127 41528 53.00 55.00 49.00 42.00 0.42 0.04 0.00 -0.46 0.00 -0.01 -161.00 0 127 41627 51.00 54.00 49.00 52.00 0.16 0.24 0.00 -0.40 0.00 0.06 -140.00 0 127 41728 51.00 53.00 48.00 46.00 0.30 0.12 0.00 -0.42 0.00 -0.02 -147.00 0 127 41829 49.00 51.00 46.00 45.00 0.27 0.10 0.00 -0.37 0.00 0.05 -129.50 0 127 41926 50.00 51.00 48.00 49.00 0.15 0.18 0.00 -0.33 0.00 0.04 -115.50 0 127 42026 50.00 52.00 48.00 48.00 0.21 0.16 0.00 -0.37 0.00 -0.04 -129.50 0 127 42129 51.00 53.00 48.00 45.00 0.32 0.10 0.00 -0.42 0.00 -0.05 -147.00 0 127 42229 51.00 54.00 48.00 47.00 0.30 0.14 0.00 -0.44 0.00 -0.02 -154.00 0 127 42326 52.00 55.00 49.00 49.00 0.28 0.18 0.00 -0.46 0.00 -0.02 -161.00 0 127 42427 53.00 55.00 49.00 47.00 0.32 0.14 0.00 -0.46 0.00 0.00 -161.00 0 127 42529 51.00 54.00 49.00 51.00 0.18 0.22 0.00 -0.40 0.00 0.06 -140.00 0 127 42627 51.00 53.00 48.00 47.00 0.27 0.14 0.00 -0.41 0.00 -0.01 -143.50 0 127 |
This was a pretty good run. The robot captured (approximately) the desired offset, tracked the wall, negotiated the 45º break, managed to go past a mostly closed door, and then plunged headlong into the next room – oops!
When I started looking at the telemetry data, I realized that I now have too much data – especially the details about how the PID engine is managing. I think I need to seriously reduce the clutter if I want to have any chance at all of understanding WallE3’s behavior during tracking operations. Maybe something like:
Msec LCen RCen Front Rear FVar RVar
I modified the telemetry code in ‘..Complete_V1’ to just output the above parameters.
07 February Update:
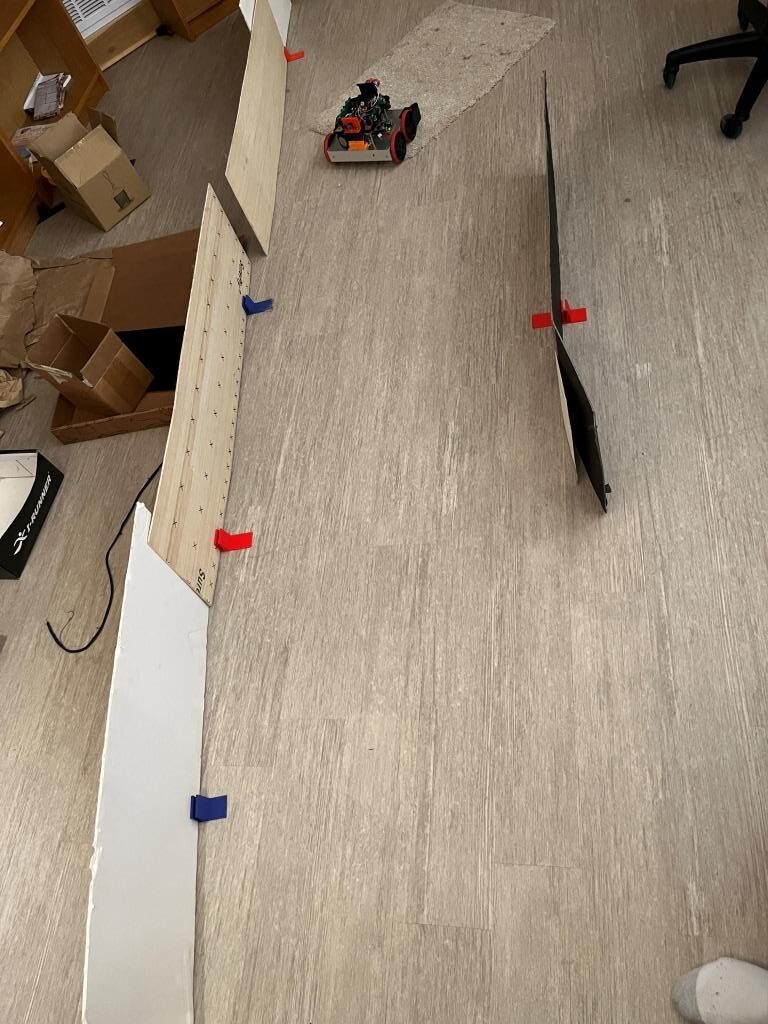
Wall tracking seems to be going well at the moment. Not perfect, but OK. Now I’m starting to think about the ‘open door’ problem. This occurs when the robot is tracking a wall down a hallway, and encounters an open doorway on the tracking side – what to do? As it stands, the robot makes an abrupt turn into the open door and may or may not ever return. I’m now thinking that the robot should bypass open doorways if possible. If the other side of the hallway is continuous across the open doorway, then maybe the robot should switch to tracking that wall for the duration of the open doorway (or maybe for as long as that wall lasts?). In order to accomplish this, the robot must be aware of the current distance to the non-tracking side. Currently that information is available, but unused. To investigate this idea I set up a straight wall tracking configuration in my ‘test range’ (aka office) and added a short section of wall on the ‘other’ (non-tracked) side, and instrumented the program as noted above. Here’s the setup:
And here’s the raw telemetry from the run, and an Excel plot of the left and right side distances:
|
1 2 3 4 5 6 7 8 9 10 11 12 13 14 15 16 17 18 19 20 21 22 23 24 25 26 27 28 29 30 31 32 33 34 35 36 37 38 39 40 41 42 43 44 45 46 47 48 49 50 51 52 |
Msec LCen RCen Front Rear FVar RVar 12207 30.0 779.0 400 63.0 12762.2 703.8 12307 29.0 779.0 400 61.0 12503.0 660.0 12414 29.0 779.0 400 67.0 11874.3 619.7 12507 30.0 779.0 400 78.0 11513.1 587.6 12614 31.0 779.0 400 82.0 10716.2 559.0 12707 32.0 779.0 400 77.0 10287.8 526.2 12807 31.0 779.0 400 84.0 9844.2 499.4 12915 32.0 779.0 267 99.0 8530.9 490.2 13007 30.0 779.0 311 106.0 7917.5 490.2 13113 32.0 779.0 218 97.0 7060.8 474.9 13207 31.0 779.0 249 106.0 6616.9 471.0 13307 31.0 779.0 228 119.0 6270.4 488.0 13414 29.0 779.0 200 125.0 5914.1 513.9 13507 29.0 779.0 209 115.0 5763.6 516.8 13613 31.0 779.0 322 115.0 5178.3 517.4 13707 30.0 779.0 284 819.0 4939.5 11334.4 13807 28.0 779.0 309 819.0 4711.6 21664.0 13910 29.0 779.0 225 819.0 4673.6 31509.9 14007 28.0 779.0 253 819.0 4611.6 40875.7 14117 28.0 75.0 334 750.0 4399.7 48018.0 14207 29.0 55.0 307 819.0 4319.8 56477.0 14307 28.0 50.0 325 750.0 4253.3 62801.1 14413 26.0 48.0 326 750.0 4163.1 68740.6 14507 27.0 49.0 325 750.0 4136.1 74298.6 14612 26.0 47.0 353 750.0 4136.8 79478.3 14707 26.0 47.0 343 750.0 4136.8 84283.0 14807 28.0 46.0 349 750.0 4144.1 88715.7 14915 28.0 46.0 385 819.0 4266.4 94214.0 15007 31.0 46.0 373 819.0 4298.5 99266.9 15113 32.0 44.0 400 819.0 4459.7 103877.6 15207 33.0 43.0 391 750.0 4502.4 106740.7 15307 34.0 42.0 397 750.0 4546.9 109248.0 15417 36.0 41.0 344 750.0 4429.7 111402.5 15507 34.0 41.0 361 750.0 4353.5 113207.5 15612 38.0 41.0 306 750.0 4175.7 114666.0 15707 36.0 41.0 324 750.0 4068.4 115781.2 15807 36.0 43.0 312 750.0 3959.6 116556.0 15914 37.0 43.0 241 819.0 3966.2 118040.7 16007 36.0 46.0 264 819.0 3881.8 119113.4 16113 35.0 47.0 167 819.0 4384.3 119777.6 16207 34.0 49.0 199 750.0 4418.8 119111.6 16307 32.0 50.0 177 819.0 4517.4 119009.3 16410 33.0 50.0 156 750.0 5036.6 117660.4 16507 30.0 50.0 163 750.0 5345.2 115993.0 16614 30.0 52.0 206 750.0 5500.7 114010.0 16707 28.0 51.0 191 750.0 5588.2 111714.6 16807 23.0 779.0 201 750.0 5703.0 109109.5 16915 23.0 779.0 221 819.0 5657.7 106864.8 17007 22.0 779.0 214 750.0 5614.2 103008.5 17112 25.0 51.0 255 819.0 5507.0 99368.0 17207 26.0 779.0 241 750.0 5513.9 94625.8 |
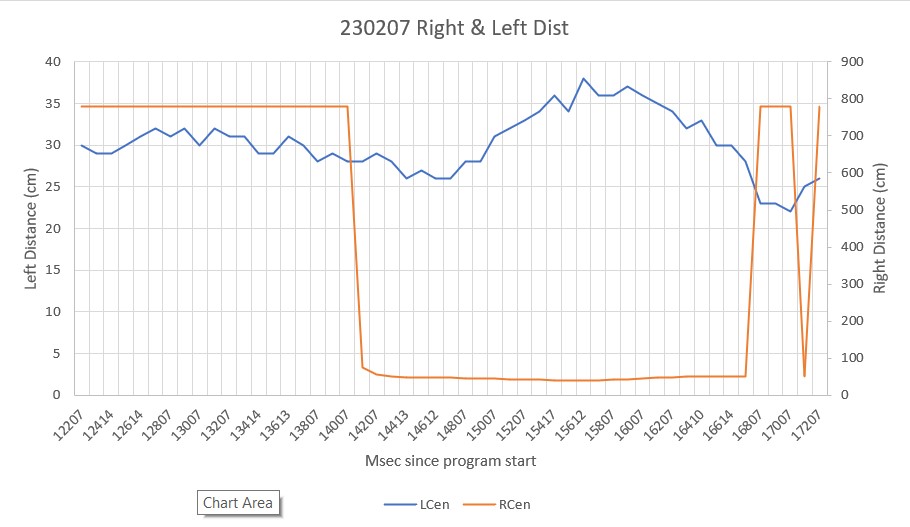
As shown above, the right wall distance drops dramatically from around 800 (basically ‘infinite’) to around 50cm during the robot’s transit through this section. It seems reasonable that I should be able to define a new AnomalyCode value – say “OPEN_DOOR” to handle the case where the ‘tracking side’ distance becomes much larger than the ‘non-tracking side’ distance. In this case, the current tracking operation would be cancelled and the main loop would be re-entered from the top, whereupon (one hopes) that the tracking operation would shift to the other wall. When the ‘open door’ section was past, then the ‘off side’ tracking operation could continue, or revert back in some as-yet-to-be-determined fashion.
To start this investigation, I created a new project called ‘WallE3_Complete_V2’ as a clone of ‘WallE3_Complete_V1’ and started from there.
- I added a new AnomalyCode – OPEN_DOORWAY in ‘enums.h’ and to AnomalyStrArray[]
- added ‘if else()’ block in CheckForAnomalies() to call new ‘isOpenDoorWay()’ fcn
- Added ‘isOpenDoorWay(WallTrackingCases trkdir) function to check for this condition
- Added MAX_TRACKING_DISTANCE_CM = 100; to DISTANCE_MEASUREMENT_SUPPORT region
- Added OPEN_DOORWAY case to HandleAnomalousConditions()
- Revised CheckForAnomalies() to accept a TrackingCases parameter, so it can be passed to IsOpenDoorWay(WallTrackingCasestrkdir)
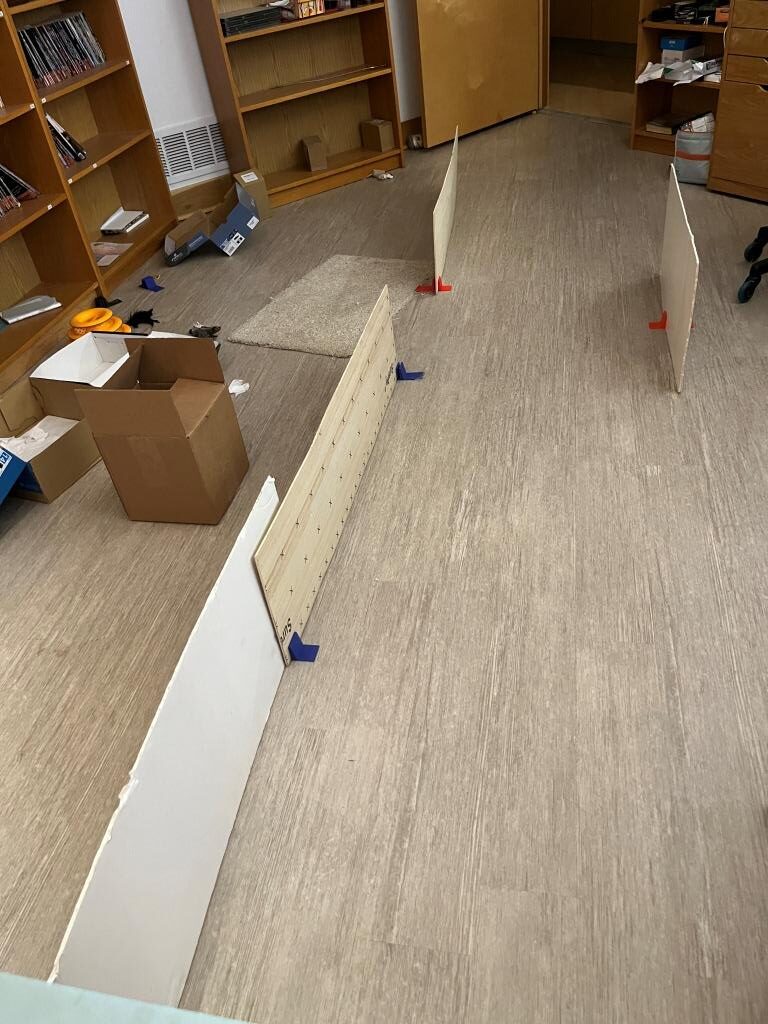
With the above changes, I was able to make a reasonably successful ‘open doorway’ run. Here’s the telemetry showing the robot switching from left-side tracking, to right-side tracking, and then back to left-side tracking.
|
1 2 3 4 5 6 7 8 9 10 11 12 13 14 15 16 17 18 19 20 21 22 23 24 25 26 27 28 29 30 31 32 33 34 35 36 37 38 39 40 41 42 43 44 45 46 47 48 49 50 51 52 53 54 55 56 57 58 59 60 61 62 63 64 65 66 67 68 69 70 71 72 73 74 75 76 77 78 79 80 81 82 83 84 85 86 |
Msec LCen RCen Front Rear FVar RVar 12236 27.0 52.0 353 73.0 11414.3 709.2 12336 26.0 53.0 353 75.0 10959.0 672.7 12443 28.0 52.0 164 79.0 9791.4 639.7 12536 30.0 49.0 227 74.0 9161.5 602.6 12642 35.0 49.0 106 83.0 8792.8 573.2 12736 37.0 53.0 146 95.0 8494.6 557.5 12836 39.0 73.0 119 94.0 8366.9 539.0 12940 39.0 63.0 332 83.0 7810.0 508.1 13036 39.0 83.0 261 75.0 7435.4 472.8 13144 39.0 779.0 400 85.0 7484.1 444.4 13236 39.0 779.0 353 103.0 7294.7 436.0 13336 39.0 779.0 384 98.0 7224.5 419.6 13441 38.0 779.0 383 100.0 7070.4 404.9 13536 38.0 779.0 383 118.0 6994.2 416.4 13641 38.0 779.0 373 118.0 6786.6 425.2 13736 37.0 779.0 376 115.0 6702.6 426.4 13836 35.0 779.0 374 117.0 6620.5 428.8 13942 35.0 779.0 365 750.0 6441.0 9266.7 14036 33.0 779.0 368 819.0 6374.7 19577.9 14148 33.0 779.0 398 819.0 6428.0 29410.0 14236 34.0 779.0 388 750.0 6433.2 36978.9 14336 34.0 106.0 394 819.0 6461.1 45906.4 14442 35.0 64.0 400 750.0 6565.4 52659.1 14536 35.0 50.0 398 750.0 6618.2 59028.0 14641 36.0 45.0 400 819.0 6744.8 66645.5 14736 37.0 44.0 399 819.0 6809.3 73805.0 14836 38.0 44.0 399 819.0 6875.2 80510.0 14940 38.0 44.0 372 750.0 6912.3 85261.0 15036 37.0 44.0 381 819.0 6943.5 91109.2 15146 39.0 44.0 353 750.0 6939.8 95090.3 15236 52.0 45.0 362 750.0 6934.2 98710.1 15336 824.0 47.0 356 750.0 6914.4 101972.0 In HandleAnomalousConditions with OPEN_DOORWAY error code detected OPEN_DOORWAY case detected 15343: Top of loop() - calling UpdateAllEnvironmentParameters() Battery Voltage = 7.87 IRHomingValTotalAvg = 43 15358: glLeftCenterCm = 824.00 glRightCenterCm = 48.00 glLeftCenterCm > glRightCenterCm --> Calling TrackRightWallOffset() TrackRightWallOffset: Start tracking offset of 40cm with Kp/Ki/Kd = 350.00 0.00 0.00 WallE3_Complete_V2.ino: In TrackRightWallOffset: before while with errcode = NO_ANOMALIES Msec RF RC RR RCCorr Steer Tweak OffCm Err LastI LastD Out Lspd Rspd 15475 51.00 51.00 49.00 48.00 0.19 0.16 0.00 -0.35 0.00 -0.35 -122.50 127 0 15575 54.00 54.00 51.00 49.00 0.24 0.18 0.00 -0.42 0.00 -0.07 -147.00 127 0 15682 57.00 56.00 55.00 53.00 0.18 0.26 0.00 -0.44 0.00 -0.02 -154.00 127 0 15775 57.00 57.00 40.00 14.00 1.00 -0.52 0.00 -0.48 0.00 -0.04 -168.00 127 0 15879 56.00 57.00 57.00 56.00 -0.10 0.32 0.00 -0.22 0.00 0.26 -77.00 127 0 15975 56.00 56.00 55.00 55.00 0.11 0.30 0.00 -0.41 0.00 -0.19 -143.50 127 0 16075 57.00 56.00 58.00 54.00 -0.16 0.28 0.00 -0.12 0.00 0.29 -42.00 117 33 16178 58.00 59.00 24.00 15.00 1.00 -0.50 0.00 -0.50 0.00 -0.38 -175.00 127 0 16275 59.00 59.00 55.00 49.00 0.34 0.18 0.00 -0.52 0.00 -0.02 -182.00 127 0 16379 61.00 63.00 68.00 31.00 -0.71 -0.18 0.00 0.89 0.00 1.41 311.50 0 127 16475 67.00 68.00 785.00 17.00 -1.00 -0.46 0.00 1.46 0.00 0.57 511.00 0 127 16575 67.00 71.00 76.00 24.00 -0.89 -0.32 0.00 1.21 0.00 -0.25 423.50 0 127 16682 62.00 63.00 69.00 31.00 -0.70 -0.18 0.00 0.88 0.00 -0.33 308.00 0 127 16775 53.00 56.00 61.00 24.00 -0.77 -0.32 0.00 1.09 0.00 0.21 381.50 0 127 16878 47.00 49.00 50.00 41.00 -0.33 0.02 0.00 0.31 0.00 -0.78 108.50 0 127 16975 43.00 43.00 44.00 42.00 -0.10 0.04 0.00 0.06 0.00 -0.25 21.00 54 96 17075 41.00 40.00 40.00 40.00 0.02 0.00 0.00 -0.02 0.00 -0.08 -7.00 82 68 17181 40.00 39.00 39.00 38.00 0.09 -0.04 0.00 -0.05 0.00 -0.03 -17.50 92 57 17275 40.00 39.00 40.00 39.00 0.08 -0.02 0.00 -0.06 0.00 -0.01 -21.00 96 54 17385 42.00 40.00 38.00 32.00 0.37 -0.16 0.00 -0.21 0.00 -0.15 -73.50 127 1 17475 757.00 44.00 39.00 11.00 1.00 -0.58 0.00 -0.42 0.00 -0.21 -147.00 127 0 17575 757.00 779.00 40.00 196.00 1.00 3.12 0.00 -4.12 0.00 -3.70 -1442.00 127 0 In HandleAnomalousConditions with OPEN_DOORWAY error code detected OPEN_DOORWAY case detected 17585: Top of loop() - calling UpdateAllEnvironmentParameters() Battery Voltage = 7.91 IRHomingValTotalAvg = 58 17600: glLeftCenterCm = 75.00 glRightCenterCm = 779.00 glLeftCenterCm <= glRightCenterCm --> Calling TrackLeftWallOffset() Msec LCen RCen Front Rear FVar RVar 17709 83.0 779.0 384 750.0 6944.9 90000.9 17809 86.0 44.0 387 819.0 6912.2 85421.8 17915 93.0 779.0 194 819.0 7251.6 80233.5 18009 88.0 779.0 258 819.0 7136.3 74827.7 18114 90.0 779.0 259 819.0 6861.6 69397.0 18209 84.0 779.0 258 819.0 6698.4 63441.8 18309 86.0 779.0 258 819.0 6519.0 57117.7 18413 86.0 779.0 209 95.0 6339.6 57651.2 |
And here’s a short video showing the action:
10 February 2023 Update:
I thought of another way to ‘improve’ ‘Open Doorway’ handling. I think it would make a smoother transition from one wall to the other by using the current distance to the ‘off’ wall as the desired offset. To do this, the robot will need a global variable to hold the ‘current desired offset’, something like ‘glCurTrackingOffset’, or maybe two of them ‘glCurrentRightTrackingOffset’ and ‘glCurrentLeftTrackingOffset’. The idea would be that when the last AnomalyCode was ‘OPEN_DOORWAY’, then the appropriate non-standard distance would be used the next time through the loop.
Hmm, I guess this means we don’t need the above ‘gl_CurrentLeft/RightTrackingOffset’ variables, but we DO need a global variable to hold the last AnomalyCode, like ‘gl_LastAnomalyCode’. The idea would be that when the side distances are measured at the top of loop() to determine which side the robot should track, the current value of ‘gl_LastAnomalyCode’ will be checked. If it is ‘OPEN_DOORAY’, then TrackLeft/RightWallOffset() will be called using the actual distance to the off wall rather than WALL_OFFSET_TGTDIST_CM, and the ‘gl_LastAnomalyCode’ variable will be set to NO_ANOMALIES.
I made the changes described above, and then after the normal number of screwups, I got a pretty good 3-wall run using the ‘open doorway’ wall configuration shown in the above video. Here’s the telemetry:
|
1 2 3 4 5 6 7 8 9 10 11 12 13 14 15 16 17 18 19 20 21 22 23 24 25 26 27 28 29 30 31 32 33 34 35 36 37 38 39 40 41 42 43 44 45 46 47 48 49 50 51 52 53 54 55 56 57 58 59 60 61 62 63 64 65 66 67 68 69 70 71 72 73 74 75 76 77 78 79 80 81 82 83 84 85 86 87 88 89 90 91 92 93 94 95 96 97 98 99 100 101 102 103 104 105 106 107 108 109 110 111 112 113 |
12053: Top of loop() - calling UpdateAllEnvironmentParameters() Battery Voltage = 7.85 IRHomingValTotalAvg = 71 12075: gl_LeftCenterCm = 14.00 gl_RightCenterCm = 79.00 TrackLeftWallOffset(350.0, 0.0, 0.0, 40) called TrackLeftWallOffset: Start tracking offset of 40cm Msec LCen RCen Front Rear FVar RVar 12186 14.0 79.0 384 65.0 12555.1 700.5 12286 13.0 81.0 384 73.0 12255.5 663.2 12392 14.0 86.0 400 78.0 11744.5 630.2 12486 15.0 101.0 394 76.0 11400.8 595.5 12591 18.0 91.0 358 82.0 10319.0 566.1 12686 20.0 81.0 370 30.0 9816.8 542.8 12786 28.0 102.0 362 24.0 9280.4 530.5 12889 41.0 107.0 194 27.0 8290.4 517.4 12986 48.0 107.0 250 27.0 7733.9 507.5 13097 50.0 89.0 235 35.0 6792.7 491.6 13186 50.0 81.0 240 52.0 6373.8 467.5 13286 45.0 101.0 236 114.0 6003.5 500.2 13391 41.0 65.0 92 101.0 6854.2 506.6 13486 41.0 779.0 140 85.0 7005.1 493.2 13598 41.0 779.0 400 99.0 6954.5 495.0 13686 40.0 117.0 313 116.0 6732.1 523.6 13786 45.0 779.0 371 108.0 6623.5 535.6 13891 43.0 779.0 357 104.0 6373.7 540.3 13986 41.0 779.0 361 819.0 6276.4 11503.3 14093 37.0 779.0 215 819.0 6419.8 21985.6 14186 34.0 779.0 263 750.0 6386.5 30145.3 14286 33.0 779.0 231 114.0 6453.8 30047.9 14392 34.0 779.0 400 750.0 6672.6 37784.0 14486 34.0 779.0 343 819.0 6660.1 46897.8 14593 33.0 779.0 386 819.0 6809.8 55547.5 14686 33.0 779.0 371 819.0 6852.6 63736.3 14786 34.0 779.0 381 750.0 6917.7 69830.2 14896 32.0 779.0 333 750.0 6920.4 75550.6 14986 32.0 779.0 349 819.0 6930.0 82462.0 15094 32.0 779.0 298 750.0 6930.2 87406.8 15186 33.0 779.0 315 750.0 6901.9 91987.6 15286 32.0 33.0 303 750.0 6863.4 96207.6 15392 33.0 33.0 172 750.0 7526.0 100069.9 15486 33.0 32.0 215 750.0 7571.5 103577.7 15592 32.0 31.0 219 819.0 7622.4 108065.3 15686 32.0 30.0 217 750.0 7611.7 110835.8 15786 32.0 30.0 218 750.0 7582.2 113261.2 15893 35.0 30.0 140 750.0 8060.7 115344.4 15986 824.0 31.0 166 750.0 8055.8 117088.5 In HandleAnomalousConditions with OPEN_DOORWAY error code detected ANOMALY_OPEN_DOORWAY case detected 15993: Top of loop() - calling UpdateAllEnvironmentParameters() Battery Voltage = 7.76 IRHomingValTotalAvg = 75 16009: gl_LeftCenterCm = 824.00 gl_RightCenterCm = 31.00 gl_LeftCenterCm > gl_RightCenterCm --> Calling TrackRightWallOffset(31) TrackRightWallOffset(350.0, 0.0, 0.0, 31) called TrackRightWallOffset: Start tracking offset of 31cm Msec LCen RCen Front Rear FVar RVar 16128 91.0 31.0 151 819.0 8276.0 120677.2 16228 94.0 32.0 155 750.0 8377.9 121385.9 16333 84.0 33.0 252 750.0 7973.6 121767.7 16428 80.0 34.0 219 750.0 7917.4 121825.8 16533 86.0 35.0 121 750.0 8608.7 121563.2 16628 112.0 35.0 153 750.0 8818.9 120982.7 16728 824.0 36.0 131 750.0 9123.6 120087.6 16835 824.0 36.0 279 750.0 9131.6 118880.4 16928 824.0 36.0 229 750.0 8596.1 116759.9 17035 43.0 36.0 248 79.0 7726.0 116525.5 17128 46.0 35.0 241 819.0 7362.0 114825.6 17228 47.0 32.0 245 750.0 6975.3 112086.0 17334 48.0 28.0 270 750.0 6660.2 109071.0 17428 48.0 28.0 261 819.0 6451.9 106312.7 17532 47.0 26.0 294 819.0 6066.8 103228.9 17628 49.0 24.0 283 750.0 6059.0 98054.0 17728 48.0 24.0 290 750.0 6056.6 92329.1 17831 48.0 26.0 64 819.0 7435.4 86743.3 17928 47.0 27.0 139 819.0 7170.4 80655.7 18029 48.0 28.0 66 819.0 7544.6 74260.7 18128 47.0 29.0 90 819.0 7406.3 67789.4 18228 47.0 28.0 74 819.0 7284.5 62300.3 18332 48.0 29.0 42 819.0 7321.9 56114.6 18428 48.0 29.0 52 819.0 7416.9 49129.8 18534 49.0 29.0 250 819.0 6692.3 42061.1 18628 50.0 29.0 184 750.0 6475.1 34834.1 18728 50.0 779.0 228 750.0 6274.9 27085.4 In HandleAnomalousConditions with OPEN_DOORWAY error code detected ANOMALY_OPEN_DOORWAY case detected 18735: Top of loop() - calling UpdateAllEnvironmentParameters() Battery Voltage = 7.83 IRHomingValTotalAvg = 50 18751: gl_LeftCenterCm = 50.00 gl_RightCenterCm = 779.00 gl_LeftCenterCm <= gl_RightCenterCm --> Calling TrackLeftWallOffset(50) TrackLeftWallOffset(350.0, 0.0, 0.0, 50) called TrackLeftWallOffset: Start tracking offset of 50cm Msec LCen RCen Front Rear FVar RVar 18869 52.0 779.0 210 819.0 5725.1 18997.0 18969 40.0 779.0 219 750.0 5740.1 18903.9 19073 38.0 779.0 199 750.0 5725.2 18903.9 19169 28.0 779.0 205 750.0 5711.8 10650.2 19272 18.0 779.0 158 750.0 5705.7 10650.2 19369 12.0 779.0 173 819.0 5687.0 10650.2 19469 11.0 779.0 163 91.0 5656.2 19401.3 19572 9.0 779.0 104 73.0 5867.5 28197.5 ENTERING COMMAND MODE: |
In the above telemetry:
- 12.1 – 16 sec: the robot starts out tracking the left wall at the default offset of 40cm.
- 16.0 sec: The left distance goes to 785mm and a OPEN_DOORWAY Anomaly code is emitted. This causes the tracking loop to exit and the main loop to run again. This time through, the TrackRightWallOffset function gets called with an offset of 50cm
- 16.1 – 18.7 sec: The robot tracks the right wall at nominally 50cm
- 18.7 sec: another OPEN_DOORWAY Anomaly code is emitted. This causes the tracking loop to exit and the main loop to run again. This time through, the TrackLeftWallOffset function gets called, also with an offset of 50cm (I *think* this is a coincidence, but it does look a bit suspicious).
- 18.8 – 19.6 sec: The left wall is tracked at a nominal 50cm
- 19.6 sec: The test was terminated.
This looks pretty good, but I had to cheat a little. During my initial runs the robot kept stopping with a STUCK_AHEAD error. When I looked through the telemetry I noticed the front variance value had indeed dropped to near zero, and then I noticed that the front distance measurement itself was holding pretty steady at 400, which is the max the Pulsed Light LIDAR can measure – rats!
There doesn’t seem to be very much I can do to get around the Pulsed Light LIDAR-LITE distance limitation, but this is pretty old technology – almost a decade out of date. Turns out Garmin bought Pulsed Light, and has been marketing the products themselves. Recently they came out with their “V4” version which uses an IR LED instead of a laser, and has a max distance of a whopping 10m! Not only that, but it is just as easy – if not easier – than the original LIDAR Lite to use, and draws much less power – such a deal!
So, I ordered one from Sparkfun, and when it arrives I’ll see if it lives up to the hype and if it will eliminate my false ‘STUCK_AHEAD’ problems
12 March 2023 Update:
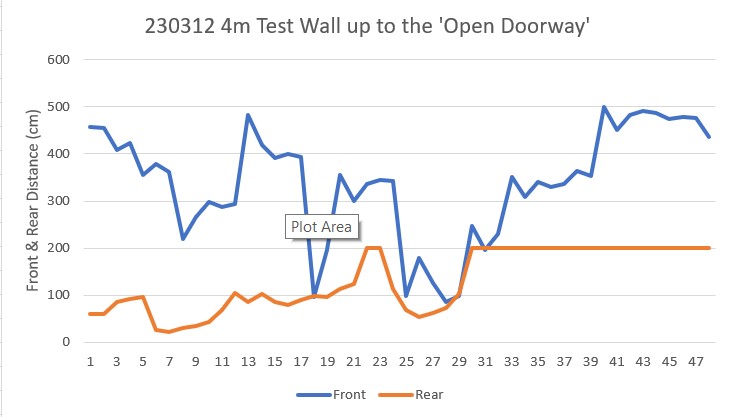
After getting my new Garmin LIDAR-Lite V4/LED distance sensor (see this post and this post) tested and integrated into WallE3, my autonomous wall-following robot, I made some more test runs in my office “test range”. As noted above, the problem with my original Pulsed Light LIDAR was that it’s maximum range was about 4m; when the actual distance was greater than 4m, the sensor simply reported ‘400’(cm). This caused the calculated front distance variance to rapidly decrease below the ‘stuck’ threshold, even though in actuality the robot was doing fine. The new sensor, with a maximum range of about 10m should solve this problem. Here’s a recent run on my ‘4m range with an ‘open doorway’ configuration about two-thirds of the way down the track.
Here’s the telemetry printout from the run:
|
1 2 3 4 5 6 7 8 9 10 11 12 13 14 15 16 17 18 19 20 21 22 23 24 25 26 27 28 29 30 31 32 33 34 35 36 37 38 39 40 41 42 43 44 45 46 47 48 49 50 51 52 53 54 55 56 57 58 59 60 61 62 63 64 65 66 67 68 69 70 71 72 73 74 75 76 77 78 79 80 81 82 83 84 85 86 87 88 89 90 91 92 93 94 95 96 97 98 99 100 101 102 103 104 105 106 107 108 |
Msec LCen RCen Front Rear FVar RVar 14260 14.0 200.0 458 61.0 61314.1 696.7 14360 14.0 200.0 456 60.0 57648.2 653.4 14493 15.0 200.0 408 86.0 51515.7 630.5 14560 15.0 200.0 424 92.0 48762.1 614.3 14675 17.0 61.0 355 95.0 44980.3 600.8 14760 24.0 69.0 378 27.0 43308.1 581.0 14860 30.0 82.0 362 22.0 42013.1 571.4 14999 39.0 79.0 220 31.0 43295.5 553.5 15060 41.0 87.0 267 34.0 43667.4 535.5 15175 42.0 75.0 297 43.0 44325.5 512.8 15260 41.0 57.0 287 68.0 45024.5 487.8 15360 39.0 200.0 293 105.0 45806.8 500.7 15496 38.0 200.0 482 86.0 45135.4 487.2 15560 37.0 200.0 419 102.0 45247.6 492.7 15680 39.0 109.0 391 85.0 46070.3 478.1 15760 38.0 112.0 400 79.0 46505.2 460.5 15860 37.0 112.0 394 90.0 47006.4 451.1 15969 35.0 200.0 96 99.0 55106.2 451.2 16060 35.0 200.0 195 96.0 57349.8 447.5 16182 31.0 200.0 355 114.0 58197.3 467.9 16260 30.0 111.0 301 123.0 58810.9 502.9 16360 27.0 116.0 337 200.0 58948.2 800.0 16478 27.0 200.0 345 200.0 58433.6 1080.8 16560 28.0 200.0 342 113.0 57788.3 1084.7 16668 31.0 200.0 98 69.0 60261.9 1070.9 16760 35.0 200.0 179 54.0 59611.6 1070.9 16860 38.0 200.0 125 62.0 58995.7 1065.6 16968 40.0 200.0 85 72.0 56639.9 1056.5 17060 41.0 200.0 98 103.0 54095.4 1056.1 17172 40.0 115.0 246 200.0 44149.1 1317.8 17260 40.0 100.0 196 200.0 38267.3 1566.3 17360 41.0 102.0 229 200.0 31329.4 1802.1 17475 40.0 200.0 350 200.0 14513.0 2025.5 17560 40.0 200.0 309 200.0 14033.2 2237.2 17675 39.0 200.0 340 200.0 13116.1 2437.5 17760 38.0 200.0 329 200.0 12643.9 2626.9 17860 38.0 200.0 336 200.0 12156.2 2805.8 17978 38.0 200.0 363 200.0 11564.4 2974.8 18060 36.0 200.0 354 200.0 11373.3 3134.1 18211 37.0 200.0 500 200.0 12656.5 3284.3 18260 37.0 200.0 451 200.0 13062.1 3425.7 18360 36.0 200.0 483 200.0 13612.7 3558.8 18486 37.0 200.0 491 200.0 14796.0 3683.9 18560 37.0 34.0 488 200.0 15255.7 3801.4 18688 38.0 33.0 475 200.0 16186.1 3911.6 18760 39.0 32.0 479 200.0 16656.8 4015.0 18860 200.0 32.0 476 200.0 17068.5 4111.8 18981 200.0 32.0 437 200.0 17037.2 4202.5 In HandleAnomalousConditions with OPEN_DOORWAY error code detected ANOMALY_OPEN_DOORWAY case detected 18988: Top of loop() - calling UpdateAllEnvironmentParameters() Battery Voltage = 7.91 IRHomingValTotalAvg = 106 19003: gl_LeftCenterCm = 200.00 gl_RightCenterCm = 31.00 gl_LeftCenterCm > gl_RightCenterCm --> Calling TrackRightWallOffset(31) TrackRightWallOffset(350.0, 0.0, 0.0, 31) called TrackRightWallOffset: Start tracking offset of 31cm Msec LCen RCen Front Rear FVar RVar 19122 200.0 31.0 441 200.0 16951.5 4191.6 19222 200.0 31.0 442 200.0 17125.4 4167.6 19332 200.0 31.0 262 200.0 17128.0 4125.1 19422 200.0 32.0 322 200.0 17035.0 4138.1 19560 200.0 32.0 373 200.0 14907.6 4153.8 19622 200.0 32.0 356 200.0 14507.4 4166.5 19722 200.0 33.0 367 200.0 14517.7 3932.8 19844 36.0 32.0 383 200.0 14554.1 3649.6 19922 35.0 31.0 377 200.0 14578.0 3387.6 20038 37.0 31.0 363 200.0 14594.0 3118.0 20122 38.0 30.0 367 200.0 14605.0 2871.0 20222 39.0 30.0 364 200.0 13377.4 2714.1 20338 40.0 31.0 366 200.0 11467.4 2662.9 20422 40.0 33.0 365 200.0 10358.2 2548.5 20538 41.0 200.0 136 200.0 9324.1 2473.2 20622 43.0 200.0 212 200.0 8361.4 2336.0 In HandleAnomalousConditions with OPEN_DOORWAY error code detected ANOMALY_OPEN_DOORWAY case detected 20629: Top of loop() - calling UpdateAllEnvironmentParameters() Battery Voltage = 7.97 IRHomingValTotalAvg = 76 20644: gl_LeftCenterCm = 43.00 gl_RightCenterCm = 200.00 gl_LeftCenterCm <= gl_RightCenterCm --> Calling TrackLeftWallOffset(43) TrackLeftWallOffset(350.0, 0.0, 0.0, 43) called TrackLeftWallOffset: Start tracking offset of 43cm Msec LCen RCen Front Rear FVar RVar 20763 44.0 200.0 169 200.0 9399.7 2024.9 20863 46.0 200.0 180 200.0 9512.3 1905.3 20982 46.0 200.0 377 200.0 9140.5 1767.3 21063 45.0 200.0 311 200.0 9197.1 1677.7 21173 46.0 200.0 200 200.0 10200.2 1606.3 21263 46.0 72.0 237 200.0 10496.5 1606.3 21363 45.0 70.0 212 200.0 10907.0 1606.3 21472 46.0 68.0 181 200.0 12091.6 1502.4 21563 45.0 61.0 191 200.0 12584.1 1219.4 21672 44.0 58.0 176 200.0 13181.0 844.0 21763 44.0 54.0 181 200.0 13093.3 495.6 21863 44.0 55.0 177 200.0 13243.4 184.4 21972 43.0 50.0 161 200.0 13097.8 0.0 22063 43.0 45.0 166 200.0 12840.0 0.0 22180 43.0 44.0 179 200.0 12091.0 0.0 |
As can be seen by examining the last four columns of the data (Front, Rear, Front Variance, Rear Variance), the measured front distance starts out at 458cm, well beyond the maximum range of the previous Pulsed Light LIDAR, and the Front Variance stays above 10,000 for all but a handful of readings (the ‘stuck’ threshold is 50). In contrast, the rear distance VL53L0X distance sensor tops out at 200cm, and the data shows that the rear variance does go to zero at the end of the run.
Here’s an Excel plot of the front and rear distances for the first part of the run, just before the robot adjusts to the ‘open doorway’ anomaly:
Here’s a plot of the front and rear variances for the same segment:
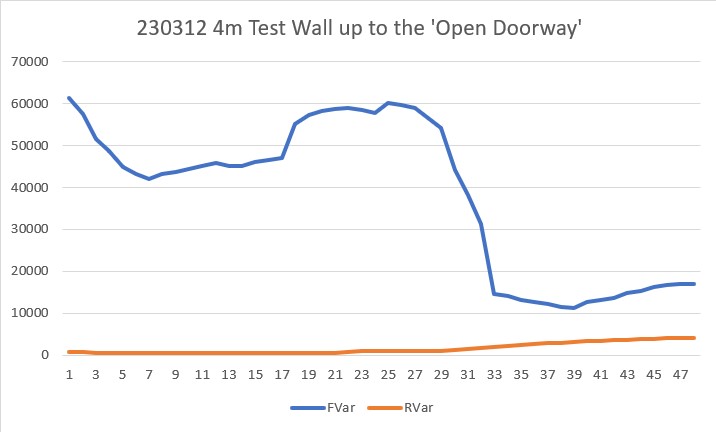
As can be seen in the above plot, the front variance value stays above 10,000 for the entire portion up to the ‘open doorway’ segment, showing that the new Garmin LIDAR sensor is doing it’s job very nicely.
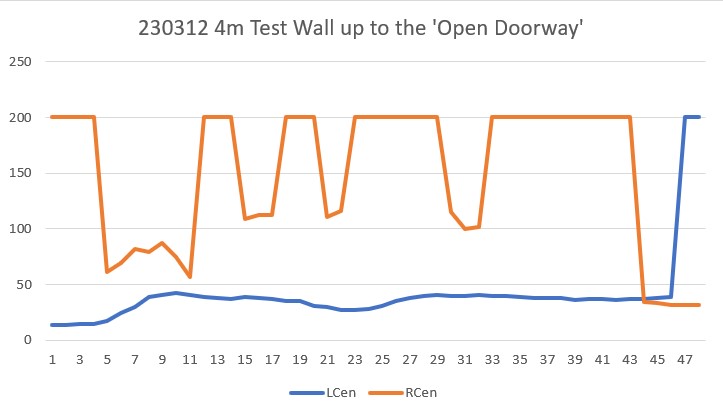
The next plot shows what happens when the robot reaches the ‘open doorway’ segment. The robot is happily tracking the left wall at a nominal 40cm offset when the left distance goes to 200cm (max sensor range) and the right distance drops to below 50cm – essentially the two side distance measurements trade places). This is the definition of the ‘open doorway’ condition, and this should cause the robot to start tracking the right wall instead of the left.
The next plot below is the same left/right distance plot, but during the ‘open doorway’ segment.
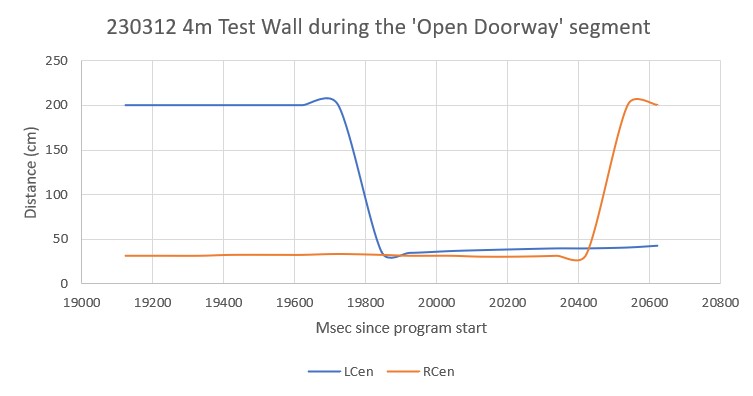
The robot starts tracking the right-hand wall at about 19,100mSec, and this condition persists to about 19,800mSec, where the left and right distances switch again, and the robot starts tracking the left-hand wall again, as shown in the following plot:
When all three segments are stitched together, you get the following plot:
The ‘open doorway’ segment centered around 19,200Msec is clearly visible, as the left and right distances switch.
Here’s a short video showing the entire run:
Stay tuned!