Posted 27 August 2019
During my recent investigation of problems associated with the MPU6050 IMU on my 2-motor robot (which I eventually narrowed down to I2C bus susceptibility to motor driver noise), one poster suggested that the Espressif ESP32 wifi & bluetooth enabled microcontroller might be a good alternative to Arduino boards because the ESP32 chip is ‘shielded’ (not sure what that means, but…). In any case, I was intrigued by the possibility that I might be able to replace my current HC-05 bluetooth module (on the 2-motor robot) and/or the Wixel shield (on the 4-motor robot) with an integrated wifi link that would be able to send back telemetry from anywhere in my house via the existing wifi network. So, I decided to buy a couple (I got the Espressif ESP32 Dev Board from Adafruit) and see if I could get the wifi capability to work.
As usual, this turned out to be a much bigger deal than I thought. My first clue was the fact that Adafruit went to significant pains on their website to note that the ESP Dev Board was ‘for developers only” as shown below:
Please note: The ESP32 is still targeted to developers. Not all of the peripherals are fully documented with example code, and there are some bugs still being found and fixed. We got many sensors and displays working under Arduino IDE, so you can expect things like I2C and SPI and analog reads to work. But other elements are still under dev
Undaunted, I got two boards, and set about connecting my ESP32 dev board to the internet. I found several examples on the internet, but none of them worked (or were even understandable, at least to me). That’s when I realized that I was basically clueless about the entire IoT world in general, and the ESP32’s place in that world in particular – bummer!
So, after lots of screaming, yelling, and hair-pulling (well, not the last because I don’t have much left), I finally got my ESP32 to talk to the internet and actually retrieve part of a web page without crashing. In order to consolidate my new-found knowledge (and maybe help other ESP32 newbies), I decided to create this post as a ‘how to’ for ESP32 internet connections.
General Strategy
Here’s the general strategy I followed in getting my ESP Dev Board connected to the internet and capable of downloading data from a website.
- Install ESP32 libraries and tools into either the Arduino IDE or the Visual Micro extension to Microsoft Visual Studio (I have the VS 2019 Community Edition).
- Install and run a localhost server. This was a great troubleshooting tool, as with it I could monitor website requests to the server.
- Install ‘curl’, the wonderful open-source tool for internet protocol data transfers. This was absolutely essential for verifying the proper http request syntax needed to elicit the proper response from the server.
- Use curl to figure out the proper HTTP ‘GET’ string syntax.
- Modify the WiFiClientBasic example program to successfully retrieve a document from my localhost server.
Install ESP32 libraries and tools
This step by itself was not entirely straightforward; I wound up installing the libraries & tools using the Arduino IDE rather than in the VS2019/Visual Micro environment. I’m sure it can be done either way, but it seemed much easier in the Arduino IDE. Once this is done, then the ESP32 Dev Board can be selected (in either the Arduino IDE or the VS/VM environment) as a compile target.
Install and run a localhost server
This step is probably not absolutely necessary, as there are a number of ‘mock’ sites on the internet that purport to help with IoT app development. However, I found having a ‘localhost’ web server on my laptop very convenient, as this gave me a self-contained test suite for working through the myriad problems I encountered. I used the Node.js setup for Win10, as described in this post. The cool thing about this approach is the console window used to start the server also shows all the request activity directed to the server, allowing me to directly monitor what the ESP32 is actually sending to the site. Here are two screenshots showing some recent activity.

The first log fragment above shows the server starting up, and the first set of http requests. The first half dozen or so requests are from another PC; I did this to initially confirm I could actually reach my localhost server. This first test failed miserably until I figured out I had to disable my PC’s firewall – oops! The next set of lines are from my curl app showing what is actually received by the server when I send a ‘GET’ request from curl.
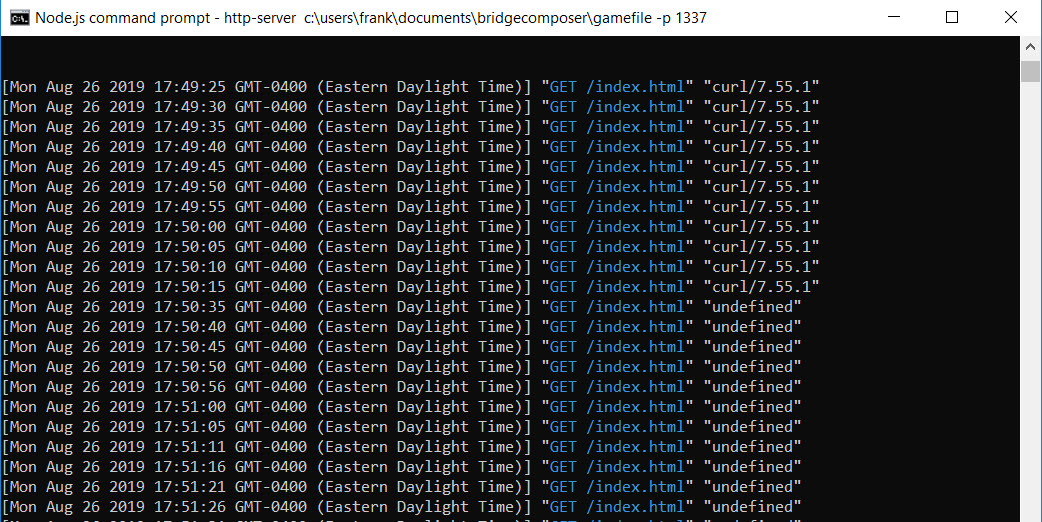
The screenshot above shows some more curl-generated requests, and then a bunch of requests from ‘undefined’. These requests were generated by my ‘WiFiClientBasic’ program running on the ESP32 – success!!
Install ‘curl’
Curl is a wonderful command-line program to generate http (and any other web protocol you can imagine) requests. You can get the executable from this site, and unzip and run it from a command window – no installation required. Using curl, I was able to determine the exact syntax for an http ‘GET’ request to a website, as shown in the screenshot below

The screenshot above shows curl being used from the command line. The first line C:\Users\Frank>curl -v http://192.168.1.90:1337/index.html generates a ‘GET’ request for the file ‘index.html’ to the site ‘192.168.1.90’ (my localhost server address on the local network), and the -v (verbose) option displays what is actually sent to the server, i.e.
GET /index.html HTTP/1.1
> Host: 192.168.1.90:1337
> User-Agent: curl/7.55.1
> Accept: */*
This was actually a huge revelation to me, as I had no idea that a simple ‘GET’ request was a multi-line deal – wow! Up to this point, I had been trying to use the ‘client.send()’ command in the WiFiClientBasic example program to just send the ‘GET /index.html HTTP/1.1’ string, with a commensurate lack of success – oops!
Modify the WifiClientBasic example program
Armed with the knowledge of the exact syntax required, I was now able to modify the ‘WifiClientBasic’ example program to emit the proper ‘GET’ syntax so that the localhost server would respond appropriately. The final program (minus my network login credentials) is shown below.
1 2 3 4 5 6 7 8 9 10 11 12 13 14 15 16 17 18 19 20 21 22 23 24 25 26 27 28 29 30 31 32 33 34 35 36 37 38 39 40 41 42 43 44 45 46 47 48 49 50 51 52 53 54 55 56 57 58 59 60 61 62 63 64 65 66 67 68 69 70 71 72 73 74 75 76 77 78 79 80 81 82 83 84 85 86 87 88 89 90 |
/* * This sketch sends a message to a TCP server * */ //#include <WiFi.h> #include <WiFiMulti.h> WiFiMulti WiFiMulti; char outbuf[100] = { "GET /index.html HTTP/1.1\nHost: 192.168.1.90:1337\nUser-Agent: ESP32\nAccept: */*\n\n" }; //char outbuf[100] = { "GET /index.html HTTP/1.1\n\n" }; char inbuf[200] = { "input buffer" }; void setup() { Serial.begin(115200); delay(10); Serial.print("outbuf = "); Serial.println(outbuf); Serial.print("inbuf = "); Serial.println(inbuf); // We start by connecting to a WiFi network WiFiMulti.addAP("your_SSID", "your_password"); Serial.println(); Serial.println(); Serial.print("Waiting for WiFi... "); while(WiFiMulti.run() != WL_CONNECTED) { Serial.print("."); delay(500); } Serial.println(""); Serial.println("WiFi connected"); Serial.println("IP address: "); Serial.println(WiFi.localIP()); delay(500); } void loop() { const uint16_t port = 1337; const char * host = "192.168.1.10"; // ip or dns Serial.print("Connecting to "); Serial.println(host); // Use WiFiClient class to create TCP connections WiFiClient client; if (!client.connect(host, port)) { Serial.println("Connection failed."); Serial.println("Waiting 5 seconds before retrying..."); delay(5000); return; } // This will send a request to the server Serial.print("Sending "); Serial.println(outbuf); client.println(outbuf); int maxloops = 0; int numbytes = 0; while (!client.available() && maxloops < 1000) { maxloops++; delay(1); } if (client.available() > 0) { numbytes = client.readBytes(inbuf, sizeof(inbuf)); // read chars from stream into outbuf Serial.print("got "); Serial.print(numbytes); Serial.print(" from server after "); Serial.print(maxloops); Serial.println(" Msec"); Serial.println(inbuf); } else { Serial.print("client.available() returned "); Serial.println(numbytes); } Serial.println("Closing connection."); client.stop(); Serial.println("Waiting 5 seconds before restarting..."); delay(5000); } |
This produced the following output:
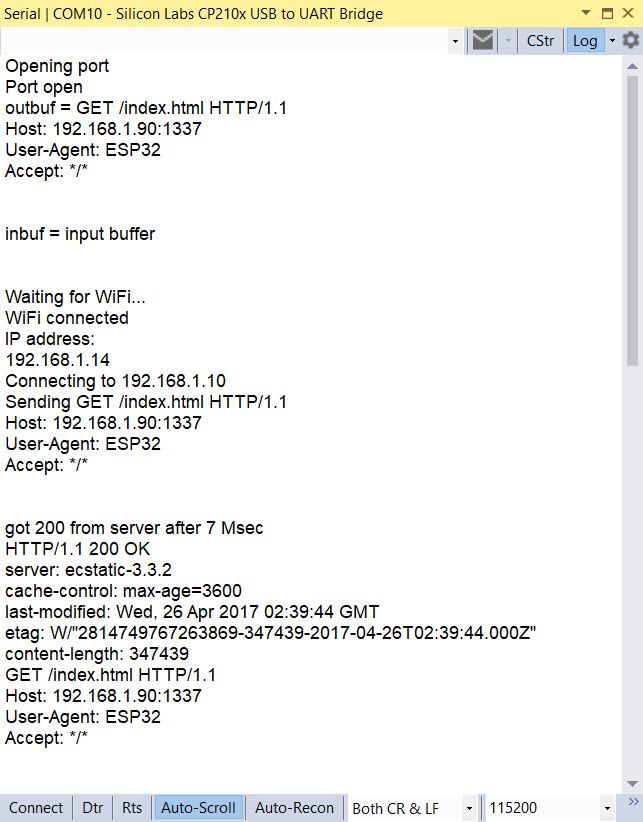
Conclusion:
After all was said and done, most of the problems I had getting the ESP32 to connect to the internet and successfully retrieve some contents from a website were due to my almost complete ignorance of HTTP protocol syntax. However, some of the blame must be laid at the foot of the WiFiClientBasic example program, as the lack of any error checking caused multiple ‘Guru Meditation Errors’ (which I believe is Espressif-speak for ‘segmentation fault’) when I was trying to get everything to work. In particular, the original example code assumes the website response will be available immediately after the request and tries to read an invalid buffer, crashing the ESP32. My modified code waits in a 1 Msec delay loop for client.available() to return a non-zero result. As shown in the above output, this usually happens after 5-7 Msec.
In addition, I found that either the full syntax:
GET /index.html HTTP/1.1
Host: 192.168.1.90:1337
User-Agent: ESP32
Accept: */* {newline}
or just
GET /index.html HTTP/1.1{newline}
worked fine to retrieve the contents of ‘index.html’ on the localhost server, because the ‘host’ information is already present in the connection, and the defaults for the remaining two lines are reasonable. However, I believe the trailing {newline} is still required for both cases.
So, now that I can successfully use the ESP32 to connect to my local wireless network and perform internet functions, my plan is to try and use some of the IoT support facilities available on the internet (like Adafruit’s io.adafruit.com) to see if I can get the ESP32 to upload simulated robot telemetry data to a cloud-based data store. If I can pull that off, then I’ll be one step closer to replacing my current HC-05 bluetooth setup (on the 2-motor robot) and/or my Wixel setup (on the 4-motor robot).
Stay tuned!
Frank