Posted 23 September 2021
For some time now I have been following developments on Paul Stoffregen’s Teensy forum with respect to OTA updates for Teensy products. As it turns out, doing OTA updates is less than straightforward due to the Teensy architecture (I’m waving my hands here).
However, in recent months, thanks to Teensy forum member joepasquariello, there is a new set of programs that seem to address the Teensy OTA issue in a much more comprehensive manner. See this thread (starting with post #85) on the Teensy forum for the details. After reading through the posts, and asking some more dumb questions (which joe was fortunately willing to answer), I decided to give this a try to see if I could achieve OTA updates for a Teensy controller, and maybe make it as convenient as OTA updates are now with Arduino products using the Pololu Wixel RF serial pipe.
The FlasherX package is actually three different files; FlasherX.ino is a demo program that #includes FlashTxx.h and FlashTxx.cpp. The FlasherX.ino program is loaded into the target Teensy device in the normal manner, just like any other Teensy program. However, once it is there, it adds the capability to update the Teensy’s firmware using the .HEX file (produced by the normal compile process) transmitted over any serial port. Of course, in order to make this magic happen, the updated Teensy program must also have this capability, so that means that any Teensy program destined for OTA updates must include the basic ‘FlasherX’ components.
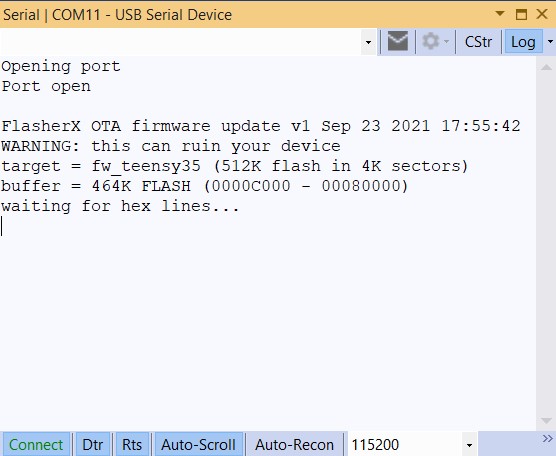
In order to get started, I dl’d all three files and programmed a Teensy 3.5 with the FlasherX.ino program using my normal VS2019/Visual Micro setup. Then I created a new Arduino Project in VS2019 called ‘TeensyFlasher_V1’ and copied the entire contents of FlasherX.ino. I compiled it for a T3.5 target and used my normal Teensy bootload process to transfer it to the Teensy 3.5. Here is the serial port output after the upload:
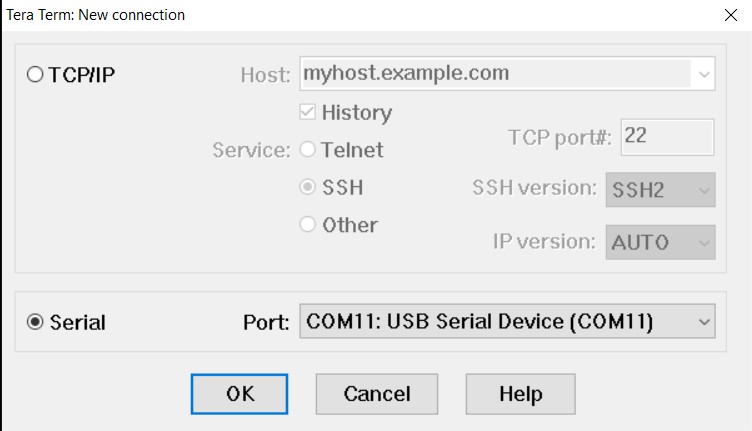
Next I used Tera Term’s ‘file send’ capability to send the FlasherX.hex file to the Teensy using the wired USB connection as just another serial port. When I first launched Tera Term I got an error dialog saying it “Cannot open COM11. Access denied” – reminding me that I had to close the normal connection in order for Tera Term to operate properly. Once I had done this, I used the ‘File->New Connection menu item in Tera Term to create a new connection to COM11 (the Teensy 3.5 USB port), as shown:
Next I used ‘File->Send File… to select the .HEX file created by the compiler, and transfer its contents over to the Teensy using the COM11 serial port

After selecting the .HEX file and clicking ‘Open’, the HEX contents were sent over the serial connection as shown below:
The reason for using the HEX file created from compiling FlasherX.ino (as opposed to a random Teensy app) is because FlasherX.ino already contains all the pieces needed to do OTA updates. Although a bit recursive, using the FlasherX app demonstrates that a Teensy device can be updated via a serial connection repeatedly, as long as the newly updated firmware contains the pieces needed to support the next OTA update.
The next step was to figure out how to get VS2019/Visual Micro to do the update automatically, so that the process emulates what happens with an Arduino controller when F5 is pressed. VS2019 supports post-build scripts, but they aren’t used in the Visual Micro environment. Instead, as I learned from VM guru Tim Leek, VM supports post-build operations via a special file called ‘board.txt’ in the project directory. If this file is present, properly formatted lines are treated as ‘build property overrides’. For instance, this is the line in ‘board.txt’ that calls a C# console app to actually communicate with the target Teensy.
|
1 |
recipe.hooks.postbuild.1.pattern=cmd.exe /c "C:\Users\Frank\Documents\Visual Studio 2019\Projects\TeensyFlash\bin\Release\netcoreapp3.1\TeensyFlash.exe" "{sketch_path}" "{ProjectDir}" {serial.port.num} |
This command launches the console app, and provides it with the path to the project, the path to the sketch, and the currently selected port number. See this thread on the VM forum for all the gory details.
I ran into a problem when I tried to use the above command line with my C# console app, because the arg[] string array in the console app was interpreting spaces in the strings in the calling command differently than expected, so when I sent three strings to the command, the console app thought I was only sending two – somehow concatenating the com port number into the second string (the sketch path). After playing around some more, I found that the following treatment:
|
1 |
recipe.hooks.postbuild.2.pattern=cmd.exe /c "C:\Users\Frank\Documents\Visual Studio 2019\Projects\TeensyFlash\bin\Release\netcoreapp3.1\TeensyFlash.exe" "{sketch_path}" "\"{ProjectDir}"" {serial.port.num} |
when passed as an argument to this small code snippet
|
1 2 3 4 5 6 7 8 9 10 11 12 13 14 15 16 |
namespace TeensyFlash { class Program { static void Main(string[] args) { //Extract the project path and selected COMPORT number from the arguments to the call to Main() Console.WriteLine("Teensy Flash Console"); Console.WriteLine("Number of arguments in args = {0}\n", args.Length); foreach (string str in args) { Console.WriteLine("{0}\n", str); } } } } |
produced the following output:
|
1 2 3 4 5 6 7 8 9 10 11 12 13 |
Compiling 'Teensy Flash Demo V1' for 'Teensy 3.5' Using previously compiled file: C:\Users\Frank\AppData\Local\Temp\VMBuilds\Teensy Flash Demo V1\teensy35\Release\pch\Arduino.h.gch Program size: 47,584 bytes (used 9% of a 524,288 byte maximum) (0.93 secs) Minimum Memory Usage: 5140 bytes (2% of a 262136 byte maximum) C:\Program Files (x86)\Arduino\java\bin>ECHO Sat 09/25/2021 20:14:24.26 Postbuild Hook 1 Sat 09/25/2021 20:14:24.26 Postbuild Hook 1 C:\Program Files (x86)\Arduino\java\bin>"C:\Users\Frank\Documents\Visual Studio 2019\Projects\TeensyFlash\bin\Release\netcoreapp3.1\TeensyFlash.exe" "C:\Users\Frank\Documents\Arduino\Teensy Flash Demo V1" "\"C:\Users\Frank\Documents\Arduino\Teensy Flash Demo V1\"" 6 Teensy Flash Console Number of arguments in args = 3 C:\Users\Frank\Documents\Arduino\Teensy Flash Demo V1 "C:\Users\Frank\Documents\Arduino\Teensy Flash Demo V1" 6 |
With the correct number of arguments, and the comport number on its own line – yay. I have no idea why this works and the other formulations don’t, and why the second argument has to be have it’s quotes escaped with ‘\’, but hey – it works.
As it turns out, this exercise was a bit academic anyway, because both the {ProjectDir} and {sketch_path} expand to identical results, so I only need one of them and the comport number to proceed. So, the ‘final’ (for now) call argument list looks like:
|
1 |
recipe.hooks.postbuild.2.pattern=cmd.exe /c "C:\Users\Frank\Documents\Visual Studio 2019\Projects\TeensyFlash\bin\Release\netcoreapp3.1\TeensyFlash.exe" "\"{ProjectDir}"" {serial.port.num} |
which produces:
|
1 2 3 4 5 6 7 |
C:\Program Files (x86)\Arduino\java\bin>ECHO Sat 09/25/2021 20:30:09.68 Postbuild Hook 1 Sat 09/25/2021 20:30:09.68 Postbuild Hook 1 C:\Program Files (x86)\Arduino\java\bin>"C:\Users\Frank\Documents\Visual Studio 2019\Projects\TeensyFlash\bin\Release\netcoreapp3.1\TeensyFlash.exe" "\"C:\Users\Frank\Documents\Arduino\Teensy Flash Demo V1\"" 6 Teensy Flash Console Number of arguments in args = 2 "C:\Users\Frank\Documents\Arduino\Teensy Flash Demo V1" 6 |
27 September 2021 Update
In order to do OTA updates, I need to be able to connect to one of the Teensy’s hardware serial ports. Up til now I have been just using the USB serial port for convenience, so I thought I would try using a FTDI Pro USB/Serial converter module to connect to Serial1 on the teensy, as shown in the following photo:
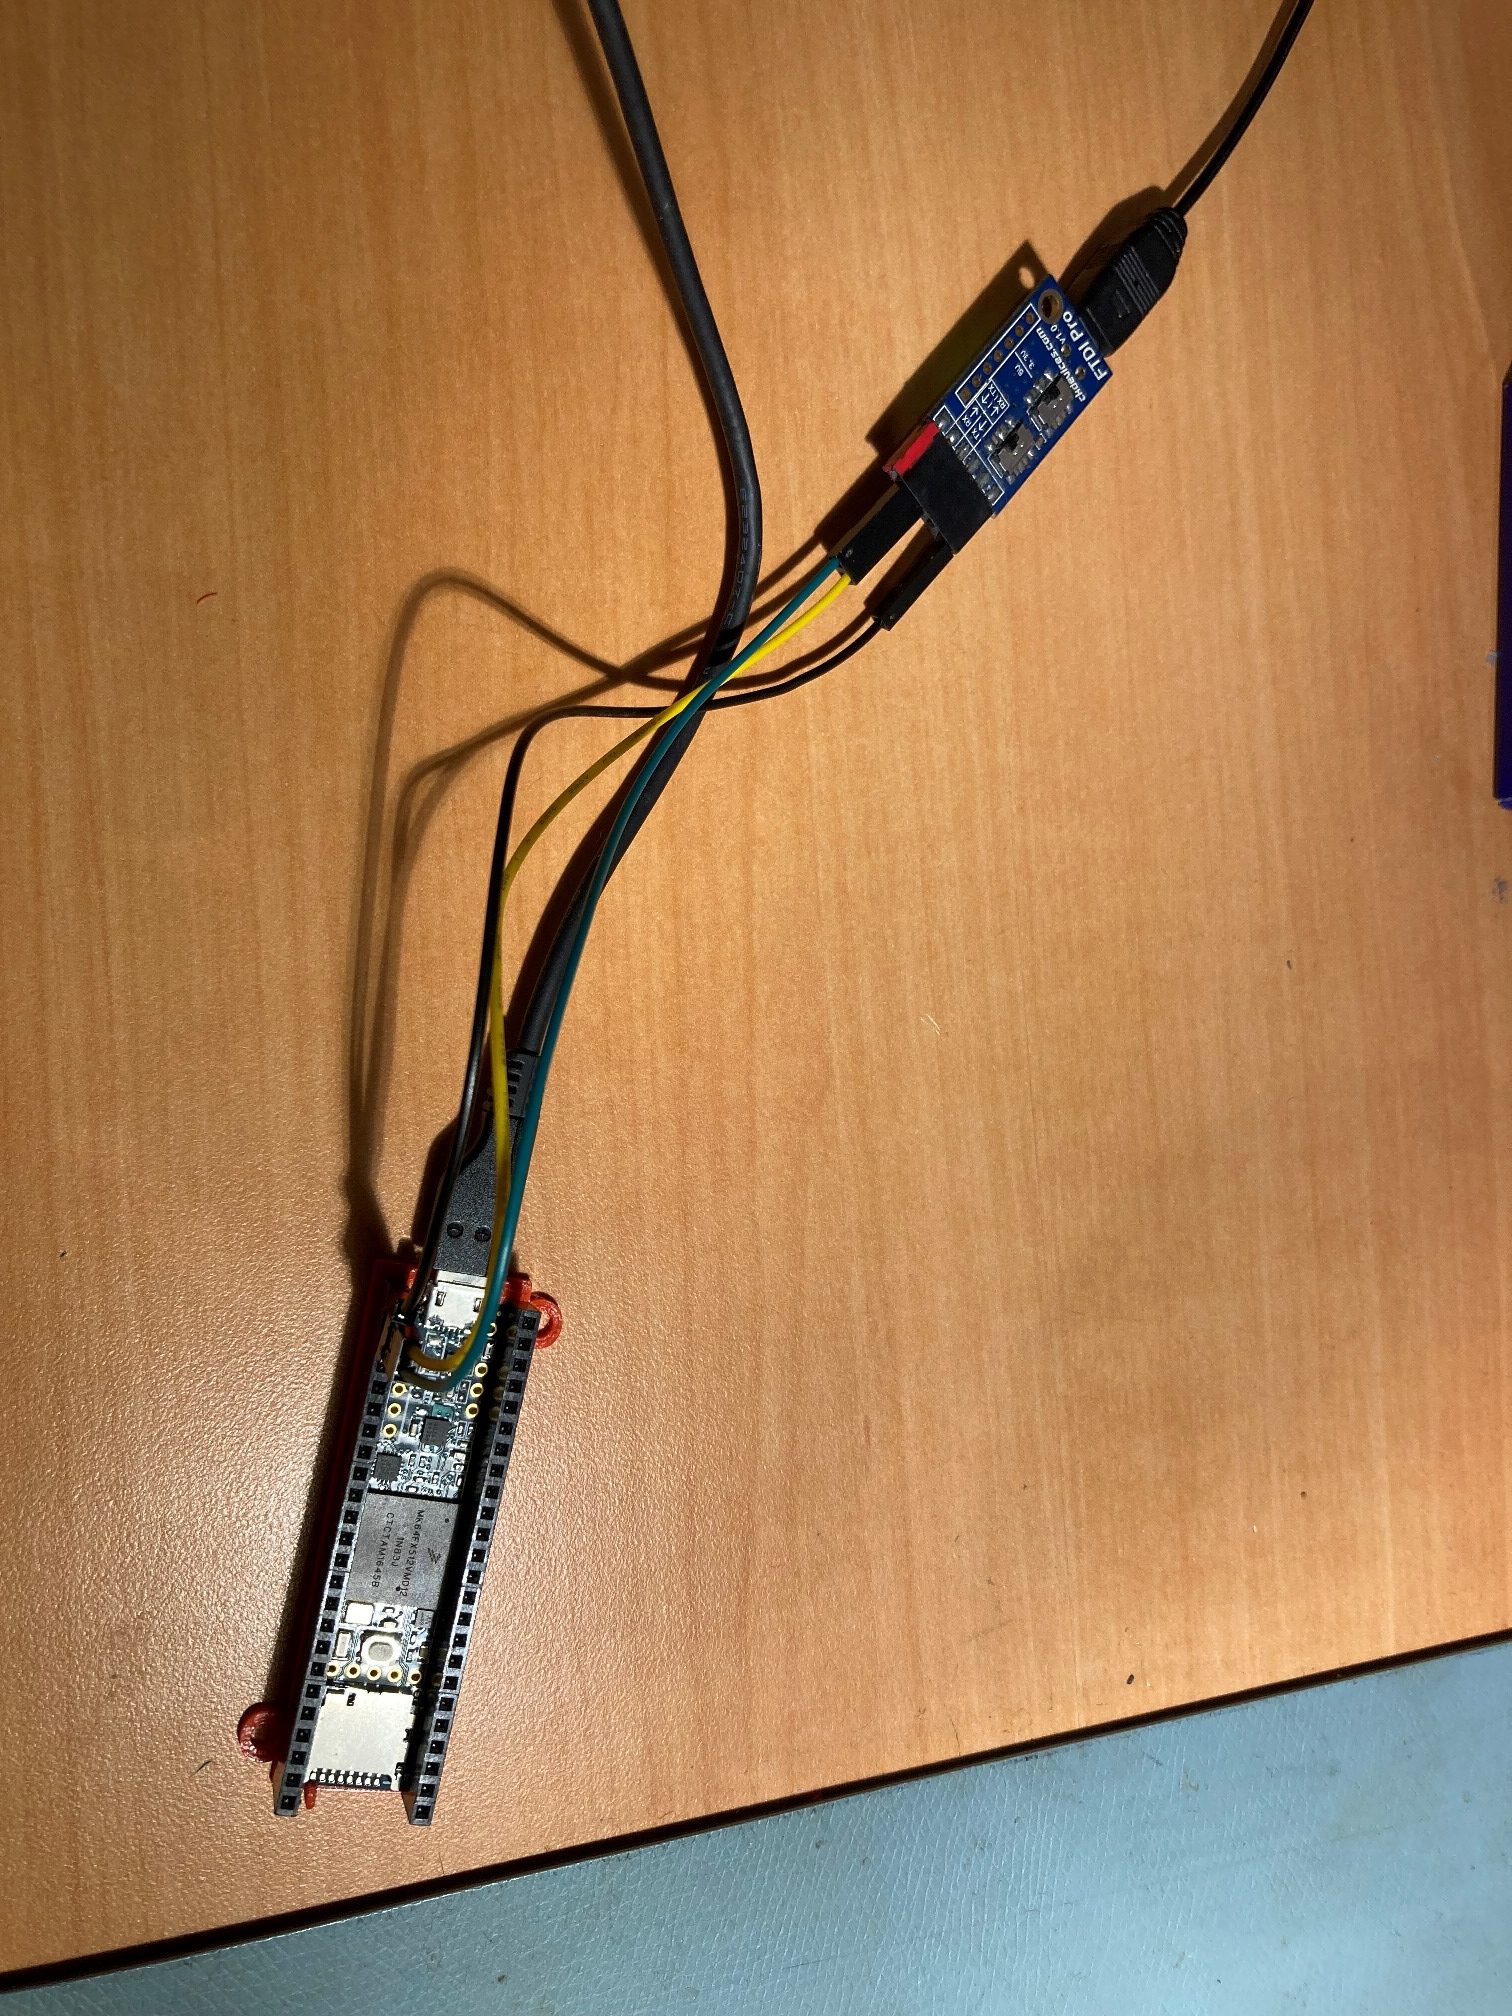
In the above photo, the normal USB connection provides 5V power for the Teensy, and also allows ‘direct’ programming via the normal VS2019/VM route. The FTDI module connection shows up as COM3, a ‘regular’ USB serial port. With this setup I was able to upload a .HEX file to the Teensy using Tera Term, confirming that I can indeed use a hardware serial port for this purpose.
04 October Update:
Between the last update and now, I spent a lot of time trying to get the command-line post-build console app working, mostly to no avail. I kept getting wrapped around the axle trying to deal with three different serial connections; two to the teensy itself, and one from the command-line app to VS2019’s Console service. This got to the point where at one time the ‘Console’ output was going to my computer display, which made the mouse jump around wildly, occasionally launching or closing apps! Even trying to restart the PC was a trial-and-error process, because about half the time the screen focus would jump away from the target button before I could get it clicked!
So, I decided to go back to basics and use just the FTDI serial adaptor to run the Teensy. This required using the Vcc connection from the FTDI module to power the Teensy, which worked OK once I figured out how to switch the FTDI module from 3.3V out to 5V out.
With this setup I am able to upload programs to the Teensy using Tera Term, as before, but now I don’t have the other USB connection to confuse things. It does mean however, that now I MUST use Tera Term to upload sketches, as I no longer have the capability to use the Teensy bootloader from VS2019.
With this simpler setup, ‘Console’ statements from the command-line app should go only to the VS2019 debug session, and serial port operations from the command-line app should go only to Teensy’s ‘serial1’ hardware serial port.
05 October 2021 Update:
I expanded the above operation to restore the USB connection to the PC, and created a small Arduino program to (at first) just echo serial data from one serial port to the other. Here’s the program:
|
1 2 3 4 5 6 7 8 9 10 11 12 13 14 15 16 17 18 19 20 21 22 23 24 25 26 27 28 29 30 31 32 33 |
void setup() { Serial.begin(115200); while (!Serial) {} Serial1.begin(115200); while (!Serial1) {} pinMode(LED_BUILTIN, OUTPUT); Serial.printf("\nFlasherX OTA firmware update v1 %s %s\n", __DATE__, __TIME__); MsecSinceLastLEDToggle = 0; } void loop() { if (Serial.available()) { Serial1.write(Serial.read()); } if (Serial1.available()) { Serial.write(Serial1.read()); } if (MsecSinceLastLEDToggle >= 200) { MsecSinceLastLEDToggle -= 200; digitalWrite(LED_BUILTIN, !digitalRead(LED_BUILTIN)); } } |
Once I had this going to my satisfaction, I started adding pieces from my ‘TeensyFlashDemoV2’ project until I had a complete working program, as shown below:
Here’s the Arduino code:
|
1 2 3 4 5 6 7 8 9 10 11 12 13 14 15 16 17 18 19 20 21 22 23 24 25 26 27 28 29 30 31 32 33 34 35 36 37 38 39 40 41 42 43 44 45 46 47 48 49 50 51 52 53 54 55 56 57 58 59 60 61 62 63 64 65 66 67 68 69 70 71 72 73 74 75 76 77 78 79 80 81 82 83 84 85 86 87 88 89 90 91 92 93 94 95 96 97 98 99 100 101 102 103 104 105 106 107 108 109 110 111 112 113 114 115 116 117 118 119 120 121 122 123 124 125 126 127 128 129 130 131 132 133 134 135 136 137 138 139 140 141 142 143 144 145 146 147 148 149 150 151 152 153 154 155 156 157 158 159 160 161 162 163 164 165 166 167 168 169 170 171 172 173 174 175 176 177 178 179 180 181 182 183 184 185 186 187 188 189 190 191 192 193 194 195 196 197 198 199 200 201 202 203 204 205 206 207 208 209 210 211 212 213 214 215 216 217 218 219 220 221 222 223 224 225 226 227 228 229 230 231 232 233 234 235 236 237 238 239 240 241 242 243 244 245 246 247 248 249 250 251 252 253 254 255 256 257 258 259 260 261 262 263 264 265 266 267 268 269 270 271 272 273 274 275 276 277 278 279 280 281 282 283 284 285 286 287 288 289 290 291 292 293 294 295 296 297 298 299 300 301 302 303 304 305 306 307 308 309 310 311 312 313 314 315 316 317 318 319 320 321 322 323 324 325 326 327 328 329 330 331 332 333 334 335 336 337 338 339 340 341 342 343 344 345 346 347 348 349 350 351 352 353 354 355 356 357 358 359 360 361 362 363 364 365 366 367 |
/* Name: TeensySerialBridgeV1.ino Created: 10/4/2021 5:07:47 PM Author: FRANKNEWXPS15\Frank */ #include "FlashTxx.h" // TLC/T3x/T4x flash primitives #include <elapsedMillis.h> elapsedMillis MsecSinceLastLEDToggle; Stream* FTDIport = &Serial1; // Serial (USB) or Serial1, Serial2, etc. (UART) Stream* USBport = &Serial1; // Serial (USB) or Serial1, Serial2, etc. (UART) //****************************************************************************** // hex_info_t struct for hex record and hex file info //****************************************************************************** typedef struct { // char* data; // pointer to array allocated elsewhere unsigned int addr; // address in intel hex record unsigned int code; // intel hex record type (0=data, etc.) unsigned int num; // number of data bytes in intel hex record uint32_t base; // base address to be added to intel hex 16-bit addr uint32_t min; // min address in hex file uint32_t max; // max address in hex file int eof; // set true on intel hex EOF (code = 1) int lines; // number of hex records received } hex_info_t; void read_ascii_line(Stream* serial, char* line, int maxbytes); int parse_hex_line(const char* theline, char* bytes, unsigned int* addr, unsigned int* num, unsigned int* code); int process_hex_record(hex_info_t* hex); void update_firmware(Stream* serial, uint32_t buffer_addr, uint32_t buffer_size); uint32_t buffer_addr, buffer_size; //09/20/21 copied from FlasherX - loop() void setup() { Serial.begin(115200); while (!Serial) {} Serial1.begin(115200); while (!Serial1) {} pinMode(LED_BUILTIN, OUTPUT); Serial.printf("\nFlasherX OTA firmware update v1 %s %s\n", __DATE__, __TIME__); MsecSinceLastLEDToggle = 0; } void loop() { if (Serial.available()) { Serial1.write(Serial.read()); } if (Serial1.available()) { //Serial.println("Got something from Serial1!"); CheckForUserInput(); Serial.write(Serial1.read()); } if (MsecSinceLastLEDToggle >= 200) { MsecSinceLastLEDToggle -= 200; digitalWrite(LED_BUILTIN, !digitalRead(LED_BUILTIN)); //Serial.printf("."); } } void CheckForUserInput() { const int bufflen = 80; char buff[bufflen]; memset(buff, 0, bufflen); //const char s[2] = ","; //if (Serial.available() > 0) if (Serial1.available() > 0) { // read the incoming byte: int incomingByte = Serial1.read(); // say what you got: Serial1.print("I received: "); Serial1.println(incomingByte, HEX); //chg to HEX 02/18/20 //02/18/20 experiment with multiple commands switch (incomingByte) { case 0x43: //ASCII 'C' case 0x63: //ASCII 'c' Serial1.println(F("Start Program Update - Send new HEX file!")); //09/20/21 copied from FlasherX - loop() if (firmware_buffer_init(&buffer_addr, &buffer_size) == 0) { Serial1.printf("unable to create buffer\n"); Serial1.flush(); for (;;) {} } Serial1.printf("buffer = %1luK %s (%08lX - %08lX)\n", buffer_size / 1024, IN_FLASH(buffer_addr) ? "FLASH" : "RAM", buffer_addr, buffer_addr + buffer_size); //09/20/21 clear the serial buffer while (Serial1.available()) { Serial1.read(); } // receive hex file via serial, write new firmware to flash, clean up, reboot update_firmware(&Serial1, buffer_addr, buffer_size); // no return if success // return from update_firmware() means error or user abort, so clean up and // reboot to ensure that static vars get boot-up initialized before retry Serial1.printf("erase FLASH buffer / free RAM buffer...\n"); firmware_buffer_free(buffer_addr, buffer_size); Serial1.flush(); REBOOT; break; } } } //09/20/21 copied from FlasherX //****************************************************************************** // update_firmware() read hex file and write new firmware to program flash //****************************************************************************** void update_firmware(Stream* serial, uint32_t buffer_addr, uint32_t buffer_size) { static char line[96]; // buffer for hex lines static char data[32] __attribute__((aligned(8))); // buffer for hex data hex_info_t hex = { // intel hex info struct data, 0, 0, 0, // data,addr,num,code 0, 0xFFFFFFFF, 0, // base,min,max, 0, 0 // eof,lines }; serial->printf("waiting for hex lines...\n"); // read and process intel hex lines until EOF or error while (!hex.eof) { read_ascii_line(serial, line, sizeof(line)); //10/02/21 gfp added for visual xfer confirmation if (hex.lines % 10 == 0) { digitalWriteFast(LED_BUILTIN, !digitalReadFast(LED_BUILTIN)); } // reliability of transfer via USB is improved by this printf/flush if (serial == (Stream*)&Serial) { serial->printf("%s\n", line); serial->flush(); } if (parse_hex_line((const char*)line, hex.data, &hex.addr, &hex.num, &hex.code) == 0) { serial->printf("abort - bad hex line %s\n", line); return; } else if (process_hex_record(&hex) != 0) { // error on bad hex code serial->printf("abort - invalid hex code %d\n", hex.code); return; } else if (hex.code == 0) { // if data record uint32_t addr = buffer_addr + hex.base + hex.addr - FLASH_BASE_ADDR; if (hex.max > (FLASH_BASE_ADDR + buffer_size)) { serial->printf("abort - max address %08lX too large\n", hex.max); return; } else if (!IN_FLASH(buffer_addr)) { memcpy((void*)addr, (void*)hex.data, hex.num); } else if (IN_FLASH(buffer_addr)) { int error = flash_write_block(addr, hex.data, hex.num); if (error) { serial->printf("abort - error %02X in flash_write_block()\n", error); return; } } } hex.lines++; } serial->printf("\nhex file: %1d lines %1lu bytes (%08lX - %08lX)\n", hex.lines, hex.max - hex.min, hex.min, hex.max); // check FSEC value in new code -- abort if incorrect #if defined(KINETISK) || defined(KINETISL) uint32_t value = *(uint32_t*)(0x40C + buffer_addr); if (value == 0xfffff9de) { serial->printf("new code contains correct FSEC value %08lX\n", value); } else { serial->printf("abort - FSEC value %08lX should be FFFFF9DE\n", value); return; } #endif // check FLASH_ID in new code - abort if not found if (check_flash_id(buffer_addr, hex.max - hex.min)) { serial->printf("new code contains correct target ID %s\n", FLASH_ID); } else { serial->printf("abort - new code missing string %s\n", FLASH_ID); return; } // get user input to write to flash or abort int user_lines = -1; while (user_lines != hex.lines && user_lines != 0) { serial->printf("enter %d to flash or 0 to abort\n", hex.lines); read_ascii_line(serial, line, sizeof(line)); sscanf(line, "%d", &user_lines); } if (user_lines == 0) { serial->printf("abort - user entered 0 lines\n"); return; } // move new program from buffer to flash, free buffer, and reboot flash_move(FLASH_BASE_ADDR, buffer_addr, hex.max - hex.min); // should not return from flash_move(), but put REBOOT here as reminder REBOOT; } //****************************************************************************** // read_ascii_line() read ascii characters until '\n', '\r', or max bytes //****************************************************************************** void read_ascii_line(Stream* serial, char* line, int maxbytes) { int c = 0, nchar = 0; while (nchar < maxbytes && !(c == '\n' || c == '\r')) { if (serial->available()) { c = serial->read(); line[nchar++] = c; } } line[nchar - 1] = 0; // null-terminate } //****************************************************************************** // process_hex_record() process record and return okay (0) or error (1) //****************************************************************************** int process_hex_record(hex_info_t* hex) { if (hex->code == 0) { // data -- update min/max address so far if (hex->base + hex->addr + hex->num > hex->max) hex->max = hex->base + hex->addr + hex->num; if (hex->base + hex->addr < hex->min) hex->min = hex->base + hex->addr; } else if (hex->code == 1) { // EOF (:flash command not received yet) hex->eof = 1; } else if (hex->code == 2) { // extended segment address (top 16 of 24-bit addr) hex->base = ((hex->data[0] << 8) | hex->data[1]) << 4; } else if (hex->code == 3) { // start segment address (80x86 real mode only) return 1; } else if (hex->code == 4) { // extended linear address (top 16 of 32-bit addr) hex->base = ((hex->data[0] << 8) | hex->data[1]) << 16; } else if (hex->code == 5) { // start linear address (32-bit big endian addr) hex->base = (hex->data[0] << 24) | (hex->data[1] << 16) | (hex->data[2] << 8) | (hex->data[3] << 0); } else { return 1; } return 0; } //****************************************************************************** // Intel Hex record foramt: // // Start code: one character, ASCII colon ':'. // Byte count: two hex digits, number of bytes (hex digit pairs) in data field. // Address: four hex digits // Record type: two hex digits, 00 to 05, defining the meaning of the data field. // Data: n bytes of data represented by 2n hex digits. // Checksum: two hex digits, computed value used to verify record has no errors. // // Examples: // :10 9D30 00 711F0000AD38000005390000F5460000 35 // :04 9D40 00 01480000 D6 // :00 0000 01 FF //****************************************************************************** /* Intel HEX read/write functions, Paul Stoffregen, paul@ece.orst.edu */ /* This code is in the public domain. Please retain my name and */ /* email address in distributed copies, and let me know about any bugs */ /* I, Paul Stoffregen, give no warranty, expressed or implied for */ /* this software and/or documentation provided, including, without */ /* limitation, warranty of merchantability and fitness for a */ /* particular purpose. */ // type modifications by Jon Zeeff /* parses a line of intel hex code, stores the data in bytes[] */ /* and the beginning address in addr, and returns a 1 if the */ /* line was valid, or a 0 if an error occured. The variable */ /* num gets the number of bytes that were stored into bytes[] */ #include <stdio.h> // sscanf(), etc. #include <string.h> // strlen(), etc. int parse_hex_line(const char* theline, char* bytes, unsigned int* addr, unsigned int* num, unsigned int* code) { unsigned sum, len, cksum; const char* ptr; int temp; *num = 0; if (theline[0] != ':') return 0; if (strlen(theline) < 11) return 0; ptr = theline + 1; if (!sscanf(ptr, "%02x", &len)) return 0; ptr += 2; if (strlen(theline) < (11 + (len * 2))) return 0; if (!sscanf(ptr, "%04x", (unsigned int*)addr)) return 0; ptr += 4; /* Serial.printf("Line: length=%d Addr=%d\n", len, *addr); */ if (!sscanf(ptr, "%02x", code)) return 0; ptr += 2; sum = (len & 255) + ((*addr >> 8) & 255) + (*addr & 255) + (*code & 255); while (*num != len) { if (!sscanf(ptr, "%02x", &temp)) return 0; bytes[*num] = temp; ptr += 2; sum += bytes[*num] & 255; (*num)++; if (*num >= 256) return 0; } if (!sscanf(ptr, "%02x", &cksum)) return 0; if (((sum & 255) + (cksum & 255)) & 255) return 0; /* checksum error */ return 1; } |
and here is the companion C# command-line app:
|
1 2 3 4 5 6 7 8 9 10 11 12 13 14 15 16 17 18 19 20 21 22 23 24 25 26 27 28 29 30 31 32 33 34 35 36 37 38 39 40 41 42 43 44 45 46 47 48 49 50 51 52 53 54 55 56 57 58 59 60 61 62 63 64 65 66 67 68 69 70 71 72 73 74 75 76 77 78 79 80 81 82 83 84 85 86 87 88 89 90 91 92 93 94 95 96 97 98 99 100 101 102 103 104 105 106 107 108 109 110 111 112 113 114 115 116 117 118 119 120 121 122 123 124 125 126 127 128 129 130 131 132 133 134 135 136 137 138 139 140 141 142 143 144 145 146 147 148 149 150 151 152 153 154 155 156 157 158 159 160 161 162 163 164 165 166 167 168 169 170 171 172 173 174 175 176 177 178 179 180 181 182 183 184 185 186 187 188 189 190 191 192 193 194 195 196 197 198 199 200 201 202 203 204 205 206 207 208 209 210 211 212 213 214 215 216 217 218 219 220 |
using System; using System.IO.Ports; using System.Threading; using System.Timers; /* Small console app to facilitate over-the-air (OTA) updates to a Teensy 3.x/4.x controller. This app is called by a post-build 'hook' statement located in whatever Teensy program is being updated. This app does the following: - Extract the project path and selected COMPORT number from the arguments to the call to Main() - Opens a UART serial port connection to the Teensy, typically one provided by a BT adaptor operating in 'pass-through' mode. The serial port COMPORT number is passed into this app as an argument. - Sends whatever command is required to put the existing Teensy firmware into 'update' mode - Using the path of the updating program (passed in as an argument), locate the .HEX file associated with the project, and send it's contents to the Teensy, one line at a time, counting lines and confirming checksums line-by-line - Compare the number of bytes sent to the Teensy with the number of bytes received by the Teensy, and if there is a match, allow the Teensy update process to complete; otherwise abort */ namespace TeensyFlash { class Program { const string startCmdStr = "C"; //used in 'GetUserInput()' to start upload sequence static string rcvStr = string.Empty; private static System.Timers.Timer aTimer; private static bool bTimedOut; static void Main(string[] args) { //Extract the build path and selected COMPORT number from the arguments to the call to Main() Console.WriteLine("Teensy Flash Console"); Console.WriteLine("Number of arguments in args = {0}\n", args.Length); int argindex = 0; string comPortStr = string.Empty; foreach (var item in args) { Console.WriteLine(item); if (item.Contains("COM")) { comPortStr = args[argindex]; } argindex++; } string build_path = args[0]; //string projectName = args[args.Length - 1]; //projectName = projectName.Substring(0, projectName.Length - 4); //remove extension string projectName = "TeensyFlashDemoV2"; build_path = build_path.Replace("\"", string.Empty).Trim(); Console.WriteLine("path = {0}", build_path); Console.WriteLine("comport = {0}", comPortStr); Console.WriteLine("build name = {0}", projectName); Console.WriteLine("path to HEX file = {0}", build_path + "\\" + projectName + ".hex"); //Find and open .HEX file - maybe pre-process to confirm checksums and get number of bytes. string[] lines = System.IO.File.ReadAllLines(build_path + "\\" + projectName + ".hex"); int numlines = 0; int numbytes = 0; //Console.WriteLine("No\t\t\t\t\tLine\t\t\t\t\tChk\tBytes\n"); //foreach (string item in lines) //{ // numlines++; // string line = item.Replace(":", string.Empty).Trim(); // numbytes += (line.Length - 2) / 2; // Console.WriteLine("{0}:{1} {2} {3}",numlines, line, chksum(line), numbytes); //} //Open UART serial port connection to the Teensy, typically one provided by a BT adaptor //Send whatever command is required to put the existing Teensy firmware into 'update' mode try { SerialPort _serport = new SerialPort(comPortStr, 115200); _serport.Open(); _serport.DiscardOutBuffer(); _serport.DiscardInBuffer(); _serport.DataReceived += new SerialDataReceivedEventHandler(ResponseHandler); Thread.Sleep(100); Console.WriteLine(startCmdStr); _serport.Write(startCmdStr); rcvStr = string.Empty; aTimer = new System.Timers.Timer(); aTimer.Interval = 5000; aTimer.Elapsed += OnTimedEvent; aTimer.Start(); while (!rcvStr.Contains("waiting") && !bTimedOut) { Thread.Sleep(100); } aTimer.Stop(); //aTimer.Dispose(); if (bTimedOut) { Console.WriteLine("Timed out waiting for response from Teensy"); } else { //if we get to here, the Teensy is ready to receive HEX file contents //Console.WriteLine("Got "+ rcvStr + "from Teensy"); Thread.Sleep(500); numlines = 0; foreach (string item in lines) { numlines++; Console.WriteLine(item); _serport.WriteLine(item); } Console.WriteLine("total lines = {0}", numlines); //now we wait for Teensy to emit "hex file: xx lines xx bytes..." and then "enter xx to flash..." //aTimer.Start(); while (!rcvStr.Contains("hex file:") && !bTimedOut) { Thread.Sleep(100); } aTimer.Stop(); //aTimer.Dispose(); if (bTimedOut) { Console.WriteLine("Timed out waiting for response from Teensy"); } else { //extract number of lines from Teensy string, and compare with numlines. //If they match, then send the number back to Teensy to complete the update. //Otherwise, send '0' to abort int colonIdx = rcvStr.IndexOf(':'); int lineIdx = rcvStr.IndexOf("lines"); string compareStr = rcvStr.Substring(colonIdx+1, lineIdx - colonIdx-1); compareStr = compareStr.Trim(); int numTeensyLines = Convert.ToInt16(compareStr); if (numTeensyLines == numlines) { Console.WriteLine("numlines {0} matches numTeensyLines {1} - send confirmation", numlines, numTeensyLines); _serport.WriteLine(compareStr); } } //Send [project_name].Hex file to the Teensy, confirming checksum and counting lines //If sent bytes match received bytes, allow the update to complete. } } catch (Exception exc) { Console.WriteLine(exc.Message); }// end CATCH portion of TRY/CATCH block } private static void ResponseHandler(object sender, SerialDataReceivedEventArgs args) { //Console.WriteLine("In ResponseHandler"); SerialPort sp = (SerialPort)sender; rcvStr = sp.ReadExisting(); Console.WriteLine(rcvStr); //rcvStr = string.Empty; sp.DiscardInBuffer(); //Environment.Exit(0); } static string chksum(string input) { int TwosComplement(string s) { if (s.Length % 2 != 0) throw new FormatException(nameof(input)); var checksum = 0; for (var i = 0; i < s.Length; i += 2) { var value = int.Parse(s.Substring(i, 2), System.Globalization.NumberStyles.AllowHexSpecifier); checksum = (checksum + value) & 0xFF; } return 256 - checksum & 0xFF; } //return string.Concat(":", input, " ", TwosComplement(input).ToString("X2")); return TwosComplement(input).ToString("X2"); } private static void SetTimer() { // Create a timer with a two second interval. aTimer = new System.Timers.Timer(2000); // Hook up the Elapsed event for the timer. aTimer.Elapsed += OnTimedEvent; //aTimer.AutoReset = true; aTimer.Enabled = true; } private static void OnTimedEvent(Object source, ElapsedEventArgs e) { Console.WriteLine("The Elapsed event was raised at {0:HH:mm:ss.fff}", e.SignalTime); bTimedOut = true; } } } |
And here is the command-line output from my last run:
|
1 2 3 4 5 6 7 8 9 10 11 12 13 14 15 16 17 18 19 20 21 22 23 24 25 26 27 28 29 30 31 32 33 34 35 36 37 38 39 40 41 42 43 44 45 46 47 48 49 50 51 52 53 54 55 56 57 58 59 60 61 62 63 64 65 66 |
Teensy Flash Console Number of arguments in args = 2 C:\Users\Frank\Documents\Arduino\TeensyFlashDemoV2\Release COM3 path = C:\Users\Frank\Documents\Arduino\TeensyFlashDemoV2\Release comport = COM3 build name = TeensyFlashDemoV2 path to HEX file = C:\Users\Frank\Documents\Arduino\TeensyFlashDemoV2\Release\TeensyFlashDemoV2.hex C I received: 43 Start Program Update - Send new HEX file! buffer = 460K FLASH (0000D000 - 00080000) waiting for hex lines... :10000000F8FF022099010000850C00003D0C000063 :100010003D0C00003D0C00003D0C00003D0C0000BC :100020003D0C00003D0C00003D0C0000850C000064 :10003000850C00003D0C0000952000009920000078 :10004000850C0000850C0000850C0000850C00006C ... ... ... :10B80C005011FF1F5011FF1F5811FF1F5811FF1F20 :10B81C006011FF1F6011FF1F6811FF1F6811FF1FD0 :10B82C007011FF1F7011FF1F7811FF1F7811FF1F80 :10B83C008011FF1F8011FF1F8811FF1F8811FF1F30 :10B84C009011FF1F9011FF1F9811FF1F9811FF1FE0 :10B85C00A011FF1FA011FF1FA811FF1FA811FF1F90 :10B86C00B011FF1FB011FF1FB811FF1FB811FF1F40 :10B87C00C011FF1FC011FF1FC811FF1FC811FF1FF0 :10B88C00D011FF1FD011FF1FD811FF1FD811FF1FA0 :10B89C00E011FF1FE011FF1FE811FF1FE811FF1F50 :10B8AC00F011FF1FF011FF1FF811FF1FF811FF1F00 :10B8BC000012FF1F0012FF1F0812FF1F0812FF1FAC :10B8CC001012FF1F1012FF1F1812FF1F1812FF1F5C :10B8DC002012FF1F2012FF1F2812FF1F2812FF1F0C :10B8EC003012FF1F3012FF1F3812FF1F3812FF1FBC :10B8FC004012FF1F4012FF1F4812FF1F4812FF1F6C :10B90C005012FF1F5012FF1F5812FF1F5812FF1F1B :10B91C006012FF1F6012FF1F6812FF1F6812FF1FCB :10B92C007012FF1F7012FF1F7812FF1F7812FF1F7B :10B93C008012FF1F8012FF1F8812FF1F8812FF1F2B :10B94C009012FF1F9012FF1F9812FF1F9812FF1FDB :10B95C00A012FF1FA012FF1FA812FF1FA812FF1F8B :10B96C00B012FF1FB012FF1FB812FF1FB812FF1F3B :10B97C00C012FF1FC012FF1FC812FF1FC812FF1FEB :10B98C00D012FF1FD012FF1FD812FF1FD812FF1F9B :10B99C00E012FF1FE012FF1FE812FF1FE812FF1F4B :10B9AC00F012FF1FF012FF1FF812FF1FF812FF1FFB :10B9BC000013FF1F0013FF1F0813FF1F0813FF1FA7 :10B9CC001013FF1F1013FF1F1813FF1F1813FF1F57 :10B9DC002013FF1F2013FF1F00000200FFFFFFFFBB :00000001FF total lines = 2977 hex file: 2977 lines 47596 bytes (00000000 - 0000B9EC) new code contains correct FSEC value FFFFF9DE new code contains correct target ID fw_teensy35 enter 2977 to flash or 0 to abort numlines 2977 matches numTeensyLines 2977 - send confirmation C:\Users\Frank\Documents\Visual Studio 2019\Projects\TeensyFlash\bin\Debug\netcoreapp3.1\TeensyFlash.exe (process 6548) exited with code 0. To automatically close the console when debugging stops, enable Tools->Options->Debugging->Automatically close the console when debugging stops. Press any key to close this window . . . |
In the above printout, most of the HEX lines were removed just to keep the line count down, but all 2977 lines were successfully sent to the Teensy. The lines
|
1 2 3 4 |
hex file: 2977 lines 47596 bytes (00000000 - 0000B9EC) new code contains correct FSEC value FFFFF9DE new code contains correct target ID fw_teensy35 enter 2977 to flash or 0 to abort |
were emitted from the Teensy at the conclusion of the HEX file upload. The line
|
1 |
numlines 2977 matches numTeensyLines 2977 - send confirmation |
was from the command-line app comparing the number of lines sent with the number of lines received. The numbers matched, so ‘2977’ was sent to the Teensy to complete the update.
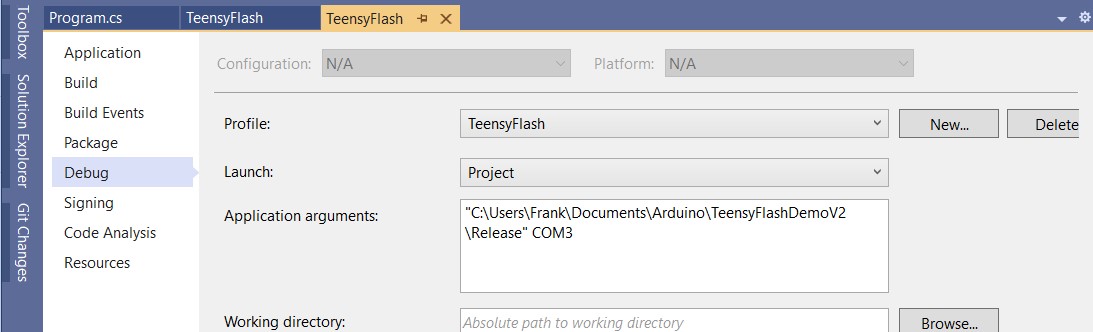
At this point I have a working automated update system except the COM port number and HEX file location was passed to the C# program as a set of fixed arguments (as shown below), to disconnect the command-line app from the Arduino sketch, instead of dynamically providing the same parameters from VM build properties
Now that I have some confidence that the command-line app does what it is supposed to do, I can go back and make that connection again, hopefully with better results this time.
A problem with the Arduino-to-C# command-line app is that the ‘build properties’ exposed by Visual Micro aren’t always the same, so what works for one sketch may or may not work for another. Here’s the ‘build properties’ output from my expanded ‘TeensySerialBridgeV1.ino’ file:
|
1 2 3 4 5 6 7 8 9 10 11 12 13 14 15 16 17 18 19 20 21 22 23 24 25 26 27 28 29 30 31 32 33 34 35 36 37 38 39 40 41 42 43 44 45 46 47 48 49 50 51 52 53 54 55 56 57 58 59 60 61 62 63 64 65 66 67 68 69 70 71 72 73 74 75 76 77 78 79 80 81 82 83 84 85 86 87 88 89 90 91 92 93 94 95 96 97 98 99 100 101 102 103 104 105 106 107 108 109 110 111 112 113 114 115 116 117 118 119 120 121 122 123 124 125 126 127 128 129 130 131 132 133 134 135 136 137 138 139 140 141 142 143 144 145 146 147 148 149 150 151 152 153 154 155 156 157 158 159 160 161 162 163 164 165 166 167 168 169 170 171 172 173 174 175 176 177 178 179 180 181 182 183 184 185 186 187 188 189 190 191 192 193 194 195 196 197 198 199 200 201 202 203 204 205 206 207 208 209 210 211 212 213 214 215 216 217 218 219 220 221 222 223 224 225 226 227 228 229 230 231 232 233 234 235 236 237 238 239 240 241 242 243 244 245 246 247 248 249 250 251 252 253 254 255 256 257 258 259 260 261 262 263 264 265 266 267 268 269 270 271 272 273 274 275 276 277 278 279 280 281 282 283 284 285 286 287 288 289 290 291 292 293 294 295 296 297 298 299 300 301 302 303 304 305 306 307 308 309 310 311 312 313 314 315 316 317 318 319 320 321 322 323 324 325 326 327 328 329 330 331 332 333 334 335 336 337 338 339 340 341 342 343 344 345 346 347 348 349 350 351 352 353 354 355 356 357 358 359 360 361 362 363 364 365 366 367 368 369 370 371 372 373 374 375 376 377 378 379 380 381 382 383 384 385 386 387 388 389 390 391 392 393 394 395 396 397 398 399 400 401 402 403 404 405 406 407 408 409 410 411 412 413 414 415 416 417 418 419 420 421 422 423 424 425 426 427 428 429 430 431 432 433 434 435 436 437 438 439 440 441 442 443 444 445 446 447 448 449 450 451 452 453 454 455 456 457 458 459 460 461 462 463 464 465 466 467 468 469 470 471 472 473 474 475 476 477 478 479 480 481 482 483 484 485 486 487 488 489 490 491 492 493 494 495 496 497 498 499 500 501 502 503 504 505 506 507 508 509 510 511 512 513 514 515 516 517 518 519 520 521 522 523 524 525 526 527 528 529 530 531 532 533 534 535 536 537 538 539 540 541 542 543 544 545 546 547 548 549 550 551 552 553 554 555 556 557 558 559 560 561 562 563 564 565 566 567 568 569 570 571 572 573 574 575 576 577 578 579 580 581 582 583 584 585 586 587 588 589 590 591 592 593 594 595 596 597 598 599 600 601 602 603 604 605 606 607 608 609 610 611 612 613 614 615 616 617 618 619 620 621 622 623 624 625 626 627 628 629 630 631 632 633 |
Board Properties name=Teensy 3.5 upload.maximum_size=524288 upload.maximum_data_size=262136 upload.tool=teensyloader upload.protocol=halfkay build.board=TEENSY35 build.core=teensy3 build.mcu=mk64fx512 build.warn_data_percentage=98 build.toolchain=arm/bin/ build.command.gcc=arm-none-eabi-gcc build.command.g++=arm-none-eabi-g++ build.command.ar=arm-none-eabi-gcc-ar build.command.objcopy=arm-none-eabi-objcopy build.command.objdump=arm-none-eabi-objdump build.command.linker=arm-none-eabi-gcc build.command.size=arm-none-eabi-size build.flags.common=-g -Wall -ffunction-sections -fdata-sections -nostdlib build.flags.dep=-MMD build.flags.optimize=-O2 build.flags.cpu=-mthumb -mcpu=cortex-m4 -mfloat-abi=hard -mfpu=fpv4-sp-d16 -fsingle-precision-constant build.flags.defs=-D__MK64FX512__ -DTEENSYDUINO=153 build.flags.cpp=-fno-exceptions -fpermissive -felide-constructors -std=gnu++14 -Wno-error=narrowing -fno-rtti build.flags.c= build.flags.S=-x assembler-with-cpp build.flags.ld=-Wl,--gc-sections,--relax,--defsym=__rtc_localtime={extra.time.local} "-T{build.core.path}/mk64fx512.ld" build.flags.libs=-larm_cortexM4lf_math -lm -lstdc++ serial.restart_cmd=false menu.usb.serial=Serial menu.usb.serial.build.usbtype=USB_SERIAL menu.usb.serial2=Dual Serial menu.usb.serial2.build.usbtype=USB_DUAL_SERIAL menu.usb.serial3=Triple Serial menu.usb.serial3.build.usbtype=USB_TRIPLE_SERIAL menu.usb.keyboard=Keyboard menu.usb.keyboard.build.usbtype=USB_KEYBOARDONLY menu.usb.keyboard.fake_serial=teensy_gateway menu.usb.touch=Keyboard + Touch Screen menu.usb.touch.build.usbtype=USB_TOUCHSCREEN menu.usb.touch.fake_serial=teensy_gateway menu.usb.hidtouch=Keyboard + Mouse + Touch Screen menu.usb.hidtouch.build.usbtype=USB_HID_TOUCHSCREEN menu.usb.hidtouch.fake_serial=teensy_gateway menu.usb.hid=Keyboard + Mouse + Joystick menu.usb.hid.build.usbtype=USB_HID menu.usb.hid.fake_serial=teensy_gateway menu.usb.serialhid=Serial + Keyboard + Mouse + Joystick menu.usb.serialhid.build.usbtype=USB_SERIAL_HID menu.usb.midi=MIDI menu.usb.midi.build.usbtype=USB_MIDI menu.usb.midi.fake_serial=teensy_gateway menu.usb.midi4=MIDIx4 menu.usb.midi4.build.usbtype=USB_MIDI4 menu.usb.midi4.fake_serial=teensy_gateway menu.usb.midi16=MIDIx16 menu.usb.midi16.build.usbtype=USB_MIDI16 menu.usb.midi16.fake_serial=teensy_gateway menu.usb.serialmidi=Serial + MIDI menu.usb.serialmidi.build.usbtype=USB_MIDI_SERIAL menu.usb.serialmidi4=Serial + MIDIx4 menu.usb.serialmidi4.build.usbtype=USB_MIDI4_SERIAL menu.usb.serialmidi16=Serial + MIDIx16 menu.usb.serialmidi16.build.usbtype=USB_MIDI16_SERIAL menu.usb.audio=Audio menu.usb.audio.build.usbtype=USB_AUDIO menu.usb.audio.fake_serial=teensy_gateway menu.usb.serialmidiaudio=Serial + MIDI + Audio menu.usb.serialmidiaudio.build.usbtype=USB_MIDI_AUDIO_SERIAL menu.usb.serialmidi16audio=Serial + MIDIx16 + Audio menu.usb.serialmidi16audio.build.usbtype=USB_MIDI16_AUDIO_SERIAL menu.usb.mtp=MTP Disk (Experimental) menu.usb.mtp.build.usbtype=USB_MTPDISK menu.usb.mtp.fake_serial=teensy_gateway menu.usb.rawhid=Raw HID menu.usb.rawhid.build.usbtype=USB_RAWHID menu.usb.rawhid.fake_serial=teensy_gateway menu.usb.flightsim=Flight Sim Controls menu.usb.flightsim.build.usbtype=USB_FLIGHTSIM menu.usb.flightsim.fake_serial=teensy_gateway menu.usb.flightsimjoystick=Flight Sim Controls + Joystick menu.usb.flightsimjoystick.build.usbtype=USB_FLIGHTSIM_JOYSTICK menu.usb.flightsimjoystick.fake_serial=teensy_gateway menu.usb.everything=All of the Above menu.usb.everything.build.usbtype=USB_EVERYTHING menu.usb.disable=No USB menu.usb.disable.build.usbtype=USB_DISABLED menu.speed.120=120 MHz menu.speed.96=96 MHz menu.speed.72=72 MHz menu.speed.48=48 MHz menu.speed.24=24 MHz menu.speed.16=16 MHz (No USB) menu.speed.8=8 MHz (No USB) menu.speed.4=4 MHz (No USB) menu.speed.2=2 MHz (No USB) menu.speed.144=144 MHz (overclock) menu.speed.168=168 MHz (overclock) menu.speed.168.build.fcpu=168000000 menu.speed.144.build.fcpu=144000000 menu.speed.120.build.fcpu=120000000 menu.speed.96.build.fcpu=96000000 menu.speed.72.build.fcpu=72000000 menu.speed.48.build.fcpu=48000000 menu.speed.24.build.fcpu=24000000 menu.speed.16.build.fcpu=16000000 menu.speed.8.build.fcpu=8000000 menu.speed.4.build.fcpu=4000000 menu.speed.2.build.fcpu=2000000 menu.opt.o2std=Faster menu.opt.o2std.build.flags.optimize=-O2 menu.opt.o2std.build.flags.ldspecs= menu.opt.o2lto=Faster with LTO menu.opt.o2lto.build.flags.optimize=-O2 -flto -fno-fat-lto-objects menu.opt.o2lto.build.flags.ldspecs=-fuse-linker-plugin menu.opt.o1std=Fast menu.opt.o1std.build.flags.optimize=-O1 menu.opt.o1std.build.flags.ldspecs= menu.opt.o1lto=Fast with LTO menu.opt.o1lto.build.flags.optimize=-O1 -flto -fno-fat-lto-objects menu.opt.o1lto.build.flags.ldspecs=-fuse-linker-plugin menu.opt.o3std=Fastest menu.opt.o3std.build.flags.optimize=-O3 menu.opt.o3std.build.flags.ldspecs= menu.opt.o3purestd=Fastest + pure-code menu.opt.o3purestd.build.flags.optimize=-O3 -mpure-code -D__PURE_CODE__ menu.opt.o3purestd.build.flags.ldspecs= menu.opt.o3lto=Fastest with LTO menu.opt.o3lto.build.flags.optimize=-O3 -flto -fno-fat-lto-objects menu.opt.o3lto.build.flags.ldspecs=-fuse-linker-plugin menu.opt.o3purelto=Fastest + pure-code with LTO menu.opt.o3purelto.build.flags.optimize=-O3 -mpure-code -D__PURE_CODE__ -flto -fno-fat-lto-objects menu.opt.o3purelto.build.flags.ldspecs=-fuse-linker-plugin menu.opt.ogstd=Debug menu.opt.ogstd.build.flags.optimize=-Og menu.opt.ogstd.build.flags.ldspecs= menu.opt.oglto=Debug with LTO menu.opt.oglto.build.flags.optimize=-Og -flto -fno-fat-lto-objects menu.opt.oglto.build.flags.ldspecs=-fuse-linker-plugin menu.opt.osstd=Smallest Code menu.opt.osstd.build.flags.optimize=-Os --specs=nano.specs menu.opt.osstd.build.flags.ldspecs= menu.opt.oslto=Smallest Code with LTO menu.opt.oslto.build.flags.optimize=-Os -flto -fno-fat-lto-objects --specs=nano.specs menu.opt.oslto.build.flags.ldspecs=-fuse-linker-plugin menu.keys.en-us=US English menu.keys.en-us.build.keylayout=US_ENGLISH menu.keys.fr-ca=Canadian French menu.keys.fr-ca.build.keylayout=CANADIAN_FRENCH menu.keys.xx-ca=Canadian Multilingual menu.keys.xx-ca.build.keylayout=CANADIAN_MULTILINGUAL menu.keys.cz-cz=Czech menu.keys.cz-cz.build.keylayout=CZECH menu.keys.da-da=Danish menu.keys.da-da.build.keylayout=DANISH menu.keys.fi-fi=Finnish menu.keys.fi-fi.build.keylayout=FINNISH menu.keys.fr-fr=French menu.keys.fr-fr.build.keylayout=FRENCH menu.keys.fr-be=French Belgian menu.keys.fr-be.build.keylayout=FRENCH_BELGIAN menu.keys.fr-ch=French Swiss menu.keys.fr-ch.build.keylayout=FRENCH_SWISS menu.keys.de-de=German menu.keys.de-de.build.keylayout=GERMAN menu.keys.de-dm=German (Mac) menu.keys.de-dm.build.keylayout=GERMAN_MAC menu.keys.de-ch=German Swiss menu.keys.de-ch.build.keylayout=GERMAN_SWISS menu.keys.is-is=Icelandic menu.keys.is-is.build.keylayout=ICELANDIC menu.keys.en-ie=Irish menu.keys.en-ie.build.keylayout=IRISH menu.keys.it-it=Italian menu.keys.it-it.build.keylayout=ITALIAN menu.keys.no-no=Norwegian menu.keys.no-no.build.keylayout=NORWEGIAN menu.keys.pt-pt=Portuguese menu.keys.pt-pt.build.keylayout=PORTUGUESE menu.keys.pt-br=Portuguese Brazilian menu.keys.pt-br.build.keylayout=PORTUGUESE_BRAZILIAN menu.keys.rs-rs=Serbian (Latin Only) menu.keys.rs-rs.build.keylayout=SERBIAN_LATIN_ONLY menu.keys.es-es=Spanish menu.keys.es-es.build.keylayout=SPANISH menu.keys.es-mx=Spanish Latin America menu.keys.es-mx.build.keylayout=SPANISH_LATIN_AMERICA menu.keys.sv-se=Swedish menu.keys.sv-se.build.keylayout=SWEDISH menu.keys.tr-tr=Turkish (partial) menu.keys.tr-tr.build.keylayout=TURKISH menu.keys.en-gb=United Kingdom menu.keys.en-gb.build.keylayout=UNITED_KINGDOM menu.keys.usint=US International menu.keys.usint.build.keylayout=US_INTERNATIONAL runtime.ide.path=C:\Program Files (x86)\Arduino runtime.os=windows build.system.path=C:\Program Files (x86)\Arduino\hardware\teensy\avr\system runtime.ide.version=108013 target_package=teensy target_platform=teensy3 runtime.hardware.path=C:\Program Files (x86)\Arduino\hardware\teensy originalid=teensy35 vm.run_sketch_prebuild_before_build=true intellisense.include.paths.more={vmresolved.compiler.path}arm\arm-none-eabi\include;{vmresolved.compiler.path}arm\lib\gcc\arm-none-eabi\5.4.1\include;{vmresolved.compiler.path}arm\arm-none-eabi\include\c++\5.4.1;{vmresolved.compiler.path}arm\arm-none-eabi\include\c++\5.4.1\tr1;{vmresolved.compiler.path}arm\arm-none-eabi\include\c++\5.4.1\bits;{vmresolved.compiler.path}arm\arm-none-eabi\include\c++\5.4.1\arm-none-eabi; vmboard.totalpins=16 vmboard.totalanalogpins=14 tools.teensy_gdbstub.cmd=arm-none-eabi-gdb.exe tools.teensy_gdbstub.debug.path={runtime.hardware.path}/../tools/arm/bin tools.teensy_gdbstub.initCmd=-ex "init halt" vs-cmd.Debug.AttachtoProcess.tools.teensy_gdbstub.initCmd=-ex "init" tools.teensy_gdbstub.debug.args=-ex "target remote \\.\{serial.debug.port}" {initCmd} build.vm.ignore_gdb_extra_flags=1 tools.teensy_gdbstub.showLocalSerialPort=true debug_menu.hwdebugger.teensy=GDBStub debug_menu.hwdebugger.teensy.debug.tool=teensy_gdbstub meta_teensy.sentence=This debugger requires the TeensyDebug Library from https://github.com/ftrias/TeensyDebug to be installed, and the <TeensyDebug.h> to be included, as well as a call to debug.begin(Serialxx); meta_teensy.comment=Ensure the COM Port for the configured Debug Port is selected before attaching the Debugger, depending on your code. . Set vMicro > Debugger > 'Compiler Optimization' to 'No Project', 'No Project + Libraries' or 'None' when debugging. (NOTE: Changing the optimization setting for this platform might cause compilation errors with certain code such as HardwareSerial.) meta_teensy.image.connect=https://www.visualmicro.com/pics/Debug-Help-TEENSY4-GDBSTUB-Connections.png meta_teensy.image.operation=https://www.visualmicro.com/pics/Debug-Break-TEENSY4-GDBSTUB-VSOnly.png meta_teensy.reference.usage.url=https://www.visualmicro.com/page/User-Guide.aspx?doc=Arduino-gdb-Tutorial.html version=1.8.5 rewriting=disabled compiler.path={runtime.hardware.path}/../tools/ compiler.objcopy.eep.flags=-O ihex -j .eeprom --set-section-flags=.eeprom=alloc,load --no-change-warnings --change-section-lma .eeprom=0 compiler.elf2hex.flags=-O ihex -R .eeprom recipe.preproc.includes="{compiler.path}{build.toolchain}{build.command.g++}" -M -MG -MP -x c++ -w {build.flags.cpp} {build.flags.cpu} {build.flags.defs} -DARDUINO={runtime.ide.version} -DARDUINO_{build.board} -DF_CPU={build.fcpu} -D{build.usbtype} -DLAYOUT_{build.keylayout} {includes} "{source_file}" recipe.preproc.macros="{compiler.path}{build.toolchain}{build.command.g++}" -E -CC -x c++ -w {compiler.cpp.flags} {build.flags.common} {build.flags.cpp} {build.flags.cpu} {build.flags.defs} -DARDUINO={runtime.ide.version} -DARDUINO_{build.board} -DF_CPU={build.fcpu} -D{build.usbtype} -DLAYOUT_{build.keylayout} {includes} "{source_file}" -o "{preprocessed_file_path}" tools.arduino-preprocessor.path={runtime.tools.arduino-preprocessor.path} tools.arduino-preprocessor.cmd.path={path}/arduino-preprocessor tools.arduino-preprocessor.pattern="{cmd.path}" "{source_file}" "{codecomplete}" -- -std=gnu++14 recipe.hooks.sketch.prebuild.1.pattern="{compiler.path}precompile_helper" "{runtime.platform.path}/cores/{build.core}" "{build.path}" "{compiler.path}{build.toolchain}{build.command.g++}" -x c++-header {build.flags.optimize} {build.flags.common} {build.flags.dep} {build.flags.cpp} {build.flags.cpu} {build.flags.defs} -DARDUINO={runtime.ide.version} -DARDUINO_{build.board} -DF_CPU={build.fcpu} -D{build.usbtype} -DLAYOUT_{build.keylayout} "-I{runtime.platform.path}/cores/{build.core}" "{build.path}/pch/Arduino.h" -o "{build.path}/pch/Arduino.h.gch" recipe.cpp.o.pattern="{compiler.path}{build.toolchain}{build.command.g++}" -c {build.flags.optimize} {build.flags.common} {build.flags.dep} {build.flags.cpp} {build.flags.cpu} {build.flags.defs} -DARDUINO={runtime.ide.version} -DARDUINO_{build.board} -DF_CPU={build.fcpu} -D{build.usbtype} -DLAYOUT_{build.keylayout} "-I{build.path}/pch" {includes} "{source_file}" -o "{object_file}" recipe.c.o.pattern="{compiler.path}{build.toolchain}{build.command.gcc}" -c {build.flags.optimize} {build.flags.common} {build.flags.dep} {build.flags.c} {build.flags.cpu} {build.flags.defs} -DARDUINO={runtime.ide.version} -DARDUINO_{build.board} -DF_CPU={build.fcpu} -D{build.usbtype} -DLAYOUT_{build.keylayout} {includes} "{source_file}" -o "{object_file}" recipe.S.o.pattern="{compiler.path}{build.toolchain}{build.command.gcc}" -c {build.flags.optimize} {build.flags.common} {build.flags.dep} {build.flags.S} {build.flags.cpu} {build.flags.defs} -DARDUINO={runtime.ide.version} -DARDUINO_{build.board} -DF_CPU={build.fcpu} -D{build.usbtype} -DLAYOUT_{build.keylayout} {includes} "{source_file}" -o "{object_file}" recipe.ar.pattern="{compiler.path}{build.toolchain}{build.command.ar}" rcs "{archive_file_path}" "{object_file}" recipe.c.combine.pattern="{compiler.path}{build.toolchain}{build.command.linker}" {build.flags.optimize} {build.flags.ld} {build.flags.ldspecs} {build.flags.cpu} -o "{build.path}/{build.project_name}.elf" {object_files} "{build.path}/{archive_file}" "-L{build.path}" {build.flags.libs} recipe.elfpatch.pattern="{compiler.path}/hardware/tools/{build.elfpatch}" -mmcu={build.mcu} "{build.path}/{build.project_name}.elf" "{sketch_path}/disk" recipe.objcopy.eep.pattern="{compiler.path}{build.toolchain}{build.command.objcopy}" {compiler.objcopy.eep.flags} "{build.path}/{build.project_name}.elf" "{build.path}/{build.project_name}.eep" recipe.objcopy.hex.pattern="{compiler.path}{build.toolchain}{build.command.objcopy}" {compiler.elf2hex.flags} "{build.path}/{build.project_name}.elf" "{build.path}/{build.project_name}.hex" recipe.hooks.postbuild.1.pattern="{compiler.path}stdout_redirect" "{build.path}/{build.project_name}.lst" "{compiler.path}{build.toolchain}{build.command.objdump}" -d -S -C "{build.path}/{build.project_name}.elf" recipe.hooks.postbuild.2.pattern="{compiler.path}stdout_redirect" "{build.path}/{build.project_name}.sym" "{compiler.path}{build.toolchain}{build.command.objdump}" -t -C "{build.path}/{build.project_name}.elf" recipe.hooks.postbuild.3.pattern="{compiler.path}teensy_post_compile" "-file={build.project_name}" "-path={build.path}" "-tools={compiler.path}" "-board={build.board}" recipe.size.pattern="{compiler.path}{build.toolchain}{build.command.size}" -A "{build.path}/{build.project_name}.elf" recipe.size.regex=^(?:\.text|\.text\.progmem|\.text\.itcm|\.data)\s+([0-9]+).* recipe.size.regex.data=^(?:\.usbdescriptortable|\.dmabuffers|\.usbbuffers|\.data|\.bss|\.noinit|\.text\.itcm|\.text\.itcm\.padding)\s+([0-9]+).* recipe.size.regex.eeprom=^(?:\.eeprom)\s+([0-9]+).* discovery.teensy.pattern="{runtime.hardware.path}/../tools/teensy_ports" -J2 tools.teensyloader.cmd.path={runtime.hardware.path}/../tools tools.teensyloader.upload.params.quiet= tools.teensyloader.upload.params.verbose=-verbose tools.teensyloader.upload.pattern="{cmd.path}/teensy_post_compile" "-file={build.project_name}" "-path={build.path}" "-tools={cmd.path}" "-board={build.board}" -reboot "-port={serial.port}" "-portlabel={serial.port.label}" "-portprotocol={serial.port.protocol}" recipe.output.tmp_file={build.project_name}.hex recipe.output.save_file={build.project_name}.{build.board}.hex recipe.output.tmp_file2={build.project_name}.elf recipe.output.save_file2={build.project_name}.elf upload.verify= tools.vmopenocd.cmd=bin/openocd.exe tools.vmopenocd.cmd.windows=bin/openocd.exe tools.vmopenocd.debug.params.verbose=-d2 tools.vmopenocd.debug.params.quiet=-d0 tools.vmopenocd.debug.address=localhost:3333 tools.vmopenocd.path={runtime.tools.openocd-0.10.0.20200213.path} tools.vmopenocd.scriptPath=-s "{path}/scripts/" tools.vmopenocd.logging=-l "{{build.path}/{build.project_name}_DebugOpenOCD.log}" tools.vmopenocd.boardCmd= tools.vmopenocd.targetCmd= tools.vmopenocd.initCmd= tools.vmopenocd.debug.pattern="{path}/{cmd}" {debug.verbose} {logging} {scriptPath} {boardCmd} {targetCmd} {initCmd} tools.vmopenocd.program.cmd=bin/openocd.exe tools.vmopenocd.program.cmd.windows=bin/openocd.exe tools.vmopenocd.program.path={runtime.tools.openocd-0.10.0.20200213.path} tools.vmopenocd.program.address=localhost:3333 tools.vmopenocd.program.params.verbose=-d2 tools.vmopenocd.program.params.quiet=-d0 tools.vmopenocd.program.elf.message=****[vMicro]**** Uploading ELF : tools.vmopenocd.program.pattern="{path}/{cmd}" {program.verbose} {scriptPath} {boardCmd} {targetCmd} -c "echo -n {{program.elf.message}}" {programCmd} tools.atmelICE.protocol= tools.atmelICE.debug.cmd=arm-none-eabi-gdb.exe tools.atmelICE.debug.path={runtime.tools.arm-none-eabi-gcc.path}/bin tools.atmelICE.debug.pattern="{path}/{cmd}" tools.atmelICE.server.initCmd=-c "init; reset halt" vs-cmd.Debug.AttachtoProcess.tools.atmelICE.server.initCmd=-c "init" tools.atmelICE.server.boardCmd=-c "adapter driver cmsis-dap" -c "cmsis_dap_vid_pid 0x03eb 0x2141" tools.atmelICE.server.tool=vmopenocd tools.atmelICE.debug.server=vmopenocd tools.atmelICE.program.scriptPath=-s "{program.path}/scripts/" tools.atmelICE.program.boardCmd=-c "adapter driver cmsis-dap" -c "cmsis_dap_vid_pid 0x03eb 0x2141" tools.atmelICE.program.cmd=bin/openocd.exe tools.atmelICE.program.cmd.windows=bin/openocd.exe tools.atmelICE.program.path={runtime.tools.openocd-0.10.0.20200213.path} tools.atmelICE.program.address=localhost:3333 tools.atmelICE.program.params.verbose=-d2 tools.atmelICE.program.params.quiet=-d0 tools.atmelICE.program.elf.message=****[vMicro]**** Uploading ELF : tools.atmelICE.program.pattern="{program.path}/{program.cmd}" {program.verbose} {program.scriptPath} {program.boardCmd} {program.targetCmd} -c "echo -n {{program.elf.message}}" {program.programCmd} tools.atmelICE.program.extra_params= tools.atmelICE.program.protocol= tools.atmelICE.erase.params.verbose=-d3 tools.atmelICE.erase.params.quiet=-d0 tools.atmelICE.erase.pattern= tools.jlink.cmd=arm-none-eabi-gdb.exe tools.jlink.path={runtime.tools.arm-none-eabi-gcc.path}/bin tools.jlink.pattern="{path}/{cmd}" tools.jlink.server.tool=vmopenocd tools.jlink.debug.server=vmopenocd tools.jlink.server.boardCmd=-f "interface/jlink.cfg" tools.jlink.server.initCmd=-c "init; reset halt" vs-cmd.Debug.AttachtoProcess.tools.jlink.server.initCmd=-c "init" tools.jlink.program.scriptPath=-s "{program.path}/scripts/" tools.jlink.program.boardCmd=-f "interface/jlink.cfg" tools.jlink.program.cmd=bin/openocd.exe tools.jlink.program.cmd.windows=bin/openocd.exe tools.jlink.program.path={runtime.tools.openocd-0.10.0.20200213.path} tools.jlink.program.address=localhost:3333 tools.jlink.program.params.verbose=-d2 tools.jlink.program.params.quiet=-d0 tools.jlink.program.elf.message=****[vMicro]**** Uploading ELF : tools.jlink.program.pattern="{program.path}/{program.cmd}" {program.verbose} {program.scriptPath} {program.boardCmd} {program.targetCmd} -c "echo -n {{program.elf.message}}" {program.programCmd} tools.jlink.upload.scriptPath=-s "{upload.path}/scripts/" tools.jlink.upload.boardCmd=-f "interface/jlink.cfg" tools.jlink.upload.cmd=bin/openocd.exe tools.jlink.upload.cmd.windows=bin/openocd.exe tools.jlink.upload.path={runtime.tools.openocd-0.10.0.20200213.path} tools.jlink.upload.address=localhost:3333 tools.jlink.upload.params.verbose=-d2 tools.jlink.upload.params.quiet=-d0 tools.jlink.upload.elf.message=****[vMicro]**** Uploading ELF : tools.jlink.upload.pattern="{upload.path}/{upload.cmd}" {upload.verbose} {upload.scriptPath} {upload.boardCmd} {upload.targetCmd} -c "echo -n {{upload.elf.message}}" {upload.programCmd} tools.bmp_upload.cmd=arm-none-eabi-gdb.exe tools.bmp_upload.debug.path={runtime.tools.arm-none-eabi-gcc.path}/bin/ tools.bmp_upload.program.cmd=bin/arm-none-eabi-gdb.exe tools.bmp_upload.program.cmd.windows=bin/arm-none-eabi-gdb.exe tools.bmp_upload.program.path={runtime.tools.arm-none-eabi-gcc.path} tools.bmp_upload.upload.cmd=bin/arm-none-eabi-gdb.exe tools.bmp_upload.upload.cmd.windows=bin/arm-none-eabi-gdb.exe tools.bmp_upload.upload.path={runtime.tools.arm-none-eabi-gcc.path} tools.bmp_upload.server.initCmd=-c "init; reset halt" vs-cmd.Debug.AttachtoProcess.tools.bmp_upload.server.initCmd=-c "init" tools.bmp_upload.showLocalSerialPort=true tools.bmp_upload.debug.server= tools.stlinkv2.description= tools.stlinkv2.cmd=arm-none-eabi-gdb.exe tools.stlinkv2.path={runtime.tools.arm-none-eabi-gcc.path}/bin tools.stlinkv2.pattern="{path}/{cmd}" tools.stlinkv2.server.tool=vmopenocd tools.stlinkv2.debug.server=vmopenocd tools.stlinkv2.server.boardCmd=-f "interface/stlink.cfg" tools.stlinkv2.server.initCmd=-c "init; reset halt" vs-cmd.Debug.AttachtoProcess.tools.stlinkv2.server.initCmd=-c "init" tools.stlinkv2.upload.scriptPath=-s "{upload.path}/scripts/" tools.stlinkv2.upload.boardCmd=-f "interface/stlink.cfg" tools.stlinkv2.upload.cmd=bin/openocd.exe tools.stlinkv2.upload.cmd.windows=bin/openocd.exe tools.stlinkv2.upload.path={runtime.tools.openocd-0.10.0.20200213.path} tools.stlinkv2.upload.address=localhost:3333 tools.stlinkv2.upload.params.verbose=-d2 tools.stlinkv2.upload.params.quiet=-d0 tools.stlinkv2.upload.elf.message=****[vMicro]**** Uploading ELF : tools.stlinkv2.upload.pattern="{upload.path}/{upload.cmd}" {upload.verbose} {upload.scriptPath} {upload.boardCmd} {upload.targetCmd} -c "echo -n {{upload.elf.message}}" {upload.programCmd} tools.stlinkv2.upload.extra_params= tools.stlinkv2.upload.protocol= tools.stlinkv2.protocol= tools.f2232mm.cmd=arm-none-eabi-gdb.exe tools.f2232mm.path={runtime.tools.arm-none-eabi-gcc.path}/bin tools.f2232mm.pattern="{path}/{cmd}" {args} tools.f2232mm.server.tool=vmopenocd tools.f2232mm.debug.server=vmopenocd tools.f2232mm.server.boardCmd=-f "interface/ftdi/minimodule.cfg" tools.f2232mm.server.initCmd=-c "init; reset halt" vs-cmd.Debug.AttachtoProcess.tools.f2232mm.server.initCmd=-c "init" tools.f2232mm.upload.scriptPath=-s "{upload.path}/scripts/" tools.f2232mm.upload.boardCmd=-f "interface/ftdi/minimodule.cfg" tools.f2232mm.upload.cmd=bin/openocd.exe tools.f2232mm.upload.cmd.windows=bin/openocd.exe tools.f2232mm.upload.path={runtime.tools.openocd-0.10.0.20200213.path} tools.f2232mm.upload.address=localhost:3333 tools.f2232mm.upload.params.verbose=-d2 tools.f2232mm.upload.params.quiet=-d0 tools.f2232mm.upload.elf.message=****[vMicro]**** Uploading ELF : tools.f2232mm.upload.pattern="{upload.path}/{upload.cmd}" {upload.verbose} {upload.scriptPath} {upload.boardCmd} {upload.targetCmd} -c "echo -n {{upload.elf.message}}" {upload.programCmd} tools.f2232mm.upload.extra_params= tools.f2232mm.upload.protocol= tools.f2232mm.protocol= tools.f2232h.server.boardCmd=-f "interface/ftdi/minimodule-lowcost.cfg" tools.f2232h.cmd=arm-none-eabi-gdb.exe tools.f2232h.path={runtime.tools.arm-none-eabi-gcc.path}/bin tools.f2232h.pattern="{path}/{cmd}" tools.f2232h.server.tool=vmopenocd tools.f2232h.debug.server=vmopenocd tools.f2232h.server.initCmd=-c "init; reset halt" vs-cmd.Debug.AttachtoProcess.tools.f2232h.server.initCmd=-c "init" tools.f2232h.upload.scriptPath=-s "{upload.path}/scripts/" tools.f2232h.upload.boardCmd=-f "interface/ftdi/minimodule-lowcost.cfg" tools.f2232h.upload.cmd=bin/openocd.exe tools.f2232h.upload.cmd.windows=bin/openocd.exe tools.f2232h.upload.path={runtime.tools.openocd-0.10.0.20200213.path} tools.f2232h.upload.address=localhost:3333 tools.f2232h.upload.params.verbose=-d2 tools.f2232h.upload.params.quiet=-d0 tools.f2232h.upload.elf.message=****[vMicro]**** Uploading ELF : tools.f2232h.upload.pattern="{upload.path}/{upload.cmd}" {upload.verbose} {upload.scriptPath} {upload.boardCmd} {upload.targetCmd} -c "echo -n {{upload.elf.message}}" {upload.programCmd} tools.f2232h.upload.extra_params= tools.f2232h.upload.protocol= tools.f2232h.protocol= tools.daplink.server.boardCmd=-f "interface/cmsis-dap.cfg" -c "adapter speed 1000" tools.daplink.cmd=arm-none-eabi-gdb.exe tools.daplink.path={runtime.tools.arm-none-eabi-gcc.path}/bin tools.daplink.pattern="{path}/{cmd}" {args} tools.daplink.server.tool=vmopenocd tools.daplink.debug.server=vmopenocd tools.daplink.server.initCmd=-c "init; reset halt" vs-cmd.Debug.AttachtoProcess.tools.daplink.server.initCmd=-c "init" tools.daplink.upload.scriptPath=-s "{upload.path}/scripts/" tools.daplink.upload.boardCmd=-f "interface/cmsis-dap.cfg" -c "adapter speed 1000" tools.daplink.upload.cmd=bin/openocd.exe tools.daplink.upload.cmd.windows=bin/openocd.exe tools.daplink.upload.path={runtime.tools.openocd-0.10.0.20200213.path} tools.daplink.upload.address=localhost:3333 tools.daplink.upload.params.verbose=-d2 tools.daplink.upload.params.quiet=-d0 tools.daplink.upload.elf.message=****[vMicro]**** Uploading ELF : tools.daplink.upload.pattern="{upload.path}/{upload.cmd}" {upload.verbose} {upload.scriptPath} {upload.boardCmd} {upload.targetCmd} -c "echo -n {{upload.elf.message}}" {upload.programCmd} tools.daplink.upload.extra_params= tools.daplink.upload.protocol= tools.daplink.protocol= vm.platform.root.path=c:\program files (x86)\microsoft visual studio\2019\community\common7\ide\extensions\53lzl3xe.1x1\Micro Platforms\arduino16x runtime.tools.arduinoOTA.path=C:\Users\Frank\AppData\Local\arduino15\packages\arduino\tools\arduinoOTA\1.3.0 runtime.tools.arduinoOTA-1.3.0.path=C:\Users\Frank\AppData\Local\arduino15\packages\arduino\tools\arduinoOTA\1.3.0 runtime.tools.arm-none-eabi-gcc.path=C:\Users\Frank\AppData\Local\arduino15\packages\arduino\tools\arm-none-eabi-gcc\4.8.3-2014q1 runtime.tools.arm-none-eabi-gcc-4.8.3-2014q1.path=C:\Users\Frank\AppData\Local\arduino15\packages\arduino\tools\arm-none-eabi-gcc\4.8.3-2014q1 runtime.tools.avrdude.path=C:\Users\Frank\AppData\Local\arduino15\packages\arduino\tools\avrdude\6.3.0-arduino17 runtime.tools.avrdude-6.3.0-arduino17.path=C:\Users\Frank\AppData\Local\arduino15\packages\arduino\tools\avrdude\6.3.0-arduino17 runtime.tools.avr-gcc.path=C:\Users\Frank\AppData\Local\arduino15\packages\arduino\tools\avr-gcc\7.3.0-atmel3.6.1-arduino7 runtime.tools.avr-gcc-7.3.0-atmel3.6.1-arduino7.path=C:\Users\Frank\AppData\Local\arduino15\packages\arduino\tools\avr-gcc\7.3.0-atmel3.6.1-arduino7 runtime.tools.bossac.path=C:\Users\Frank\AppData\Local\arduino15\packages\arduino\tools\bossac\1.6.1-arduino runtime.tools.bossac-1.6.1-arduino.path=C:\Users\Frank\AppData\Local\arduino15\packages\arduino\tools\bossac\1.6.1-arduino runtime.tools.CMSIS.path=C:\Users\Frank\AppData\Local\arduino15\packages\STM32\tools\CMSIS\5.5.1 runtime.tools.CMSIS-5.5.1.path=C:\Users\Frank\AppData\Local\arduino15\packages\STM32\tools\CMSIS\5.5.1 runtime.tools.esptool_py.path=C:\Users\Frank\AppData\Local\arduino15\packages\esp32\tools\esptool_py\3.0.0 runtime.tools.esptool_py-3.0.0.path=C:\Users\Frank\AppData\Local\arduino15\packages\esp32\tools\esptool_py\3.0.0 runtime.tools.mkspiffs.path=C:\Users\Frank\AppData\Local\arduino15\packages\esp32\tools\mkspiffs\0.2.3 runtime.tools.mkspiffs-0.2.3.path=C:\Users\Frank\AppData\Local\arduino15\packages\esp32\tools\mkspiffs\0.2.3 runtime.tools.STM32Tools.path=C:\Users\Frank\AppData\Local\arduino15\packages\STM32\tools\STM32Tools\1.4.0 runtime.tools.STM32Tools-1.4.0.path=C:\Users\Frank\AppData\Local\arduino15\packages\STM32\tools\STM32Tools\1.4.0 runtime.tools.xpack-arm-none-eabi-gcc.path=C:\Users\Frank\AppData\Local\arduino15\packages\STM32\tools\xpack-arm-none-eabi-gcc\9.2.1-1.1 runtime.tools.xpack-arm-none-eabi-gcc-9.2.1-1.1.path=C:\Users\Frank\AppData\Local\arduino15\packages\STM32\tools\xpack-arm-none-eabi-gcc\9.2.1-1.1 runtime.tools.xtensa-esp32-elf-gcc.path=C:\Users\Frank\AppData\Local\arduino15\packages\esp32\tools\xtensa-esp32-elf-gcc\1.22.0-97-gc752ad5-5.2.0 runtime.tools.xtensa-esp32-elf-gcc-1.22.0-97-gc752ad5-5.2.0.path=C:\Users\Frank\AppData\Local\arduino15\packages\esp32\tools\xtensa-esp32-elf-gcc\1.22.0-97-gc752ad5-5.2.0 runtime.vm.boardinfo.id=teensy35 runtime.vm.boardinfo.name=teensy35 runtime.vm.boardinfo.desc=Teensy 3.5 runtime.vm.boardinfo.src_location=C:\Program Files (x86)\Arduino\hardware\teensy\avr ide.hint=Use installed IDE (hardware, reference/help + libraries) ide.location.key=Arduino16x ide.location.ide.winreg=Arduino 1.6.x Application ide.location.sketchbook.winreg=Arduino 1.6.x Sketchbook ide.location.sketchbook.preferences=sketchbook.path ide.default.revision_name=1.8.13 ide.default.version=10800 ide.default.package=arduino ide.default.platform=avr ide.multiplatform=true ide.includes=Arduino.h ide.exe_name=arduino ide.recipe.preproc.defines.flags=-w -x c++ -E -dM ide.platformswithoutpackage=false ide.includes.fallback=wprogram.h ide.extension=ino ide.extension.fallback=pde ide.versionGTEQ=160 ide.exe=arduino.exe ide.builder.exe=arduinobuilder.exe ide.builder.name=Arduino Builder ide.hosts=atmel ide.url=https://www.visualmicro.com/page/Download-Arduino-Or-Other-Supporting-IDEs.aspx ide.help.reference.path=reference ide.help.reference.path2=reference\www.arduino.cc\en\Reference ide.help.reference.serial=reference\www.arduino.cc\en\Serial ide.location.preferences.portable={runtime.ide.path}\portable ide.location.preferences.arduinoData={runtime.sketchbook.path}\ArduinoData ide.location.preferences=%VM_APPDATA_LOCAL%\arduino15\preferences.txt ide.location.preferences_fallback=%VM_APPDATA_ROAMING%\arduino15\preferences.txt ide.location.contributions=%VM_APPDATA_LOCAL%\arduino15 ide.location.contributions_fallback=%VM_APPDATA_ROAMING%\arduino15 ide.contributions.boards.allow=true ide.contributions.boards.ignore_unless_rewrite_found=true ide.contributions.libraries.allow=true ide.contributions.boards.support.urls.wiki=https://github.com/arduino/Arduino/wiki/Unofficial-list-of-3rd-party-boards-support-urls ide.create_platforms_from_boardsTXT.teensy=build.core vm.debug=true software=ARDUINO ssh.user.name=root ssh.user.default.password=arduino ssh.host.wwwfiles.path=/www/sd build.working_directory={runtime.ide.path}\java\bin runtime.tools.vm_web_debugger.path={vm.platform.root.path}/../../Micro Debuggers/WebDebugger recipe.hooks.vmdeploy.vm_web_debugger_postupload.1.pattern="{runtime.tools.vm_web_debugger.path}/DeployMicroWebserver.exe" "{sketch_path}" "{serial.port}" "{runtime.hardware.path}\.." recipe.hooks.vmlaunch.vm_web_debugger_preopen.1.pattern=notepad.exe "{sketch_path}\__vm\vmWebDebugger\Start-WebServer.bat" recipe.hooks.vmlaunch.vm_web_debugger_preopen.2.pattern={sketch_path}\__vm\vmWebDebugger\Start-WebServer.bat ide.debug_menu.debugger_type=Debug ide.debug_menu.debugger_type.none=Off ide.debug_menu.none.debug.tool=no_debug ide.debug_menu.debugger_type.universal=Serial ide.debug_menu.universal.debug.tool=universal ide.debug_menu.debugger_type.hwdebugger=Hardware ide.debug_menu.hwdebugger=Debugger ide.debug_menu.hwdebugger.custom_debugger=Manual/Custom ide.debug_menu.hwdebugger.custom_debugger.debug.tool=dbg_external ide.meta_custom_debugger.sentence=Provides a build that includes debug defines and will launch a custom debugger if one is provided. ide.meta_custom_debugger.paragraph=This is option is for advanced use. It is recommended that a pre-configured debugger be selected when available in this list. Usage: Optionally add a customer debugger to the project. A 'debugger_launch.json' file shares the same command syntax that is used by the VsCode debugger. Custom debuggers can be targeted at a board and/or variant and/or configuration name. IE: [variant].[configuration_name][.]debugger_launch.json ide.meta_custom_debugger.reference.usage.url=https://github.com/Microsoft/vscode-cpptools/blob/master/launch.md#customlaunchsetupcommands ide.meta_custom_debugger.reference.connect.url=https://docs.microsoft.com/en-us/visualstudio/debugger/create-custom-views-of-native-objects?view=vs-2019 ide.compiler_flags_no_opt=-O0 ide.debug_menu.vm_disable_optimization=Disable Optimization ide.debug_menu.vm_disable_optimization.vm_disable_opt_default=Default Optimization ide.debug_menu.vm_disable_optimization.vm_disable_opt_proj=No Project Optimization ide.debug_menu.vm_disable_opt_proj.vm_disable_opt_project={ide.compiler_flags_no_opt} ide.debug_menu.vm_disable_optimization.vm_disable_opt_proj_libs=No Project + Libraries Optimization ide.debug_menu.vm_disable_opt_proj_libs.vm_disable_opt_project={ide.compiler_flags_no_opt} ide.debug_menu.vm_disable_opt_proj_libs.vm_disable_opt_libraries={ide.compiler_flags_no_opt} ide.debug_menu.vm_disable_optimization.vm_disable_opt_all=No Optimization ide.meta_vm_disable_opt_all.sentence=Disable compiler optimization for all sources:- Project, Library and Platform. ide.meta_vm_disable_opt_all.comment=After switching between 'No Optimization' and other optimization values, please click "Solution Clean" or switch off (or cycle) 'vMicro>Compiler>Shared Cache For Cores'. NOTE: Changing optimization settings can cause build errors or result in overly large programs. ide.debug_menu.vm_disable_opt_all.vm_disable_opt_project={ide.compiler_flags_no_opt} ide.debug_menu.vm_disable_opt_all.vm_disable_opt_libraries={ide.compiler_flags_no_opt} ide.debug_menu.vm_disable_opt_all.vm_disable_opt_core={ide.compiler_flags_no_opt} ide.appid=arduino16x location.sketchbook=C:\Users\Frank\Documents\Arduino build.core.path=C:\Program Files (x86)\Arduino\hardware\teensy\avr\cores\teensy3 vm.core.include=arduino.h vm.boardsource.path=C:\Program Files (x86)\Arduino\hardware\teensy\avr runtime.platform.path=C:\Program Files (x86)\Arduino\hardware\teensy\avr vm.platformname.name=teensy3 build.arch=TEENSY3 debug.tool=no_debug build.usbtype=USB_SERIAL build.fcpu=120000000 build.flags.ldspecs= build.keylayout=US_ENGLISH vm.runtime.compiler.cached_cores_path=C:\Users\Frank\AppData\Local\Temp\VMBCore\arduino16x vm.runtime.compiler.showwarnings=false vm.runtime.compiler.showwarnings_core=true vm.runtime.compiler.showwarnings_library=false vm.runtime.upload.verbose=false vm.runtime.upload.verify=false runtime.vm.ide.platforms.path=c:\program files (x86)\microsoft visual studio\2019\community\common7\ide\extensions\53lzl3xe.1x1\Micro Platforms runtime.vm.ide.tools.openocd.path={runtime.tools.openocd-0.9.0.path} runtime.vm.openocd.path={runtime.tools.openocd-0.9.0.path} vm.runtime.build.intermediate_output_path=C:\Users\Frank\Documents\Arduino\TeensySerialBridgeV1\Release\ vm.runtime.build.final_output_path=C:\Users\Frank\Documents\Arduino\TeensySerialBridgeV1\Release\ compiler.always_include_sketchfolder=true compiler.always_include_sharedprojectfolders=true vm.runtime.compiler.auto_discover_includes=true vm.runtime.compiler.auto_discover_includes_shallow=true vm.runtime.compiler.allow_library_debugging=false vm.sketch_ino_cpp_name=TeensySerialBridgeV1.cpp serial.port.file=COM11 serial.port=COM11 serial.port.num=11 port.caption=COM11 - USB Serial Device Caption=USB Serial Device (COM11) ClassGuid={4d36e978-e325-11ce-bfc1-08002be10318} CompatibleID.value0=USB\Class_02 ConfigManagerErrorCode=0 ConfigManagerUserConfig=False CreationClassName=Win32_PnPEntity Description=USB Serial Device DeviceID=USB\VID_16C0&PID_0483\3016580 HardwareID.value0=USB\VID_16C0&PID_0483 Manufacturer=Microsoft Name=USB Serial Device (COM11) PNPClass=Ports PNPDeviceID=USB\VID_16C0&PID_0483\3016580 Present=True Service=usbser Status=OK SystemCreationClassName=Win32_ComputerSystem SystemName=FRANKNEWXPS15 vid=0x16C0 pid=0x0483 vidpid=16C00483 vid_pid=0x16C0_0x0483 iserial=3016580 extra.time.local=1633459396 extra.time.utc=1633473796 extra.time.dst=-14400 extra.time.zone=14400 serial.port.caption=COM11 - USB Serial Device serial.Caption=USB Serial Device (COM11) serial.ClassGuid={4d36e978-e325-11ce-bfc1-08002be10318} serial.CompatibleID.value0=USB\Class_02 serial.ConfigManagerErrorCode=0 serial.ConfigManagerUserConfig=False serial.CreationClassName=Win32_PnPEntity serial.Description=USB Serial Device serial.DeviceID=USB\VID_16C0&PID_0483\3016580 serial.HardwareID.value0=USB\VID_16C0&PID_0483 serial.Manufacturer=Microsoft serial.Name=USB Serial Device (COM11) serial.PNPClass=Ports serial.PNPDeviceID=USB\VID_16C0&PID_0483\3016580 serial.Present=True serial.Service=usbser serial.Status=OK serial.SystemCreationClassName=Win32_ComputerSystem serial.SystemName=FRANKNEWXPS15 serial.vid=0x16C0 serial.pid=0x0483 serial.vidpid=16C00483 serial.vid_pid=0x16C0_0x0483 serial.iserial=3016580 serial.port.iserial=3016580 build.project_name=TeensySerialBridgeV1.ino build.project_path=C:\Users\Frank\Documents\Arduino\TeensySerialBridgeV1 sketch_path=C:\Users\Frank\Documents\Arduino\TeensySerialBridgeV1 ProjectDir=C:\Users\Frank\Documents\Arduino\TeensySerialBridgeV1\ build.path=C:\Users\Frank\AppData\Local\Temp\VMBuilds\TeensySerialBridgeV1\teensy35\Release vm.runtime.compile.skip_library_file_if_exists_in_project=true vm.runtime.compiler.auto_discover_includes_cache=true build.vm.build.vmdebug=0 build.vm.build.isgdb=0 build.vm.build.optimised=1 vm.last.buildpath=C:\Users\Frank\AppData\Local\Temp\VMBuilds\TeensySerialBridgeV1\teensy35\Release build.architecture=hardware vmresolved.compiler.path=C:\Program Files (x86)\Arduino\hardware\tools\ vmresolved.tools.path=C:\Program Files (x86)\Arduino\hardware Compiling 'TeensySerialBridgeV1' for 'Teensy 3.5' Using previously compiled file: C:\Users\Frank\AppData\Local\Temp\VMBuilds\TeensySerialBridgeV1\teensy35\Release\pch\Arduino.h.gch Program size: 50,268 bytes (used 10% of a 524,288 byte maximum) (0.84 secs) Minimum Memory Usage: 5316 bytes (2% of a 262136 byte maximum) |
I need two things from the build properties – the COM port number, and the path to the .HEX file. From the above list, it appears that I could use either of the following properties,
|
1 2 |
serial.port.caption=COM11 - USB Serial Device serial.Name=USB Serial Device (COM11) |
but neither is very convenient, as the COM port number has to be extracted from a ‘known’ string. On other projects, I have seen a build property like ‘serial.port.number = 11’ which would be much more convenient, but it seems to have disappeared. For the path to the .HEX file, I should be able to use
|
1 |
vm.runtime.build.final_output_path=C:\Users\Frank\Documents\Arduino\TeensySerialBridgeV1\Release\ |
or
|
1 |
build.path=C:\Users\Frank\AppData\Local\Temp\VMBuilds\TeensySerialBridgeV1\teensy35\Release |
but it appears the ‘final_output_path’ is a bit more directly related to the .HEX file location. So, to make this work using the VM post-build facility, the required ‘board.txt’ file should look like:
|
1 2 3 |
# Teensy Flash Demo V1 build property overrides # 10/05/21 gfp - trying to run a post-build command recipe.hooks.postbuild.1.pattern=cmd.exe /c "C:\Users\Frank\source\repos\FlashExecV1\bin\Release\net5.0\FlashExecV1.exe" "\"{vm.runtime.build.final_output_path}"" {serial.port.caption} |
When the above is placed in ‘board.txt’ and the Arduino sketch is run, I got the following output:
|
1 2 3 4 5 6 7 8 9 10 11 12 13 14 15 16 17 18 19 20 21 22 23 24 25 26 27 28 29 30 31 32 33 34 35 36 37 38 39 40 41 42 43 44 45 46 47 48 49 50 51 52 53 54 55 56 57 58 59 60 61 62 63 64 65 66 67 68 69 70 71 72 73 74 75 76 77 78 79 80 81 82 83 84 85 86 87 88 89 90 91 92 93 94 95 96 97 98 99 100 101 102 103 104 105 106 107 108 109 110 111 112 113 114 115 116 117 118 |
Compiling 'TeensySerialBridgeV1' for 'Teensy 3.5' Using previously compiled file: C:\Users\Frank\AppData\Local\Temp\VMBuilds\TeensySerialBridgeV1\teensy35\Release\pch\Arduino.h.gch Program size: 50,268 bytes (used 10% of a 524,288 byte maximum) (0.84 secs) Minimum Memory Usage: 5316 bytes (2% of a 262136 byte maximum) C:\Program Files (x86)\Arduino\java\bin>"C:\Users\Frank\Documents\Visual Studio 2019\Projects\TeensyFlash\bin\Release\netcoreapp3.1\TeensyFlash.exe" "\"C:\Users\Frank\Documents\Arduino\TeensySerialBridgeV1\Release\"" COM3 - USB Serial Port TeensySerialBridgeV1.ino Teensy Flash Console Number of arguments in args = 7 "C:\Users\Frank\Documents\Arduino\TeensySerialBridgeV1\Release" COM3 - USB Serial Port TeensySerialBridgeV1.ino path = C:\Users\Frank\Documents\Arduino\TeensySerialBridgeV1\Release comport = COM3 build name = TeensySerialBridgeV1 path to HEX file = C:\Users\Frank\Documents\Arduino\TeensySerialBridgeV1\Release\TeensySerialBridgeV1.hex C I received: 43 Start Program Update - Send new HEX file! buffer = 460K FLASH (0000D000 - 00080000) waiting for hex lines... :10000000F8FF022099010000110D0000C90C00004A :10001000C90C0000C90C0000C90C0000C90C00008C :10002000C90C0000C90C0000C90C0000110D000033 :10003000110D0000C90C00006129000065290000B5 :10004000110D0000110D0000110D0000110D000038 :10005000110D0000110D0000110D0000110D000028 :10006000110D0000110D0000110D0000110D000018 :10007000110D0000110D0000110D0000110D000008 :10008000110D0000110D0000110D0000110D0000F8 :10009000110D0000110D0000110D0000110D0000E8 :1000A000110D0000110D0000110D0000110D0000D8 :1000B000110D0000110D0000110D00006917000066 ... ... ... :10BFF000DCAE0000DCAE0000DCAE0000DCAE000019 :10C00000DCAE0000FFFFFFFFFFFFFFFFFFFFFFFFB2 :10C01000FFFF0000010041534349490000000000B8 :10C020000000000000000000000000000000000010 :10C030000000000000004153434949000000000097 :10C0400000000000000000000000000000000000F0 :10C0500000000000000000000000000000000000E0 :10C06000400FFF1F400FFF1F480FFF1F480FFF1F0C :10C07000500FFF1F500FFF1F580FFF1F580FFF1FBC :10C08000600FFF1F600FFF1F680FFF1F680FFF1F6C :10C09000700FFF1F700FFF1F780FFF1F780FFF1F1C :10C0A000800FFF1F800FFF1F880FFF1F880FFF1FCC :10C0B000900FFF1F900FFF1F980FFF1F980FFF1F7C :10C0C000A00FFF1FA00FFF1FA80FFF1FA80FFF1F2C :10C0D000B00FFF1FB00FFF1FB80FFF1FB80FFF1FDC :10C0E000C00FFF1FC00FFF1FC80FFF1FC80FFF1F8C :10C0F000D00FFF1FD00FFF1FD80FFF1FD80FFF1F3C :10C10000E00FFF1FE00FFF1FE80FFF1FE80FFF1FEB :10C11000F00FFF1FF00FFF1FF80FFF1FF80FFF1F9B :10C120000010FF1F0010FF1F0810FF1F0810FF1F47 :10C130001010FF1F1010FF1F1810FF1F1810FF1FF7 :10C140002010FF1F2010FF1F2810FF1F2810FF1FA7 :10C150003010FF1F3010FF1F3810FF1F3810FF1F57 :10C160004010FF1F4010FF1F4810FF1F4810FF1F07 :10C170005010FF1F5010FF1F5810FF1F5810FF1FB7 :10C180006010FF1F6010FF1F6810FF1F6810FF1F67 :10C190007010FF1F7010FF1F7810FF1F7810FF1F17 :10C1A0008010FF1F8010FF1F8810FF1F8810FF1FC7 :10C1B0009010FF1F9010FF1F9810FF1F9810FF1F77 :10C1C000A010FF1FA010FF1FA810FF1FA810FF1F27 :10C1D000B010FF1FB010FF1FB810FF1FB810FF1FD7 :10C1E000C010FF1FC010FF1FC810FF1FC810FF1F87 :10C1F000D010FF1FD010FF1FD810FF1FD810FF1F37 :10C20000E010FF1FE010FF1FE810FF1FE810FF1FE6 :10C21000F010FF1FF010FF1FF810FF1FF810FF1F96 :10C220000011FF1F0011FF1F0811FF1F0811FF1F42 :10C230001011FF1F1011FF1F1811FF1F1811FF1FF2 :10C240002011FF1F2011FF1F2811FF1F2811FF1FA2 :10C250003011FF1F3011FF1F3811FF1F3811FF1F52 :10C260004011FF1F4011FF1F4811FF1F4811FF1F02 :10C270005011FF1F5011FF1F5811FF1F5811FF1FB2 :10C280006011FF1F6011FF1F6811FF1F6811FF1F62 :10C290007011FF1F7011FF1F7811FF1F7811FF1F12 :10C2A0008011FF1F8011FF1F8811FF1F8811FF1FC2 :10C2B0009011FF1F9011FF1F9811FF1F9811FF1F72 :10C2C000A011FF1FA011FF1FA811FF1FA811FF1F22 :10C2D000B011FF1FB011FF1FB811FF1FB811FF1FD2 :10C2E000C011FF1FC011FF1FC811FF1FC811FF1F82 :10C2F000D011FF1FD011FF1FD811FF1FD811FF1F32 :10C30000E011FF1FE011FF1FE811FF1FE811FF1FE1 :10C31000F011FF1FF011FF1FF811FF1FF811FF1F91 :10C320000012FF1F0012FF1F0812FF1F0812FF1F3D :10C330001012FF1F1012FF1F1812FF1F1812FF1FED :10C340002012FF1F2012FF1F2812FF1F2812FF1F9D :10C350003012FF1F3012FF1F3812FF1F3812FF1F4D :10C360004012FF1F4012FF1F4812FF1F4812FF1FFD :10C370005012FF1F5012FF1F5812FF1F5812FF1FAD :10C380006012FF1F6012FF1F6812FF1F6812FF1F5D :10C390007012FF1F7012FF1F7812FF1F7812FF1F0D :10C3A0008012FF1F8012FF1F8812FF1F8812FF1FBD :10C3B0009012FF1F9012FF1F9812FF1F9812FF1F6D :10C3C000A012FF1FA012FF1FA812FF1FA812FF1F1D :10C3D000B012FF1FB012FF1FB812FF1FB812FF1FCD :10C3E000C012FF1FC012FF1FC812FF1FC812FF1F7D :10C3F000D012FF1FD012FF1FD812FF1FD812FF1F2D :10C40000E012FF1FE012FF1FE812FF1FE812FF1FDC :10C41000F012FF1FF012FF1FF812FF1FF812FF1F8C :10C420000013FF1F0013FF1F0813FF1F0813FF1F38 :10C430001013FF1F1013FF1F1813FF1F1813FF1FE8 :10C440002013FF1F2013FF1F2813FF1F2813FF1F98 :10C450003013FF1F3013FF1F3813FF1F3813FF1F48 :08C4600000000200FFFFFFFFD6 :00000001FF total lines = 3146 hex file: 3146 lines 50280 bytes (00000000 - 0000C468) new code contains correct FSEC value FFFFF9DE new code contains correct target ID fw_teensy35 enter 3146 to flash or 0 to abort numlines 3146 matches numTeensyLines 3146 - send confirmation |
Which appears to be correct, and the Teensy was obviously updated (got the USB disconnect/connect tones, and the LED tell-tale stopped and then resumed blinking). It looks like I might actually have a working program now – woo hoo!
06 October 2021 Update:
One minor snag occurred with the build property used to pass the COM port number to the command-line program; I had been using {serial.port.caption} and it turns out that this parameter (along with many other serial.port parameters) isn’t always available – things change depending on the COM port chosen in the Arduino program and the actual device connected (or not connected) to the PC. After another round of posts in the Visual Micro forum, Tim Leek pointed out that the ‘serial.port’ parameter should always be available. I had missed this on this because it isn’t grouped in with the rest of the ‘serial.xxx.xxx’ parameters. With the benefit of hindsight, I can see why this is so; the ‘serial.port’ parameter is probably pulled from the VS2019 IDE, while the other ‘serial.port.xxx’ parameters are hardware-specific. Once I switched my ‘board.txt’ to use the ‘serial.port’ parameter vs ‘serial.port.caption’, I started getting much more consistent results. Here’s the ‘final’ (I hope) board.txt configuration:
|
1 2 3 |
# Teensy Flash Demo V1 build property overrides # 10/05/21 gfp - trying to run a post-build command recipe.hooks.postbuild.1.pattern=cmd.exe /c "C:\Users\Frank\Documents\Visual Studio 2019\Projects\TeensyFlash\bin\Release\netcoreapp3.1\TeensyFlash.exe" "\"{vm.runtime.build.final_output_path}"" {serial.port} |
One other small snag; my ‘TeensySerialBridgeV1’ program was originally intended to just pass serial data back and forth between two terminal programs (Tera Term on one side, the Teensy sketch on the other). As a result, there was a built-in assumption that both serial connections would always be available, as shown in the following code snippet:
|
1 2 3 4 5 6 7 8 9 10 11 12 13 |
void setup() { Serial.begin(115200); while (!Serial) {} Serial1.begin(115200); while (!Serial1) {} pinMode(LED_BUILTIN, OUTPUT); Serial.printf("\nFlasherX OTA firmware update v1 %s %s\n", __DATE__, __TIME__); MsecSinceLastLEDToggle = 0; } |
The first ‘while()’ statement causes the program to hang if the physical Teensy USB connection is missing. This gave me some grief when I removed the Teensy USB cable to prove I could do the entire update cycle with only the Serial1 hardware serial device connected – oops!
The final Teensy program is shown below:
|
1 2 3 4 5 6 7 8 9 10 11 12 13 14 15 16 17 18 19 20 21 22 23 24 25 26 27 28 29 30 31 32 33 34 35 36 37 38 39 40 41 42 43 44 45 46 47 48 49 50 51 52 53 54 55 56 57 58 59 60 61 62 63 64 65 66 67 68 69 70 71 72 73 74 75 76 77 78 79 80 81 82 83 84 85 86 87 88 89 90 91 92 93 94 95 96 97 98 99 100 101 102 103 104 105 106 107 108 109 110 111 112 113 114 115 116 117 118 119 120 121 122 123 124 125 126 127 128 129 130 131 132 133 134 135 136 137 138 139 140 141 142 143 144 145 146 147 148 149 150 151 152 153 154 155 156 157 158 159 160 161 162 163 164 165 166 167 168 169 170 171 172 173 174 175 176 177 178 179 180 181 182 183 184 185 186 187 188 189 190 191 192 193 194 195 196 197 198 199 200 201 202 203 204 205 206 207 208 209 210 211 212 213 214 215 216 217 218 219 220 221 222 223 224 225 226 227 228 229 230 231 232 233 234 235 236 237 238 239 240 241 242 243 244 245 246 247 248 249 250 251 252 253 254 255 256 257 258 259 260 261 262 263 264 265 266 267 268 269 270 271 272 273 274 275 276 277 278 279 280 281 282 283 284 285 286 287 288 289 290 291 292 293 294 295 296 297 298 299 300 301 302 303 304 305 306 307 308 309 310 311 312 313 314 315 316 317 318 319 320 321 322 323 324 325 326 327 328 329 330 331 332 333 334 335 336 337 338 339 340 341 342 343 344 345 346 347 348 349 350 351 352 353 354 355 356 357 358 359 360 361 362 363 364 365 366 367 368 369 |
/* Name: TeensySerialBridgeV1.ino Created: 10/4/2021 5:07:47 PM Author: FRANKNEWXPS15\Frank */ #include "FlashTxx.h" // TLC/T3x/T4x flash primitives #include <elapsedMillis.h> elapsedMillis MsecSinceLastLEDToggle; Stream* FTDIport = &Serial1; // Serial (USB) or Serial1, Serial2, etc. (UART) Stream* USBport = &Serial1; // Serial (USB) or Serial1, Serial2, etc. (UART) //****************************************************************************** // hex_info_t struct for hex record and hex file info //****************************************************************************** typedef struct { // char* data; // pointer to array allocated elsewhere unsigned int addr; // address in intel hex record unsigned int code; // intel hex record type (0=data, etc.) unsigned int num; // number of data bytes in intel hex record uint32_t base; // base address to be added to intel hex 16-bit addr uint32_t min; // min address in hex file uint32_t max; // max address in hex file int eof; // set true on intel hex EOF (code = 1) int lines; // number of hex records received } hex_info_t; void read_ascii_line(Stream* serial, char* line, int maxbytes); int parse_hex_line(const char* theline, char* bytes, unsigned int* addr, unsigned int* num, unsigned int* code); int process_hex_record(hex_info_t* hex); void update_firmware(Stream* serial, uint32_t buffer_addr, uint32_t buffer_size); uint32_t buffer_addr, buffer_size; //09/20/21 copied from FlasherX - loop() void setup() { Serial.begin(115200); //while (!Serial) {} //10/06/21 infinite wait hangs pgm when USB cable removed - oops! delay(2000); //10/06/21 - just use fixed delay instead Serial1.begin(115200); while (!Serial1) {} pinMode(LED_BUILTIN, OUTPUT); Serial.printf("\nFlasherX OTA firmware update v1 %s %s\n", __DATE__, __TIME__); MsecSinceLastLEDToggle = 0; } void loop() { if (Serial.available()) { Serial1.write(Serial.read()); } if (Serial1.available()) { //Serial.println("Got something from Serial1!"); CheckForUserInput(); Serial.write(Serial1.read()); } if (MsecSinceLastLEDToggle >= 200) { MsecSinceLastLEDToggle -= 200; digitalWrite(LED_BUILTIN, !digitalRead(LED_BUILTIN)); //Serial.printf("."); } } void CheckForUserInput() { const int bufflen = 80; char buff[bufflen]; memset(buff, 0, bufflen); //const char s[2] = ","; //if (Serial.available() > 0) if (Serial1.available() > 0) { // read the incoming byte: int incomingByte = Serial1.read(); // say what you got: Serial1.print("I received: "); Serial1.println(incomingByte, HEX); //chg to HEX 02/18/20 //02/18/20 experiment with multiple commands switch (incomingByte) { case 0x43: //ASCII 'C' case 0x63: //ASCII 'c' Serial1.println(F("Start Program Update - Send new HEX file!")); //09/20/21 copied from FlasherX - loop() if (firmware_buffer_init(&buffer_addr, &buffer_size) == 0) { Serial1.printf("unable to create buffer\n"); Serial1.flush(); for (;;) {} } Serial1.printf("buffer = %1luK %s (%08lX - %08lX)\n", buffer_size / 1024, IN_FLASH(buffer_addr) ? "FLASH" : "RAM", buffer_addr, buffer_addr + buffer_size); //09/20/21 clear the serial buffer while (Serial1.available()) { Serial1.read(); } // receive hex file via serial, write new firmware to flash, clean up, reboot update_firmware(&Serial1, buffer_addr, buffer_size); // no return if success // return from update_firmware() means error or user abort, so clean up and // reboot to ensure that static vars get boot-up initialized before retry Serial1.printf("erase FLASH buffer / free RAM buffer...\n"); firmware_buffer_free(buffer_addr, buffer_size); Serial1.flush(); REBOOT; break; } } } //09/20/21 copied from FlasherX //****************************************************************************** // update_firmware() read hex file and write new firmware to program flash //****************************************************************************** void update_firmware(Stream* serial, uint32_t buffer_addr, uint32_t buffer_size) { static char line[96]; // buffer for hex lines static char data[32] __attribute__((aligned(8))); // buffer for hex data hex_info_t hex = { // intel hex info struct data, 0, 0, 0, // data,addr,num,code 0, 0xFFFFFFFF, 0, // base,min,max, 0, 0 // eof,lines }; serial->printf("waiting for hex lines...\n"); // read and process intel hex lines until EOF or error while (!hex.eof) { read_ascii_line(serial, line, sizeof(line)); //10/02/21 gfp added for visual xfer confirmation if (hex.lines % 10 == 0) { digitalWriteFast(LED_BUILTIN, !digitalReadFast(LED_BUILTIN)); } // reliability of transfer via USB is improved by this printf/flush if (serial == (Stream*)&Serial) { serial->printf("%s\n", line); serial->flush(); } if (parse_hex_line((const char*)line, hex.data, &hex.addr, &hex.num, &hex.code) == 0) { serial->printf("abort - bad hex line %s\n", line); return; } else if (process_hex_record(&hex) != 0) { // error on bad hex code serial->printf("abort - invalid hex code %d\n", hex.code); return; } else if (hex.code == 0) { // if data record uint32_t addr = buffer_addr + hex.base + hex.addr - FLASH_BASE_ADDR; if (hex.max > (FLASH_BASE_ADDR + buffer_size)) { serial->printf("abort - max address %08lX too large\n", hex.max); return; } else if (!IN_FLASH(buffer_addr)) { memcpy((void*)addr, (void*)hex.data, hex.num); } else if (IN_FLASH(buffer_addr)) { int error = flash_write_block(addr, hex.data, hex.num); if (error) { serial->printf("abort - error %02X in flash_write_block()\n", error); return; } } } hex.lines++; } serial->printf("\nhex file: %1d lines %1lu bytes (%08lX - %08lX)\n", hex.lines, hex.max - hex.min, hex.min, hex.max); // check FSEC value in new code -- abort if incorrect #if defined(KINETISK) || defined(KINETISL) uint32_t value = *(uint32_t*)(0x40C + buffer_addr); if (value == 0xfffff9de) { serial->printf("new code contains correct FSEC value %08lX\n", value); } else { serial->printf("abort - FSEC value %08lX should be FFFFF9DE\n", value); return; } #endif // check FLASH_ID in new code - abort if not found if (check_flash_id(buffer_addr, hex.max - hex.min)) { serial->printf("new code contains correct target ID %s\n", FLASH_ID); } else { serial->printf("abort - new code missing string %s\n", FLASH_ID); return; } // get user input to write to flash or abort int user_lines = -1; while (user_lines != hex.lines && user_lines != 0) { serial->printf("enter %d to flash or 0 to abort\n", hex.lines); read_ascii_line(serial, line, sizeof(line)); sscanf(line, "%d", &user_lines); } if (user_lines == 0) { serial->printf("abort - user entered 0 lines\n"); return; } // move new program from buffer to flash, free buffer, and reboot //serial->printf("user entered %d lines\n", user_lines); flash_move(FLASH_BASE_ADDR, buffer_addr, hex.max - hex.min); // should not return from flash_move(), but put REBOOT here as reminder REBOOT; } //****************************************************************************** // read_ascii_line() read ascii characters until '\n', '\r', or max bytes //****************************************************************************** void read_ascii_line(Stream* serial, char* line, int maxbytes) { int c = 0, nchar = 0; while (nchar < maxbytes && !(c == '\n' || c == '\r')) { if (serial->available()) { c = serial->read(); line[nchar++] = c; } } line[nchar - 1] = 0; // null-terminate } //****************************************************************************** // process_hex_record() process record and return okay (0) or error (1) //****************************************************************************** int process_hex_record(hex_info_t* hex) { if (hex->code == 0) { // data -- update min/max address so far if (hex->base + hex->addr + hex->num > hex->max) hex->max = hex->base + hex->addr + hex->num; if (hex->base + hex->addr < hex->min) hex->min = hex->base + hex->addr; } else if (hex->code == 1) { // EOF (:flash command not received yet) hex->eof = 1; } else if (hex->code == 2) { // extended segment address (top 16 of 24-bit addr) hex->base = ((hex->data[0] << 8) | hex->data[1]) << 4; } else if (hex->code == 3) { // start segment address (80x86 real mode only) return 1; } else if (hex->code == 4) { // extended linear address (top 16 of 32-bit addr) hex->base = ((hex->data[0] << 8) | hex->data[1]) << 16; } else if (hex->code == 5) { // start linear address (32-bit big endian addr) hex->base = (hex->data[0] << 24) | (hex->data[1] << 16) | (hex->data[2] << 8) | (hex->data[3] << 0); } else { return 1; } return 0; } //****************************************************************************** // Intel Hex record foramt: // // Start code: one character, ASCII colon ':'. // Byte count: two hex digits, number of bytes (hex digit pairs) in data field. // Address: four hex digits // Record type: two hex digits, 00 to 05, defining the meaning of the data field. // Data: n bytes of data represented by 2n hex digits. // Checksum: two hex digits, computed value used to verify record has no errors. // // Examples: // :10 9D30 00 711F0000AD38000005390000F5460000 35 // :04 9D40 00 01480000 D6 // :00 0000 01 FF //****************************************************************************** /* Intel HEX read/write functions, Paul Stoffregen, paul@ece.orst.edu */ /* This code is in the public domain. Please retain my name and */ /* email address in distributed copies, and let me know about any bugs */ /* I, Paul Stoffregen, give no warranty, expressed or implied for */ /* this software and/or documentation provided, including, without */ /* limitation, warranty of merchantability and fitness for a */ /* particular purpose. */ // type modifications by Jon Zeeff /* parses a line of intel hex code, stores the data in bytes[] */ /* and the beginning address in addr, and returns a 1 if the */ /* line was valid, or a 0 if an error occured. The variable */ /* num gets the number of bytes that were stored into bytes[] */ #include <stdio.h> // sscanf(), etc. #include <string.h> // strlen(), etc. int parse_hex_line(const char* theline, char* bytes, unsigned int* addr, unsigned int* num, unsigned int* code) { unsigned sum, len, cksum; const char* ptr; int temp; *num = 0; if (theline[0] != ':') return 0; if (strlen(theline) < 11) return 0; ptr = theline + 1; if (!sscanf(ptr, "%02x", &len)) return 0; ptr += 2; if (strlen(theline) < (11 + (len * 2))) return 0; if (!sscanf(ptr, "%04x", (unsigned int*)addr)) return 0; ptr += 4; /* Serial.printf("Line: length=%d Addr=%d\n", len, *addr); */ if (!sscanf(ptr, "%02x", code)) return 0; ptr += 2; sum = (len & 255) + ((*addr >> 8) & 255) + (*addr & 255) + (*code & 255); while (*num != len) { if (!sscanf(ptr, "%02x", &temp)) return 0; bytes[*num] = temp; ptr += 2; sum += bytes[*num] & 255; (*num)++; if (*num >= 256) return 0; } if (!sscanf(ptr, "%02x", &cksum)) return 0; if (((sum & 255) + (cksum & 255)) & 255) return 0; /* checksum error */ return 1; } |
09 October 2021 Update: The final product
After encountering and solving a few more ‘gotchas’, I think I now have a reliable Teensy OTA mechanism using the VS2019/Visual Micro IDE and Joe Pasquariello’s wonderful ‘FlasherX’ code . The ‘trick’ is using Visual Micro’s ‘board.txt’ feature to add a post-build command that runs each time the Teensy sketch is compiled, and a small C# command-line program to trigger the FlasherX update code and feed it the correct Hex file.
I created a very simple Teensy project called ‘TeensyOTADemo’ that does only two things; it flashes the built-in LED, and launches the FlasherX update code when triggered by a ‘U’ (for Update) ascii code on Serial1 (pins 0 & 1 on a T3.5). Then I created a small C# command-line program to actually send the trigger character and then transmit the .HEX file created as part of the normal compile process.
Then I created a ‘board.txt’ file containing a post-build command that launches the C# command-line program and feeds it two arguments – one containing the build path, and the other containing the COM port number to be used to connect to the Teensy’s Serial1 port.
Here’s the Teensy sketch:
|
1 2 3 4 5 6 7 8 9 10 11 12 13 14 15 16 17 18 19 20 21 22 23 24 25 26 27 28 29 30 31 32 33 34 35 36 37 38 39 40 41 42 43 44 45 46 47 48 49 50 51 52 53 54 55 56 57 58 59 60 61 62 63 64 65 66 67 68 69 70 71 72 73 74 75 76 77 78 79 80 81 82 83 84 85 86 87 88 89 90 91 92 93 94 95 96 97 98 99 100 101 102 103 104 105 106 107 108 109 110 111 112 113 114 115 116 117 118 119 120 121 122 123 124 125 126 127 128 129 130 131 132 133 134 135 136 137 138 139 140 141 142 143 144 145 146 147 148 149 150 151 152 153 154 155 156 157 158 159 160 161 162 163 164 165 166 167 168 169 170 171 172 173 174 175 176 177 178 179 180 181 182 183 184 185 186 187 188 189 190 191 192 193 194 195 196 197 198 199 200 201 202 203 204 205 206 207 208 209 210 211 212 213 214 215 216 217 218 219 220 221 222 223 224 225 226 227 228 229 230 231 232 233 234 235 236 237 238 239 240 241 242 243 244 245 246 247 248 249 250 251 252 253 254 255 256 257 258 259 260 261 262 263 264 265 266 267 268 269 270 271 272 273 274 275 276 277 278 279 280 281 282 283 284 285 286 287 288 289 290 291 292 293 294 295 296 297 298 299 300 301 302 303 304 305 306 307 308 309 310 311 312 313 314 315 316 317 318 319 320 321 322 323 324 325 326 327 328 329 330 331 332 333 334 335 336 337 338 339 340 341 342 343 344 345 346 347 348 349 350 351 352 353 354 355 356 357 358 359 360 361 362 363 364 365 366 367 368 369 370 |
/* Name: TeensyOTADemo.ino Created: 10/9/2021 11:18:19 AM Author: FRANKNEWXPS15\Frank This program demonstrates the use of 'board.txt' post-build instructions in conjunction with a small C# command-line program for seamless 'over-the-air' (OTA) firmware update for Teensy modules. Implementation of OTA update requires that Joe Pasquariello's 'FlasherX' code be added to the Teensy sketch as it is below, and some code to allow an external serial communications program to trigger the update process. In the demo sketch below, the 'FlasherX' additions are the '#include FlasherTxx.h' line and the addition of the FlasherX specific code at the bottom. The trigger mechanism is provided by the 'CheckForUserInput();' call in loop. If the ASCII code for 'U' or 'u' is present on Serial1, the update process will be launched. */ #include "FlashTxx.h" // TLC/T3x/T4x flash primitives #include <elapsedMillis.h> elapsedMillis MsecSinceLastLEDToggle; //used for LED blink timer Stream* FTDIport = &Serial1; // Serial (USB) or Serial1, Serial2, etc. (UART) //****************************************************************************** // hex_info_t struct for hex record and hex file info //****************************************************************************** typedef struct { // char* data; // pointer to array allocated elsewhere unsigned int addr; // address in intel hex record unsigned int code; // intel hex record type (0=data, etc.) unsigned int num; // number of data bytes in intel hex record uint32_t base; // base address to be added to intel hex 16-bit addr uint32_t min; // min address in hex file uint32_t max; // max address in hex file int eof; // set true on intel hex EOF (code = 1) int lines; // number of hex records received } hex_info_t; void read_ascii_line(Stream* serial, char* line, int maxbytes); int parse_hex_line(const char* theline, char* bytes, unsigned int* addr, unsigned int* num, unsigned int* code); int process_hex_record(hex_info_t* hex); void update_firmware(Stream* serial, uint32_t buffer_addr, uint32_t buffer_size); uint32_t buffer_addr, buffer_size; //09/20/21 copied from FlasherX - loop() void setup() { Serial.begin(115200); //while (!Serial) {} //10/06/21 infinite wait hangs pgm when USB cable removed - oops! delay(2000); //10/06/21 - just use fixed delay instead Serial1.begin(115200); while (!Serial1) {} pinMode(LED_BUILTIN, OUTPUT); MsecSinceLastLEDToggle = 0; } void loop() { if (Serial1.available()) { CheckForUserInput(); } if (MsecSinceLastLEDToggle >= 200) { MsecSinceLastLEDToggle -= 200; digitalWrite(LED_BUILTIN, !digitalRead(LED_BUILTIN)); } } void CheckForUserInput() { const int bufflen = 80; char buff[bufflen]; memset(buff, 0, bufflen); //const char s[2] = ","; if (Serial1.available() > 0) { // read the incoming byte: int incomingByte = Serial1.read(); // say what you got: Serial1.print("I received: "); Serial1.println(incomingByte, HEX); //chg to HEX 02/18/20 //02/18/20 experiment with multiple commands switch (incomingByte) { case 0x55: //ASCII 'U' case 0x75: //ASCII 'u' Serial1.println(F("Start Program Update - Send new HEX file!")); //09/20/21 copied from FlasherX - loop() if (firmware_buffer_init(&buffer_addr, &buffer_size) == 0) { Serial1.printf("unable to create buffer\n"); Serial1.flush(); for (;;) {} } Serial1.printf("buffer = %1luK %s (%08lX - %08lX)\n", buffer_size / 1024, IN_FLASH(buffer_addr) ? "FLASH" : "RAM", buffer_addr, buffer_addr + buffer_size); //09/20/21 clear the serial buffer while (Serial1.available()) { Serial1.read(); } // receive hex file via serial, write new firmware to flash, clean up, reboot update_firmware(&Serial1, buffer_addr, buffer_size); // no return if success // return from update_firmware() means error or user abort, so clean up and // reboot to ensure that static vars get boot-up initialized before retry Serial1.printf("erase FLASH buffer / free RAM buffer...\n"); firmware_buffer_free(buffer_addr, buffer_size); Serial1.flush(); REBOOT; break; } } } //09/20/21 copied from FlasherX //****************************************************************************** // update_firmware() read hex file and write new firmware to program flash //****************************************************************************** void update_firmware(Stream* serial, uint32_t buffer_addr, uint32_t buffer_size) { static char line[96]; // buffer for hex lines static char data[32] __attribute__((aligned(8))); // buffer for hex data hex_info_t hex = { // intel hex info struct data, 0, 0, 0, // data,addr,num,code 0, 0xFFFFFFFF, 0, // base,min,max, 0, 0 // eof,lines }; serial->printf("waiting for hex lines...\n"); // read and process intel hex lines until EOF or error while (!hex.eof) { read_ascii_line(serial, line, sizeof(line)); //10/02/21 gfp added for visual xfer confirmation if (hex.lines % 10 == 0) { digitalWriteFast(LED_BUILTIN, !digitalReadFast(LED_BUILTIN)); } // reliability of transfer via USB is improved by this printf/flush if (serial == (Stream*)&Serial) { serial->printf("%s\n", line); serial->flush(); } if (parse_hex_line((const char*)line, hex.data, &hex.addr, &hex.num, &hex.code) == 0) { serial->printf("abort - bad hex line %s\n", line); return; } else if (process_hex_record(&hex) != 0) { // error on bad hex code serial->printf("abort - invalid hex code %d\n", hex.code); return; } else if (hex.code == 0) { // if data record uint32_t addr = buffer_addr + hex.base + hex.addr - FLASH_BASE_ADDR; if (hex.max > (FLASH_BASE_ADDR + buffer_size)) { serial->printf("abort - max address %08lX too large\n", hex.max); return; } else if (!IN_FLASH(buffer_addr)) { memcpy((void*)addr, (void*)hex.data, hex.num); } else if (IN_FLASH(buffer_addr)) { int error = flash_write_block(addr, hex.data, hex.num); if (error) { serial->printf("abort - error %02X in flash_write_block()\n", error); return; } } } hex.lines++; } serial->printf("\nhex file: %1d lines %1lu bytes (%08lX - %08lX)\n", hex.lines, hex.max - hex.min, hex.min, hex.max); // check FSEC value in new code -- abort if incorrect #if defined(KINETISK) || defined(KINETISL) uint32_t value = *(uint32_t*)(0x40C + buffer_addr); if (value == 0xfffff9de) { serial->printf("new code contains correct FSEC value %08lX\n", value); } else { serial->printf("abort - FSEC value %08lX should be FFFFF9DE\n", value); return; } #endif // check FLASH_ID in new code - abort if not found if (check_flash_id(buffer_addr, hex.max - hex.min)) { serial->printf("new code contains correct target ID %s\n", FLASH_ID); } else { serial->printf("abort - new code missing string %s\n", FLASH_ID); return; } // get user input to write to flash or abort int user_lines = -1; while (user_lines != hex.lines && user_lines != 0) { serial->printf("enter %d to flash or 0 to abort\n", hex.lines); read_ascii_line(serial, line, sizeof(line)); sscanf(line, "%d", &user_lines); } if (user_lines == 0) { serial->printf("abort - user entered 0 lines\n"); return; } // move new program from buffer to flash, free buffer, and reboot //serial->printf("user entered %d lines\n", user_lines); flash_move(FLASH_BASE_ADDR, buffer_addr, hex.max - hex.min); // should not return from flash_move(), but put REBOOT here as reminder REBOOT; } //****************************************************************************** // read_ascii_line() read ascii characters until '\n', '\r', or max bytes //****************************************************************************** void read_ascii_line(Stream* serial, char* line, int maxbytes) { int c = 0, nchar = 0; while (nchar < maxbytes && !(c == '\n' || c == '\r')) { if (serial->available()) { c = serial->read(); line[nchar++] = c; } } line[nchar - 1] = 0; // null-terminate } //****************************************************************************** // process_hex_record() process record and return okay (0) or error (1) //****************************************************************************** int process_hex_record(hex_info_t* hex) { if (hex->code == 0) { // data -- update min/max address so far if (hex->base + hex->addr + hex->num > hex->max) hex->max = hex->base + hex->addr + hex->num; if (hex->base + hex->addr < hex->min) hex->min = hex->base + hex->addr; } else if (hex->code == 1) { // EOF (:flash command not received yet) hex->eof = 1; } else if (hex->code == 2) { // extended segment address (top 16 of 24-bit addr) hex->base = ((hex->data[0] << 8) | hex->data[1]) << 4; } else if (hex->code == 3) { // start segment address (80x86 real mode only) return 1; } else if (hex->code == 4) { // extended linear address (top 16 of 32-bit addr) hex->base = ((hex->data[0] << 8) | hex->data[1]) << 16; } else if (hex->code == 5) { // start linear address (32-bit big endian addr) hex->base = (hex->data[0] << 24) | (hex->data[1] << 16) | (hex->data[2] << 8) | (hex->data[3] << 0); } else { return 1; } return 0; } //****************************************************************************** // Intel Hex record foramt: // // Start code: one character, ASCII colon ':'. // Byte count: two hex digits, number of bytes (hex digit pairs) in data field. // Address: four hex digits // Record type: two hex digits, 00 to 05, defining the meaning of the data field. // Data: n bytes of data represented by 2n hex digits. // Checksum: two hex digits, computed value used to verify record has no errors. // // Examples: // :10 9D30 00 711F0000AD38000005390000F5460000 35 // :04 9D40 00 01480000 D6 // :00 0000 01 FF //****************************************************************************** /* Intel HEX read/write functions, Paul Stoffregen, paul@ece.orst.edu */ /* This code is in the public domain. Please retain my name and */ /* email address in distributed copies, and let me know about any bugs */ /* I, Paul Stoffregen, give no warranty, expressed or implied for */ /* this software and/or documentation provided, including, without */ /* limitation, warranty of merchantability and fitness for a */ /* particular purpose. */ // type modifications by Jon Zeeff /* parses a line of intel hex code, stores the data in bytes[] */ /* and the beginning address in addr, and returns a 1 if the */ /* line was valid, or a 0 if an error occured. The variable */ /* num gets the number of bytes that were stored into bytes[] */ #include <stdio.h> // sscanf(), etc. #include <string.h> // strlen(), etc. int parse_hex_line(const char* theline, char* bytes, unsigned int* addr, unsigned int* num, unsigned int* code) { unsigned sum, len, cksum; const char* ptr; int temp; *num = 0; if (theline[0] != ':') return 0; if (strlen(theline) < 11) return 0; ptr = theline + 1; if (!sscanf(ptr, "%02x", &len)) return 0; ptr += 2; if (strlen(theline) < (11 + (len * 2))) return 0; if (!sscanf(ptr, "%04x", (unsigned int*)addr)) return 0; ptr += 4; /* Serial.printf("Line: length=%d Addr=%d\n", len, *addr); */ if (!sscanf(ptr, "%02x", code)) return 0; ptr += 2; sum = (len & 255) + ((*addr >> 8) & 255) + (*addr & 255) + (*code & 255); while (*num != len) { if (!sscanf(ptr, "%02x", &temp)) return 0; bytes[*num] = temp; ptr += 2; sum += bytes[*num] & 255; (*num)++; if (*num >= 256) return 0; } if (!sscanf(ptr, "%02x", &cksum)) return 0; if (((sum & 255) + (cksum & 255)) & 255) return 0; /* checksum error */ return 1; } |
And the C# command-line program:
|
1 2 3 4 5 6 7 8 9 10 11 12 13 14 15 16 17 18 19 20 21 22 23 24 25 26 27 28 29 30 31 32 33 34 35 36 37 38 39 40 41 42 43 44 45 46 47 48 49 50 51 52 53 54 55 56 57 58 59 60 61 62 63 64 65 66 67 68 69 70 71 72 73 74 75 76 77 78 79 80 81 82 83 84 85 86 87 88 89 90 91 92 93 94 95 96 97 98 99 100 101 102 103 104 105 106 107 108 109 110 111 112 113 114 115 116 117 118 119 120 121 122 123 124 125 126 127 128 129 130 131 132 133 134 135 136 137 138 139 140 141 142 143 144 145 146 147 148 149 150 151 152 153 154 155 156 157 158 159 160 161 162 163 164 165 166 167 168 169 170 171 172 173 174 175 176 177 178 179 180 181 182 183 184 185 186 187 188 189 190 191 192 193 194 195 196 197 198 199 200 201 202 203 204 205 206 207 208 |
using System; using System.IO.Ports; using System.Threading; using System.Timers; /* Small console app to facilitate over-the-air (OTA) updates to a Teensy 3.x/4.x controller, using VS2019 with the Visual Micro extension as the Arduino IDE. It is called by a post-build 'hook' statement in a file called 'board.txt' located in whatever Teensy program is being updated. This app does the following: - Extract the project path and selected COMPORT number from the arguments to the call to Main() - Opens a UART serial port connection to the Teensy, typically one provided by a BT adaptor operating in 'pass-through' mode. The serial port COMPORT number is passed into this app as an argument. - Sends whatever command is required to put the existing Teensy firmware into 'update' mode - Using the path of the updating program (passed in as an argument), locates the .HEX file associated with the project, and sends it's contents to the Teensy, one line at a time, counting lines and confirming checksums line-by-line - Compares the number of lines sent to the Teensy with the number of lines received by the Teensy, and if there is a match, allows the Teensy update process to complete; otherwise aborts */ namespace TeensyFlash { class Program { const string startCmdStr = "U"; //used in sketch's 'GetUserInput()' to start upload sequence static string rcvStr = string.Empty; private static System.Timers.Timer aTimer; private static bool bTimedOut; static void Main(string[] args) { //Extract the build path and selected COMPORT number from the arguments to the call to Main() Console.WriteLine("Teensy Flash Console"); Console.WriteLine("Number of arguments in args = {0}\n", args.Length); int argindex = 0; string comPortStr = string.Empty; foreach (var item in args) { Console.WriteLine(item); if (item.Contains("COM")) { comPortStr = args[argindex]; } argindex++; } string build_path = args[0]; string projectName = args[args.Length - 1]; projectName = projectName.Substring(0, projectName.Length - 4); //remove extension build_path = build_path.Replace("\"", string.Empty).Trim(); Console.WriteLine("path = {0}", build_path); Console.WriteLine("comport = {0}", comPortStr); Console.WriteLine("build name = {0}", projectName); Console.WriteLine("path to HEX file = {0}", build_path + "\\" + projectName + ".hex"); //Find and open .HEX file - maybe pre-process to confirm checksums and get number of bytes. try { Console.WriteLine("just before file read"); string[] lines = System.IO.File.ReadAllLines(build_path + "\\" + projectName + ".hex"); Console.WriteLine("Read {0} lines from hex file", lines.Length); int numlines = 0; //Open UART serial port connection to the Teensy, typically one provided by a BT adaptor //Send whatever command is required to put the existing Teensy firmware into 'update' mode try { SerialPort _serport = new SerialPort(comPortStr, 115200); _serport.Open(); _serport.DiscardOutBuffer(); _serport.DiscardInBuffer(); Thread.Sleep(100); Console.WriteLine(startCmdStr); _serport.Write(startCmdStr); rcvStr = string.Empty; aTimer = new System.Timers.Timer(); aTimer.Interval = 5000; aTimer.Elapsed += OnTimedEvent; aTimer.Start(); while (!rcvStr.Contains("waiting") && !bTimedOut) { if (_serport.BytesToRead > 0) { rcvStr = _serport.ReadLine(); } } aTimer.Stop(); if (bTimedOut) { Console.WriteLine("Timed out waiting for 'waiting' response from Teensy"); } else { //if we get to here, the Teensy is ready to receive HEX file contents Thread.Sleep(500); numlines = 0; foreach (string item in lines) { numlines++; _serport.WriteLine(item); } Console.WriteLine("total lines = {0}", numlines); //now we wait for Teensy to emit "hex file: xx lines xx bytes..." and then "enter xx to flash..." aTimer.Start(); while (!rcvStr.Contains("hex file:") && !bTimedOut) { if (_serport.BytesToRead > 0) { rcvStr = _serport.ReadLine(); } } aTimer.Stop(); aTimer.Dispose(); if (bTimedOut) { Console.WriteLine("Timed out waiting for response from Teensy"); } else { //extract number of lines from Teensy string, and compare with numlines. //If they match, then send the number back to Teensy to complete the update. //Otherwise, send '0' to abort int colonIdx = rcvStr.IndexOf(':'); int lineIdx = rcvStr.IndexOf("lines"); string compareStr = rcvStr.Substring(colonIdx+1, lineIdx - colonIdx-1); compareStr = compareStr.Trim(); int numTeensyLines = Convert.ToInt16(compareStr); Console.WriteLine("sent {0} teensy replied {1}",numlines, numTeensyLines); if (numTeensyLines == numlines) { Console.WriteLine("numlines {0} matches numTeensyLines {1} - send confirmation", numlines, numTeensyLines); _serport.WriteLine(compareStr); } } //Send [project_name].Hex file to the Teensy, confirming checksum and counting lines //If sent bytes match received bytes, allow the update to complete. } } catch (Exception exc) { Console.WriteLine(exc.Message); }// end CATCH portion of TRY/CATCH block } catch (Exception e) { Console.WriteLine("hex file read failed with message:" + e.Message); } aTimer.Dispose(); } static string chksum(string input) { int TwosComplement(string s) { if (s.Length % 2 != 0) throw new FormatException(nameof(input)); var checksum = 0; for (var i = 0; i < s.Length; i += 2) { var value = int.Parse(s.Substring(i, 2), System.Globalization.NumberStyles.AllowHexSpecifier); checksum = (checksum + value) & 0xFF; } return 256 - checksum & 0xFF; } //return string.Concat(":", input, " ", TwosComplement(input).ToString("X2")); return TwosComplement(input).ToString("X2"); } private static void SetTimer() { // Create a timer with a two second interval. aTimer = new System.Timers.Timer(2000); // Hook up the Elapsed event for the timer. aTimer.Elapsed += OnTimedEvent; //aTimer.AutoReset = true; aTimer.Enabled = true; } private static void OnTimedEvent(Object source, ElapsedEventArgs e) { Console.WriteLine("The Elapsed event was raised at {0:HH:mm:ss.fff}", e.SignalTime); bTimedOut = true; } } } |
And last, the ‘board.txt’ file contents that launches the C# command-line program:
|
1 2 3 |
# Teensy OTA Demo build property overrides # 10/05/21 gfp - trying to run a post-build command recipe.hooks.postbuild.1.pattern=cmd.exe /c "C:\Users\Frank\Documents\Visual Studio 2019\Projects\TeensyFlash\bin\Release\netcoreapp3.1\TeensyFlash.exe" "\"{vm.runtime.build.final_output_path}"" {serial.port} {build.project_name} |
Here’s a short video showing the update process. The clip starts with the ascii ‘U’ trigger code arriving at the Teensy Serial1 port, and ends with the update finished and the Teensy rebooted back into the ‘blink’ code.
09 October 2021 Update: HC-05 Bluetooth link:
The next step is to replace the FTDI module with an HC-05 Bluetooth link. I had some HC-05 modules from previous work, and I had done a similar project with an Arduino some time back – so how hard could it be?
I hooked up a HC-05 to the Teensy as shown in the following photo, using a bench power supply to power both the HC-05 and the Teensy 3.5
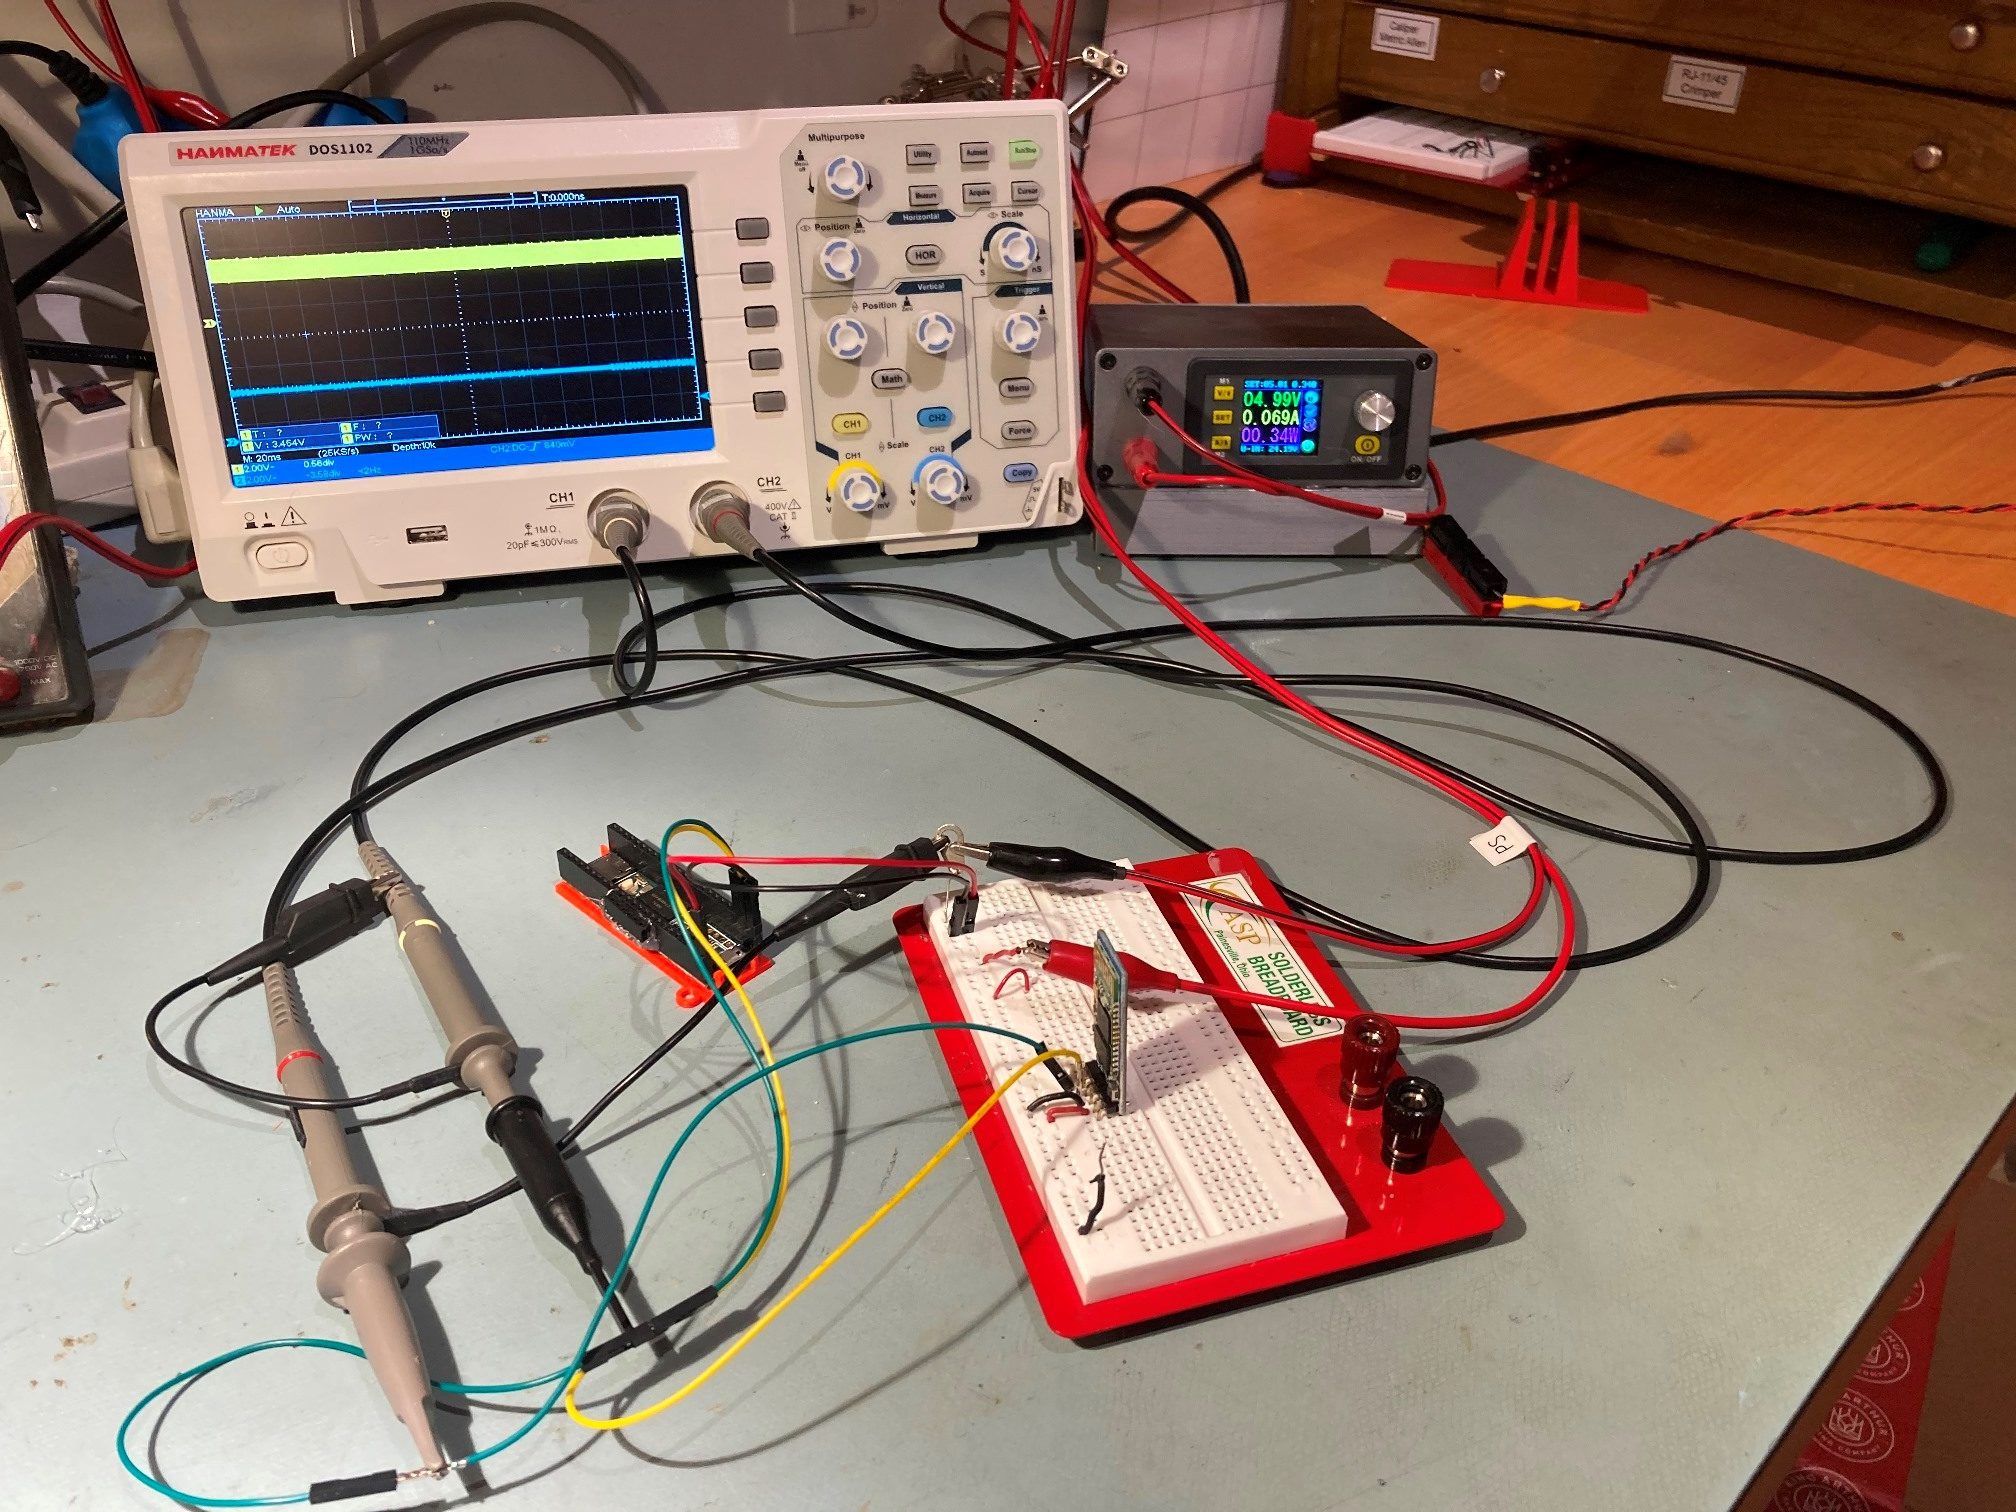
Then I paired the HC-05 with my laptop; this took a bit of fumbling around, as the laptop thought it was still paired with an HC-05 even though it’s been over two years since I last used it, and I had since forgotten that the default password was ‘1234’. In any case, I eventually got it paired, as shown, with an automatically generated COM port on COM4.
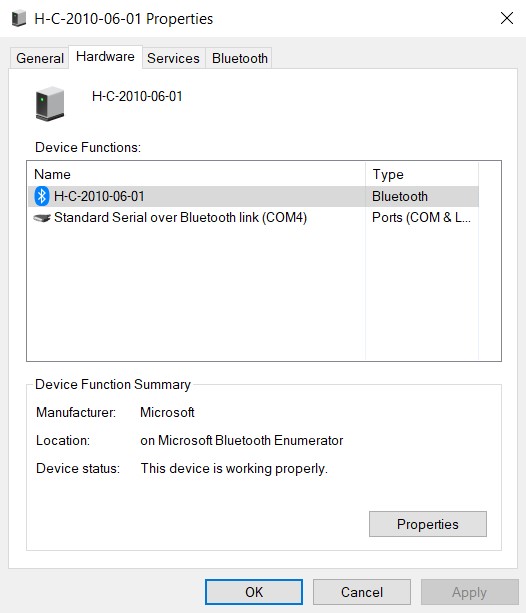
Next I fired up Tera Term and created a connection to COM4, as shown:
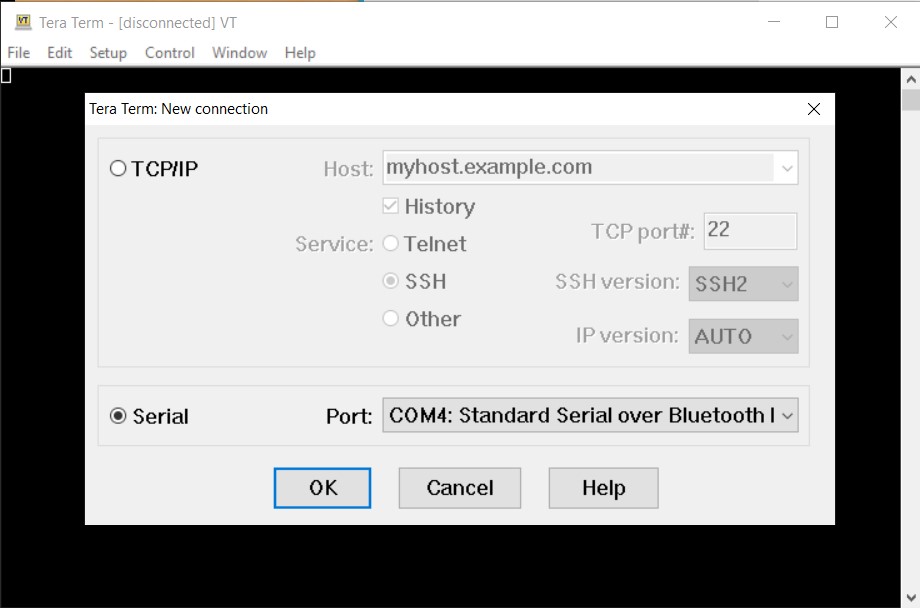
And then tried sending some ascii text through to the Teensy. This appeared to work fine, but when I tried a program update via the HC-05 link I got an error that indicated the FlasherX code didn’t like something I was sending it.

The ‘abort – bad hex line’ output happens before I try to send it the .HEX file contents, so it clearly isn’t choking on that; maybe some extra characters getting sent instead of just the “U” character?
Looking at the ‘FlasherX’ code, it appears that the offending characters/line is supposed to be printed out with the lines
|
1 2 3 4 |
if (parse_hex_line((const char*)line, hex.data, &hex.addr, &hex.num, &hex.code) == 0) { serial->printf("abort - bad hex line %s\n", line); return; } |
which implies whatever caused the problem is non-printable – maybe an extra CR/LF? So, I added some debug code to update_firmware() to print out each line as it is read into the ‘line’ character array, so maybe I can see the problem.
Hmm, more mysteries. I reconnected the regular USB connection, and uploaded the new version of the sketch. Then I disconnected the USB connector, and used Tera Term to send the update command (“U”). However, this time the OTA Update code didn’t choke, and AFAICT performed a completely successful update via BT and the HC-05 – yay! Of course, I now have no idea what caused the problem to start with, and whether or not my addition of a few lines of debugging code made the difference.
So, I undid the changes to the update code and tried again. And, as shown below, the OTA update worked perfectly – double Yay!!
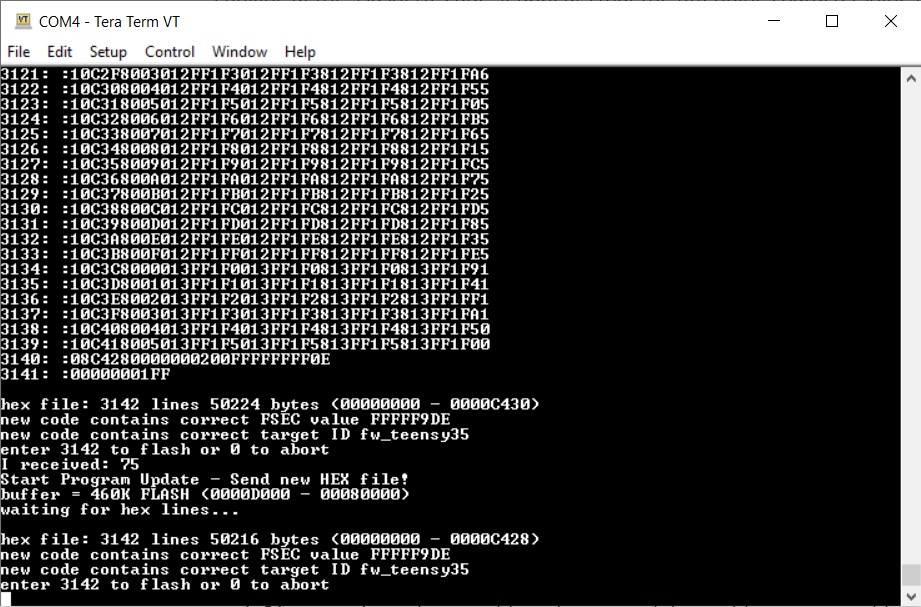
So now to try an OTA update using my command-line program instead of Tera Term. I disconnected TT from COM4, and then, after selecting COM4 in the VS2019 IDE, pressed F7 to start the process. This worked as well, but it appeared the transfer rate was considerably slower – no idea why.
|
1 2 3 4 5 6 7 8 9 10 11 12 13 14 15 16 |
C:\Program Files (x86)\Arduino\java\bin>"C:\Users\Frank\Documents\Visual Studio 2019\Projects\TeensyFlash\bin\Release\netcoreapp3.1\TeensyFlash.exe" "\"C:\Users\Frank\Documents\Arduino\Teensy Projects\TeensyOTADemo\Release\"" COM4 TeensyOTADemo.ino Teensy Flash Console Number of arguments in args = 3 "C:\Users\Frank\Documents\Arduino\Teensy Projects\TeensyOTADemo\Release" COM4 TeensyOTADemo.ino path = C:\Users\Frank\Documents\Arduino\Teensy Projects\TeensyOTADemo\Release comport = COM4 build name = TeensyOTADemo path to HEX file = C:\Users\Frank\Documents\Arduino\Teensy Projects\TeensyOTADemo\Release\TeensyOTADemo.hex just before file read Read 3142 lines from hex file U total lines = 3142 sent 3142 teensy replied 3142 numlines 3142 matches numTeensyLines 3142 - send confirmation |
Here’s a short video showing the OTA update using the command-line program and BT OTA.
Just comparing the overall times from the two videos above the one using the command-line program runs approximately twice as long. It’s hard to believe it is only the use of the command-line program vs Tera Term that is causing the delay – but it is possible that TT was simply running at a higher baud rate – more study required.
In summary, however, slow rate or no, it is clear that we now can implement completely automated, seamless OTA update processes using VS2019 and Visual Micro. Now that the groundwork has been laid, I would assume that this same strategy could be implemented for other IDE’s as well.
I have started GitHub repositories for the Teensy demo sketch TeensyOTADemo and my TeensyFlash C# command-line program on my GitHub site, and I would welcome suggestions/improvements.
10 October 2021 Update:
I’m trying to determine what caused the slow update when using my command-line program and the HC-05 when doing an OTA update relative to the situation when using Tera Term to manually transfer the .HEX file to the Teensy. In both cases, the OTA link is through the HC-05, so that module shouldn’t be the cause. However, just to check I went back and checked the HC-05 settings using the ‘AT Command Mode’ trick discussed in this post. AFAICT, the HC-05 was set to 115200 baud rate. I also checked to see if I had somehow misconfigured the serial port created in my command-line program, but it is set to create a port at 115,200 BPS as well. So, I’m officially baffled.
To investigate the problem, did an OTA update via the HC-05 BT link, but using Tera Term to trigger the update process and send the .HEX file. Using this method, it took approximately 14 sec to transfer the entire 3142-line .HEX file. Then I did an OTA update using my command-line program, using the same HC-05 BT link. With this setup, the transfer took approximately 35 seconds – over twice the time. Watching with my scope, it is clear that the transfer takes place at a much slower rate when using the command-line program, even though (at least AFAICT) the programmed baud rates are identical in both cases. The two photos below show the transfer rate for both cases, using the same time scale for both.

After a bit of web research on C# .NET serial port programming, I came across this post, which indicates that using .NET for this task was not a very wise move – bummer!
Stay tuned,
Frank