void loop()
{
CheckForUserInput(); //allows remote manual robot control
//03/08/17 Revised to introduce three top-level op modes (wall-follow, IR home, charging)
//Purpose: Follow nearest wall, or home on IR beam, or monitor charging as necessary
//Plan:
// Step1: Determine current operating mode
// Step2: Switch to appropriate operating case block
// Step3: Check for FRAM and/or MPU interrupt flags
//Notes:
// 03/19/17 IRHomeToChgStn sig rev to include init l/r speeds in IRHOMING case block
// 09/19/18 added section to write telemetry to FRAM
// 08/15/20 new plan: use 'bTimeForNavUpdate' set to true in Timer ISR, cleared here
// 08/15/20 new plan: use 'bTimeForNavUpdate' set to true in Timer1 ISR, cleared here
if (bTimeForNavUpdate)
{
//mySerial.printf("%lu: Top of Loop()\n", millis());
bTimeForNavUpdate = false; //set in Timer1 ISR
digitalWrite(RED_LASER_DIODE_PIN, HIGH); //fire the laser pointer
//03/10/19 rev so NO_STUCK #define can prevent 'stuck' detection while still keeping LIDAR active
#ifndef NO_LIDAR
//frontdistval = GetFrontDistCm(); //11/02/20 frontdistval updated in ISR
#else
frontdistval = MAX_FRONT_DISTANCE_CM; //05/03/17 bugfix
#endif //NO_LIDAR
UpdateLRDistanceArrays(Lidar_LeftCenter, Lidar_RightCenter);
float batVoltage = GetBattVoltage(); //04/28/19 mvd here so can be used in GetOpMode()
CurrentOpMode = (OpModes)GetOpMode(batVoltage); //04/28/19 bat volts added to sig
//Step1: Determine current operating mode
#pragma region OP_MODE SWITCH
//Step2: Switch to appropriate operating case block
String trackstr = "Unknown"; //used for telemetry printouts
switch (CurrentOpMode)
{
#pragma region MODE_CHARGING
case MODE_CHARGING:
digitalWrite(RED_LASER_DIODE_PIN, LOW); //disable the laser pointer
chgStartMsec = millis(); //used for charge duration telemetry
Serial.print(F("Starting Charge Mode at ")); Serial.println(chgStartMsec);
StopBothMotors(); //added 03/13/17
//04/27/21
mySerial.printf("Reset VL53L0X Teensy to reduce current consumption\n");
digitalWrite(VL53L0X_TEENSY_RESET_PIN, LOW); //hold Teensy reset to reduce current consumption
MonitorChargeUntilDone();
mySerial.printf("Restart VL53L0X Teensy...\n");
digitalWrite(VL53L0X_TEENSY_RESET_PIN, HIGH); //restart Teensy
WaitForVL53L0XTeensy(); //wait for it to come back up.
ExecDisconManeuver();
PrevOpMode = MODE_NONE; //04/27/21: this will force wall offset recapture
//mySerial.printf("%lu: just after ExecDisconManeuver() in TRACKING_RIGHT case block\n", millis());
break;
#pragma endregion MODE_CHARGING
#pragma region MODE_IRHOMING
case MODE_IRHOMING:
digitalWrite(RED_LASER_DIODE_PIN, LOW); //disable the laser pointer
mySerial.printf("IR Beam Detected with Battery Voltage = %1.2f\n", batVoltage);
//PrevOpMode = MODE_IRHOMING;
if (batVoltage > LOW_BATT_THRESH_VOLTS) //not hungry
{
Serial.println("Not Hungry - Avoiding Charger");
//04/27/21 too complicated - just have robot reverse course
int leftdist = GetAvgLeftDistCm();
int rightdist = GetAvgRightDistCm();
SpinTurn(leftdist > rightdist, 180);
PrevOpMode = MODE_NONE;
}
else //hungry - try to connect
{
Serial.println("Low battery - homing to Charger");
IRHomeToChgStn(0, MOTOR_SPEED_HALF, MOTOR_SPEED_HALF);
}
break;
#pragma endregion IR Homing Case
#pragma region MODE_WALLFOLLOW
case MODE_WALLFOLLOW:
//Purpose: Follow nearest wall, responding to obstacles as necessary
//Provenance: G. Frank Paynter and Danny Frank 12/20/2015
//Inputs: Distances from left/right/front sensors
//Outputs: updated left/right motor speeds in wall-follow case, or appropriate avoidance maneuver
//Plan:
// Step 1: Update motor speeds & NAV mode based on current TRACK/NAV states and front distance
// Step 2: Print out telemetry info
//Notes:
// 03/30/14 Step1 code moved to top of loop() - compiler directives cause errors here
// 09/11/18 revised plan to reflect reality
// 04/11/20 revised to incorporate heading-based wall offset tracking
// Update motor speeds & NAV mode based on current TRACK/NAV states and front distance
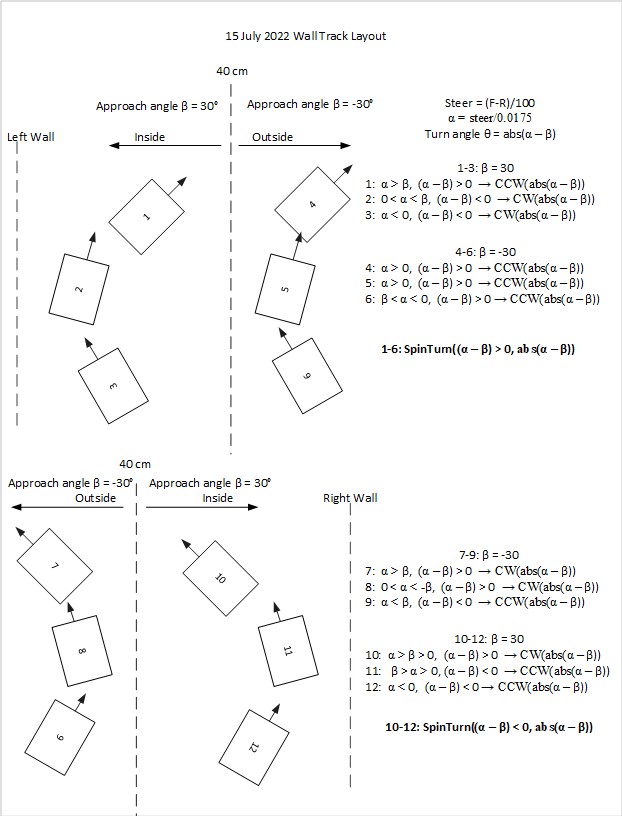
// See https://fpaynter.com/2016/01/making-wall-e2-smarter-using-karnaugh-maps/ for details
//11/13/20 rev to use a sliding obstacle detection range during tracking ops
//detection range is WALL_OFFSET_TGTDIST_CM/2 at max cut, increasing to WALL_OFFSET_TGTDIST_CM with zero cut angle
float adjustedFrontObstacleDetectionRangeCm = (WallTrackSetPoint <= 0) ?
WALL_OFFSET_TGTDIST_CM * ((WallTrackSetPoint / (2 * WALL_OFFSET_TRACK_SETPOINT_LIMIT)) + 1) : WALL_OFFSET_TGTDIST_CM;
TrackingCase = (WallTrackingCases)GetTrackingDir();
switch (TrackingCase)
{
case TRACKING_LEFT:
#pragma region TRACKLEFT
//mySerial.printf("At top of TRACKING_LEFT case block\n");
//07/22/2020 updated to use VL53L0X array vs 'ping' sensors
trackstr = "Left"; //used for telemetry printouts
//10/08/20 hack to prevent immediate obstacle detection
if (PrevOpMode != MODE_WALLFOLLOW) WallTrackSetPoint = -WALL_OFFSET_TRACK_SETPOINT_LIMIT;
if (bIsStuck)//bIsStuck updated in timer1 ISR
{
mySerial.printf("bIsStuck TRUE in TRACKLEFT at %lu with frontdist %d, variance = %6.2f\n",
millis(), frontdistval, frontvar);
InitFrontDistArray(); //added 08/12/20 to prevent multiple 'stuck' detections
ExecuteStuckRecoveryManeuver(TRACKING_LEFT); //10/24/20
PrevOpMode = MODE_NONE; //this will force wall offset recapture
WallTrackPID.SetMode(MANUAL); //11/21/20 this will force PID re-init
break; //don't execute the rest - just go back to GetOpMode()
}
//11/11/20 added separate section for 'Obstacle Ahead'
if (bObstacleAhead)//bObstacleAhead updated in timer1 ISR
{
mySerial.printf("bObstacleAhead TRUE in TRACKLEFT at %lu with frontdist %d, variance = %6.2f\n",
millis(), frontdistval, frontvar);
InitFrontDistArray(); //added 08/12/20 to prevent multiple 'stuck' detections
//11/13/20 added code to back up to WALL_OFFSET_TGTDIST_CM before beginning the spin turn
mySerial.printf("backing up to %d using front distance sensor\n", WALL_OFFSET_TGTDIST_CM);
MoveToDesiredFrontDistCm(WALL_OFFSET_TGTDIST_CM);
mySerial.printf("backed up successfully to %d using front distance sensor\n", frontdistval);
SpinTurn(false, 90);//turn 90 deg right
PrevOpMode = MODE_NONE; //this will force wall offset recapture
WallTrackPID.SetMode(MANUAL); //11/21/20 this will force PID re-init
break; //don't execute the rest - just go back to GetOpMode()
}
//11/08/20 added section for too close behind
//the idea is to move ahead to a position about WALL_OFFSET_TGTDIST_CM away from wall, and turn 45 deg
//one way or other so wall tracking can continue from that point
else if (bObstacleBehind)
{
mySerial.printf("Obstacle behind with reardist, frontdist = %d, %d cm\n", Lidar_Rear / 10, frontdistval);
ExecuteRearObstacleRecoveryManeuver(); //doesn't need tracking case info
PrevOpMode = MODE_NONE;
WallTrackPID.SetMode(MANUAL); //11/21/20 this will force PID re-init
break;
}
//11/13/20 rev to use a sliding obstacle detection range during tracking ops
//detection range is WALL_OFFSET_TGTDIST_CM/2 at max cut, increasing to WALL_OFFSET_TGTDIST_CM with zero cut angle
else if (frontdistval < adjustedFrontObstacleDetectionRangeCm)
{
//DEBUG!!
mySerial.printf("Hit adjusted wall offset limit (%2.2f cm) at %lu with frontdist = %d, Setpoint = %2.2f\n",
adjustedFrontObstacleDetectionRangeCm, millis(), frontdistval, WallTrackSetPoint);
//DEBUG!!
//06/06/21 rev to use code from 'if (bObstacleAhead)' block
////StepTurn(TRACKING_LEFT);
//PrevOpMode = MODE_NONE; //this will force wall offset recapture
//WallTrackPID.SetMode(MANUAL); //11/21/20 this will force PID re-init
InitFrontDistArray(); //added 08/12/20 to prevent multiple 'stuck' detections
//11/13/20 added code to back up to WALL_OFFSET_TGTDIST_CM before beginning the spin turn
mySerial.printf("backing up to %d using front distance sensor\n", WALL_OFFSET_TGTDIST_CM);
MoveToDesiredFrontDistCm(WALL_OFFSET_TGTDIST_CM);
mySerial.printf("backed up successfully to %d using front distance sensor\n", frontdistval);
SpinTurn(false, 90);//turn 90 deg right
PrevOpMode = MODE_NONE; //this will force wall offset recapture
WallTrackPID.SetMode(MANUAL); //11/21/20 this will force PID re-init
break; //don't execute the rest - just go back to GetOpMode()
}
//if we get to here, not stuck and no nearby obstacle issues
else if (PrevOpMode != MODE_WALLFOLLOW)//02/26/20 first time through capture offset
{
PrevOpMode = MODE_WALLFOLLOW; //added 04/27/21
//04/18/21 experiment with IRHomingNavigateToIAP() here
RotateToParallelOrientation(TRACKING_LEFT);
if (bIRBeamAvail)
{
IRHomingNavigateToIAP(TRACKING_LEFT);
if (batVoltage > LOW_BATT_THRESH_VOLTS) //not hungry
{
Serial.println("Not Hungry - Avoiding Charger");
curMinObstacleDistance = CHG_STN_AVOIDANCE_DIST_CM; //hopefully this will cause avoidance
IRHomeToChgStn(CHG_STN_AVOIDANCE_DIST_CM, MOTOR_SPEED_HALF, MOTOR_SPEED_HALF);
}
else //hungry - try to connect
{
Serial.println("Low battery - homing to Charger");
IRHomeToChgStn(0, MOTOR_SPEED_HALF, MOTOR_SPEED_HALF);
StopBothMotors();
digitalWrite(RED_LASER_DIODE_PIN, LOW); //turn off the laser
mySerial.printf("Reset VL53L0X Teensy to reduce current consumption\n");
digitalWrite(VL53L0X_TEENSY_RESET_PIN, LOW); //hold Teensy reset to reduce current consumption
MonitorChargeUntilDone();
mySerial.printf("Restart VL53L0X Teensy...\n");
digitalWrite(VL53L0X_TEENSY_RESET_PIN, HIGH); //restart Teensy
WaitForVL53L0XTeensy(); //wait for it to come back up.
ExecDisconManeuver();
PrevOpMode = MODE_NONE; //this will force wall offset recapture
mySerial.printf("%lu: just after ExecDisconManeuver() in TRACKING_LEFT case block\n", millis());
break;
}
}
}
//if we get here, we are continuing tracking operation
PrevOpMode = MODE_WALLFOLLOW; //added 04/27/21
WallTrackSteerVal = LeftSteeringVal; //computed by Teensy 3.5
//at 30mm from tgt offset, setpoint will be +/-0.3
WallTrackSetPoint = (double)(10 * WALL_OFFSET_TGTDIST_CM - Lidar_LeftCenter) / 100.f; //10/04/20 positive value drives robot toward wall
//limit approach angle to reasonable values
if (WallTrackSetPoint > WALL_OFFSET_TRACK_SETPOINT_LIMIT) WallTrackSetPoint = WALL_OFFSET_TRACK_SETPOINT_LIMIT;
if (WallTrackSetPoint < -WALL_OFFSET_TRACK_SETPOINT_LIMIT) WallTrackSetPoint = -WALL_OFFSET_TRACK_SETPOINT_LIMIT;
//update motor speeds, skipping bad values
if (!isnan(WallTrackSteerVal))
{
//10/12/20 now this executes every time, with interval controlled by timer ISR
WallTrackPID.Compute();
leftspeednum = MOTOR_SPEED_QTR - WallTrackOutput;
rightspeednum = MOTOR_SPEED_QTR + WallTrackOutput;
rightspeednum = (rightspeednum <= MOTOR_SPEED_FULL) ? rightspeednum : MOTOR_SPEED_FULL;
rightspeednum = (rightspeednum > 0) ? rightspeednum : 0;
leftspeednum = (leftspeednum <= MOTOR_SPEED_FULL) ? leftspeednum : MOTOR_SPEED_FULL;
leftspeednum = (leftspeednum > 0) ? leftspeednum : 0;
MoveAhead(leftspeednum, rightspeednum);
mySerial.printf("%lu\t%d\t%d\t%d\t%d\t%8.2f\t%d\t%2.2f\t%2.2f\t%2.2f\t%2.2f\t%d\t%d\t%lu\t%2.3f\n", millis(),
Lidar_LeftFront, Lidar_LeftCenter, Lidar_LeftRear, frontdistval, frontvar, Lidar_Rear, WallTrackSteerVal, WallTrackOutput,
WallTrackSetPoint, adjustedFrontObstacleDetectionRangeCm, leftspeednum, rightspeednum, IRHomingValTotalAvg, IRHomingLRSteeringVal);
}
#pragma endregion Tracking Left Wall Case
//mySerial.printf("At bottom of TRACKING_LEFT case block\n");
break;
case TRACKING_RIGHT:
#pragma region TRACKRIGHT
mySerial.printf("At top of TRACKING_RIGHT case block\n");
//07/22/2020 updated to use VL53L0X array vs 'ping' sensors
trackstr = "Right"; //used for telemetry printouts
//10/08/20 hack to prevent immediate obstacle detection
if (PrevOpMode != MODE_WALLFOLLOW) WallTrackSetPoint = -WALL_OFFSET_TRACK_SETPOINT_LIMIT;
if (bIsStuck)//bIsStuck updated in timer1 ISR
{
mySerial.printf("bIsStuck TRUE in TRACKRIGHT at %lu with frontdist %d, variance = %6.2f\n",
millis(), frontdistval, frontvar);
InitFrontDistArray(); //added 08/12/20 to prevent multiple 'stuck' detections
ExecuteStuckRecoveryManeuver(TRACKING_RIGHT); //10/24/20
PrevOpMode = MODE_NONE; //this will force wall offset recapture
WallTrackPID.SetMode(MANUAL); //11/21/20 this will force PID re-init
break; //don't execute the rest - just go back to GetOpMode()
}
//11/11/20 added separate section for 'Obstacle Ahead'
if (bObstacleAhead)//bObstacleAhead updated in timer1 ISR
{
mySerial.printf("bObstacleAhead TRUE in TRACKRIGHT at %lu with frontdist %d, variance = %6.2f\n",
millis(), frontdistval, frontvar);
InitFrontDistArray(); //added 08/12/20 to prevent multiple 'stuck' detections
//11/13/20 added code to back up to WALL_OFFSET_TGTDIST_CM before beginning the spin turn
mySerial.printf("backing up to %d using front distance sensor\n", WALL_OFFSET_TGTDIST_CM);
MoveToDesiredFrontDistCm(WALL_OFFSET_TGTDIST_CM);
mySerial.printf("backed up successfully to %d using front distance sensor\n", frontdistval);
SpinTurn(true, 90);//turn 90 deg left
PrevOpMode = MODE_NONE; //this will force wall offset recapture
WallTrackPID.SetMode(MANUAL); //11/21/20 this will force PID re-init
break; //don't execute the rest - just go back to GetOpMode()
}
//11/08/20 added section for too close behind
//the idea is to move ahead to a position about WALL_OFFSET_TGTDIST_CM away from wall, and turn 45 deg
//one way or other so wall tracking can continue from that point
else if (bObstacleBehind)
{
mySerial.printf("Obstacle behind with reardist, frontdist = %d, %d cm\n", Lidar_Rear / 10, frontdistval);
ExecuteRearObstacleRecoveryManeuver(); //doesn't need tracking case info
PrevOpMode = MODE_NONE;
WallTrackPID.SetMode(MANUAL); //11/21/20 this will force PID re-init
break;
}
//11/13/20 rev to use a sliding obstacle detection range during tracking ops
//detection range is WALL_OFFSET_TGTDIST_CM/2 at max cut, increasing to WALL_OFFSET_TGTDIST_CM with zero cut angle
else if (frontdistval < adjustedFrontObstacleDetectionRangeCm)
{
//DEBUG!!
mySerial.printf("Hit adjusted wall offset limit (%2.2f cm) at %lu with frontdist = %d, Setpoint = %2.2f\n",
adjustedFrontObstacleDetectionRangeCm, millis(), frontdistval, WallTrackSetPoint);
//DEBUG!!
//06/06/21 rev to use code from 'if (bObstacleAhead)' block
//StepTurn(TRACKING_RIGHT);
//PrevOpMode = MODE_NONE; //this will force wall offset recapture
//WallTrackPID.SetMode(MANUAL); //11/21/20 this will force PID re-init
InitFrontDistArray(); //added 08/12/20 to prevent multiple 'stuck' detections
//11/13/20 added code to back up to WALL_OFFSET_TGTDIST_CM before beginning the spin turn
mySerial.printf("backing up to %d using front distance sensor\n", WALL_OFFSET_TGTDIST_CM);
MoveToDesiredFrontDistCm(WALL_OFFSET_TGTDIST_CM);
mySerial.printf("backed up successfully to %d using front distance sensor\n", frontdistval);
SpinTurn(true, 90);//turn 90 deg left
PrevOpMode = MODE_NONE; //this will force wall offset recapture
WallTrackPID.SetMode(MANUAL); //11/21/20 this will force PID re-init
break; //don't execute the rest - just go back to GetOpMode()
}
//if we get to here, not stuck and no nearby obstacle issues
else if (PrevOpMode != MODE_WALLFOLLOW)//02/26/20 first time through capture offset
{
//04/18/21 experiment with IRHomingNavigateToIAP() here
RotateToParallelOrientation(TRACKING_RIGHT);
if (bIRBeamAvail)
{
IRHomingNavigateToIAP(TRACKING_RIGHT);
if (batVoltage > LOW_BATT_THRESH_VOLTS) //not hungry
{
Serial.println("Not Hungry - Avoiding Charger");
curMinObstacleDistance = CHG_STN_AVOIDANCE_DIST_CM; //hopefully this will cause avoidance
IRHomeToChgStn(CHG_STN_AVOIDANCE_DIST_CM, MOTOR_SPEED_HALF, MOTOR_SPEED_HALF);
}
else //hungry - try to connect
{
Serial.println("Low battery - homing to Charger");
IRHomeToChgStn(0, MOTOR_SPEED_HALF, MOTOR_SPEED_HALF);
StopBothMotors();
digitalWrite(RED_LASER_DIODE_PIN, LOW); //turn off the laser
mySerial.printf("Reset VL53L0X Teensy to reduce current consumption\n");
digitalWrite(VL53L0X_TEENSY_RESET_PIN, LOW); //hold Teensy reset to reduce current consumption
MonitorChargeUntilDone();
mySerial.printf("Restart VL53L0X Teensy...\n");
digitalWrite(VL53L0X_TEENSY_RESET_PIN, HIGH); //restart Teensy
WaitForVL53L0XTeensy(); //wait for it to come back up.
ExecDisconManeuver();
PrevOpMode = MODE_NONE; //04/27/21: this will force wall offset recapture
mySerial.printf("%lu: just after ExecDisconManeuver() in TRACKING_RIGHT case block\n", millis());
break;
}
}
}
mySerial.printf("After else if (PrevOpMode != MODE_WALLFOLLOW) block\n");
//mySerial.printf("%lu: just after else if (PrevOpMode != MODE_WALLFOLLOW)\n");
//if we get here, we are continuing tracking operation
PrevOpMode = MODE_WALLFOLLOW; //added 04/27/21
WallTrackSteerVal = RightSteeringVal; //computed by Teensy 3.5
//at 30mm from tgt offset, setpoint will be +/-0.3
WallTrackSetPoint = (double)(10 * WALL_OFFSET_TGTDIST_CM - Lidar_RightCenter) / 100.f; //10/04/20 positive value drives robot toward wall
//limit approach angle to reasonable values
if (WallTrackSetPoint > WALL_OFFSET_TRACK_SETPOINT_LIMIT) WallTrackSetPoint = WALL_OFFSET_TRACK_SETPOINT_LIMIT;
if (WallTrackSetPoint < -WALL_OFFSET_TRACK_SETPOINT_LIMIT) WallTrackSetPoint = -WALL_OFFSET_TRACK_SETPOINT_LIMIT;
//update motor speeds, skipping bad values
if (!isnan(WallTrackSteerVal))
{
//10/12/20 now this executes every time, with interval controlled by timer ISR
WallTrackPID.Compute();
leftspeednum = MOTOR_SPEED_QTR + WallTrackOutput;
rightspeednum = MOTOR_SPEED_QTR - WallTrackOutput;
rightspeednum = (rightspeednum <= MOTOR_SPEED_FULL) ? rightspeednum : MOTOR_SPEED_FULL;
rightspeednum = (rightspeednum > 0) ? rightspeednum : 0;
leftspeednum = (leftspeednum <= MOTOR_SPEED_FULL) ? leftspeednum : MOTOR_SPEED_FULL;
leftspeednum = (leftspeednum > 0) ? leftspeednum : 0;
MoveAhead(leftspeednum, rightspeednum);
mySerial.printf("%lu\t%d\t%d\t%d\t%d\t%6.2f\t%2.2f\t%2.2f\t%2.2f\t%2.2f\t%d\t%d\t%lu\t%2.3f\n", millis(),
Lidar_RightFront, Lidar_RightCenter, Lidar_RightRear,
frontdistval, frontvar, WallTrackSteerVal, WallTrackOutput,
WallTrackSetPoint, adjustedFrontObstacleDetectionRangeCm, leftspeednum, rightspeednum, IRHomingValTotalAvg, IRHomingLRSteeringVal);
}
#pragma endregion Tracking Right Wall Case
//mySerial.printf("End of Tracking Right Wall Case\n");
break;
case TRACKING_NEITHER:
#pragma region TRACKNEITHER
trackstr = "Neither"; //used for telemetry printouts
mySerial.printf("time(ms) in TRACKNEITHER = %lu\n", millis());
//added 01/20/16: turn direction arbitrary
if (bObstacleAhead || bIsStuck) //08/10/20 now bObstacleAhead & bIsStuck updated in timer1 ISR
{
if (bIsStuck)
{
InitFrontDistArray(); //added 08/12/20 to prevent multiple 'stuck' detections
}
//DEBUG!!
Serial.println(F("---- Backup & Turn to the Left"));
//DEBUG!!
BackupAndTurn90Deg(true, true, MOTOR_SPEED_HALF);
//go back to normal tracking mode after B&T completes
NavCase = NAV_WALLTRK;
}
//Open Corner case
else if (frontdistval > STEPTURN_DIST_CM)
{
//OK, this is the Open Corner case - turn toward the last-tracked wall
#ifndef NO_MOTORS
delay(1000); //01/20/16 - delay to give Wall-E2 time to clear the corner a bit
#endif
if (PrevTrackingCase == TRACKING_LEFT)
{
//RotateCWDeg(false, NUM_DEG_FOR_90_DEG_TURN, MOTOR_SPEED_HALF);
}
else if (PrevTrackingCase == TRACKING_RIGHT)
{
//RotateCWDeg(true, NUM_DEG_FOR_90_DEG_TURN, MOTOR_SPEED_HALF);
}
else //oops! not tracking either wall - out in middle of room somewhere?
{
//not open corner, but not tracking a wall, either - go straight
leftspeednum = rightspeednum = MOTOR_SPEED_HALF;
MoveAhead(leftspeednum, rightspeednum);
}
}
#pragma endregion Not Tracking Either Wall
break;
default:
break;
//mySerial.printf("Bottom of opMode switch\n");
} //switch (TrackingCase)
#pragma endregion MODE_WALLFOLLOW
//mySerial.printf("%lu: at end of MODE_WALLFOLLOW\n", millis());
//07/16/21 added to manage offset capture operation
#pragma region MODE_WALLCAPTURE
case MODE_WALLCAPTURE:
break;
#pragma endregion MODE_WALLCAPTURE
}
digitalWrite(RED_LASER_DIODE_PIN, LOW);
//mySerial.printf("%lu: Bottom of loop()\n", millis());
}//if (bTimeForNavUpdate)
}//loop()